Using the Blend Tool
To create a blend:
For object-to-object blends the blend line is colored black. When blending between control handles, it is colored red. |
|


The Blend Tool InfoBar
|
|
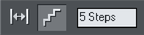
Edit distance between steps |
|
|
Edit number of steps |
|
|
Steps in blend |
|
|
Remove blend |
|
|
Blend color effect |
|
|
Position profile |
|
|
Attribute profile |
|
|
1:1 node mapping |
|
|
Anti-alias blend steps |
|
|
Blend along a curve |
|
|
Rotate blend steps along the curve |


Steps is the number of intermediate stages in the blend. At lower settings the individual steps are apparent. This is useful for object transforms. At higher settings the steps merge together. This is more suitable for highlight effects. Experience shows that you rarely need more than 50 steps even in a complex blend.
The two objects can have different numbers of control handles and can be different types (for example, shapes to lines).
When you create a blend, it has to have a "start" handle on one object that maps onto an equivalent "start" handle on the other object.
|
|
If you create a blend by dragging from the filled interior of one shape to the other, then Xara will automatically choose the bottom-left control handles to match. However, you can force a blend to use any control handle as the starting handle by dragging exactly from one control handle to another.
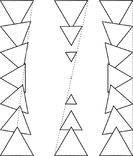
Blending between different control handles gives different blend patterns. |
||
|
|
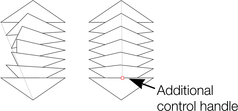
A second way to adjust the blend is to add control handles to one object. The left-hand example is a blend between two triangles. The right-hand example has an extra control handle in the lower triangle. The blend was then made to that control handle. |
||
A third way is using the 1 to 1 node mapping button.
|
|
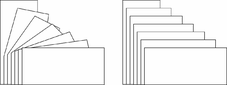
This only has an effect if the two objects have the same number of control handles. Usually Xara adds or removes handles as necessary to transform one shape into another. |

When blending with shapes that have the same number of handles (such as copies or duplicates) this can sometimes produce strange results. In this situation, the 1:1 button prevents extra handles being added. You can still control the start handles by dragging exactly between control handles as previously described.
|
|
The left-hand example is a normal blend between the rectangles. The right-hand example uses 1:1 |
Selecting the start or end object
After creating the blend you may want to change some attribute of either the start or end object such as its color or line width or position.
To change an object's attributes:
- Select the Selector Tool.
- "Ctrl + click" on the start or end object to "select inside"
- Make the required changes.
The Selector Tool is described in Selecting objects.
To change the color, drag-and-drop the color from the Color Line onto the object. You can't select intermediate steps of a blend, unless you Convert to Editable Shapes – see later.
Multi-stage blends
You are not limited to blending between only two objects. Xara can blend between several objects.
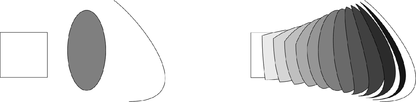
The original three objects, left, and the resultant blends right
(It also shows blending between different types of object.)
The produce a multi-stage blend just blend from the fist to the second, and then again from the second to the third, etc.
Producing highlight effects
By increasing the number of blend steps you can create some complex highlight shading effects. One of the most powerful features of Xara Designer is that it allows blends from just about any shape to any other shape, with dissimilar numbers of handles.
However, blends between objects with sharp corners can produce unwanted twists in the blend.
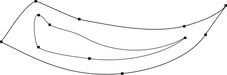

The two shapes have different numbers of handles, and a blend from one to the other produces the result on the right. It has a twist in the top right corner.
You can control exactly which point handles map, when creating the blend, by dragging from the point handle of one shape to a corresponding handle on the other shape. You will need to have both shapes selected in order to see the control points.
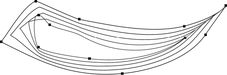
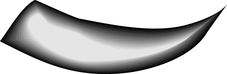
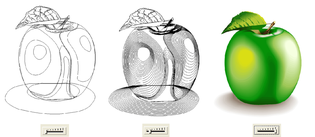
The left example has the top right handles mapped so now there is no twist in the right side. In order to get the exact desired effect it's sometimes necessary to experiment by mapping between alternative points or adding or removing point handles to one of the shapes. The Apple drawing on the front of this chapter is an example of complex highlights created entirely from blends.
The number of steps
|
|
To change the number of steps in your blend, just enter a value in the Steps box. |
It is also possible to change the distance between steps, but this option is only available when creating a blend along a curve (see below).
The Anti-Alias button on the InfoBar
When producing highlight effects, anti-aliasing the intermediate steps has no visible benefit. However, it slows down screen redraws by up to 30% on slow computers.
|
|
Therefore, deselecting the Anti-Alias button means that Xara never anti-aliases the intermediate steps of this blend. |

Profiles
|
|
Position profile lets you select how to space the intermediate steps in a blend. You can have regular spacing or closer at one end than the other or closer in the center. |
|
|
Attribute profile lets you select how attributes (such as transparency, colors or line thickness) change in a blend. You can have a regular rate of change, greater change at one end, or greater change in the center. |


Changing profiles
To change a profile:
- On the Blend Tool InfoBar click either Position profile or Attribute profile. This opens the required profile dialog box.
- You either select a predefined profile from the dropdown list or drag the sliders to create a custom profile. The top option in the dropdown list (the straight line) creates regular spacing.
Blending along a curve
|
To make your blend follow a curved line or shape: |
|
|
|
|
|


You will most likely want to hide the line or shape, and just leave the items going along an invisible curve. To do this:
|
|

Rotating along a curve
|
If you have blended along a curve, you can make the objects rotate to match the curve. |
|
|
|
|
To do this, select the Rotate along curve button on the Blend Tool InfoBar. |
|


Blends and PDF or PostScript files
When printing or exporting to a PDF file, using a large number of blend steps can result in large files (megabytes in some cases) which can be very slow to print or view. If necessary reduce the number of blend steps.
Editing the shapes in a blend
The intermediate steps of a blend are calculated on-the-fly and are not selectable or editable. Use the menu, Arrange -> Convert to Editable shapes to convert the individual blend steps to separate objects. (The result is grouped so you would need to ungroup before editing the individual steps.) Doing this is less efficient because to change the blend you will have to re-blend from the start object to the end object.
Color Blend Effect
The Color Blend Effect menu on the Blend Tool InfoBar gives you a control over intermediate colors:
- Fade: Fades between the two colors.
- Rainbow: Blends along the shortest edge of the HSV color wheel. For example, a blend from yellow to cyan runs yellow-green-cyan. (This option has no effect when the two colors are black, white or gray.)
- Alt rainbow: Similar to rainbow except the blend is along the longest edge of the color wheel. For example, yellow to cyan runs yellow-red-magenta-blue-cyan.
The HSV color wheel is described in Color handling. This menu is identical to the fill effect menu in the Fill Tool.
Viewing blends as outlines
Window -> Quality controls how blends are displayed:
- At Outline only the start and end objects appear. The intermediate objects are not drawn.
- At Outline with blend steps start, end and intermediate objects are drawn as outline.
- At Full color the outlines and fill colors of the intermediate objects are drawn.
- At High & Very High Quality all the information is shown anti-aliased if the Anti-Alias button (described above) is active. If not, the intermediate steps are not anti-aliased.
With the view quality slider in the second position you can see all the intermediate steps of a blend as outlines.
Copyright © Xara