Creating a Tint, Shade or Linked color
Tints, shades and Linked color have to have a master "parent" color, which needs to be a named color, so that when you change this parent color, the tint will change as well. So, if necessary, first create a named color (see Creating new named colors).
To create a tint, shade or linked color:
- Select the object or objects to which you want to apply the color.
- Open the Color Editor showing the advanced options.
- Select the "normal color" drop-down menu and select the Tint, Shade, or Linked option.
- From the Parent dropdown menu, select the named color that you want this color to be linked to.
- Adjust the Tint, Shade or Linked color on the top section of the color editor.
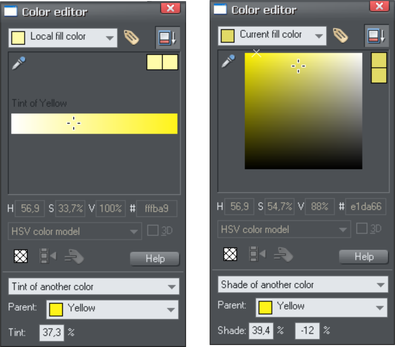
On the left you can see the new color is a tint of the parent "yellow" and so the editor provides only paler tints of the parent color. On the right, if you select a shade, you get to choose any lighter or darker shades of the parent color.
If you want to use this color in many places in the document it's recommended that you also make this a Named Color, so it appears on the Color Line, for easy picking. Just click on the New Named Color label icon on the top of the Color Editor and give it a name. It will now appear on the Color Line where you can pick it for use on other objects.
Editing the parent color
The key point of using tints, shades and linked colors is that they track any changes to the parent color. To see this working try editing the Named color that is the parent (drag it from the Color Line to the Color Editor and alter the color). You will see the objects with the tint, shade or linked color change in sync with the parent.
Note: Be careful not to edit the color of objects on the page to which you've applied Named, Tints, Shades, or Linked colors as this will change them to Local colors.
Copyright © Xara