Contouring objects
To contour an object:
- Select the object.
- Choose the Contour Tool.
- Then:
|
|
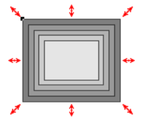
Contours can be either inside or outside of objects (outside contours make the objects larger).
To swap the contour direction:
- Select the contoured object.
- Choose the Contour Tool.
- Then:
|
|

Note that objects cannot have both a contour and a bevel.
Changing the number of steps in a contour
Contours are initially created with five intermediate steps. You can increase the number of steps to make each step less obvious. Alternatively, you can reduce the number of steps so you can clearly see each step. You can either enter the number of intermediate steps or enter the distance between steps.
To change the number of steps in a contour:
- Select the contoured object.
- Choose the Contour Tool.
- Select either distance or number of steps by pressing one of the two buttons on the left side of the InfoBar.
- Type the required value into the steps (or distance, depending on the above selection) field on the Contour Tool InfoBar and press return.
If required, Xara rounds the distance to give a whole number of steps.
Changing the contour color
After applying a contour to an object, you can change the contour's color.
For more on colors and the Color Line refer to Color handling.
How to change the contour color:
The easiest way is to drag-and-drop a color from the Color Line onto the contour (make sure you drop the color onto the contour and not the object).
Alternatively this method is slightly more complex but you have full control over the color:
- Select the contour using the Selector Tool (make sure you select the contour and not the object).
- Use the Color editor to edit the color.
Note that you can also select the contour using the Contour Tool. Click on the contour to select it.
Changing the contour join style
|
|
After applying a contour to an object, you can change the shape of the corners (joins). |

How to change the contour join style:
- Select the object.
- Click the appropriate join button on the Contour Tool InfoBar.

|
|
Miter |
|
Round |
|
Bevel |


Changing the contour attribute profile
After creating a contour you can change how the attributes (such as color or line thickness) change. You might want a regular rate of change or a more pronounced change towards one end or the center.
To change the attribute profile:
- Create the contour.
- In the Contour Tool click Attribute profile. This opens the Profile dialog box.
- You can either select a pre-defined profile from the dropdown list or drag the sliders to create a custom profile. The top option in the dropdown list (the straight line) is the default and creates a regular rate of change.
Changing the contour position profile
After creating a contour you can change how the intermediate steps are spaced. You can have regular spacing or closer at one end than the other or closer in the center.
To change the position profile:
- Create the contour.
- In the Contour Tool click Position Profile. This opens the Profile dialog box.
- You either select a pre-defined profile from the dropdown list or drag the sliders to create a custom profile. The top option in the dropdown list (the straight line) is the default and creates regular spacing.
Applying a contour to several objects
|
|
If the objects are grouped, overlapping contours merge together. The contour color is the same as the rear-most object in the group. |
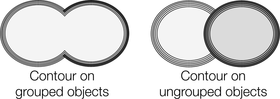
If the objects are ungrouped, each object has a separate contour. The contour color is the same as the object color.
The contour steps are not separate objects. To make them selectable, you need to convert the contour to editable shapes (see below).
Using contours to resize objects
You can use contours to change the size of objects by making the outline thicker or thinner. This has advantages over resizing for shapes like the letter "C":
|
|
On the left is the original object. The center letter is resized using a contour, the right letter is resized by scaling the object up. |

To resize using contours:
- Select the object.
- Choose the Contour Tool.
- Give the object a contour of the required size.
- Click Inset path on the Contour Tool InfoBar. The contour steps disappear and the object is now the size of the contoured object.
Copyright © Xara