General tab
This page describes the General tab of the Utilities, Options dialog.
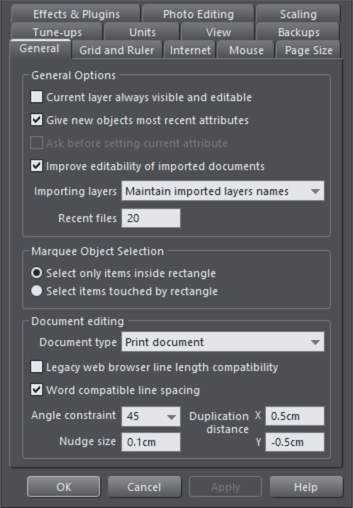
Current layer always visible and editable
With this option selected, selecting a layer in the Page & Layer Gallery automatically makes it visible and editable.
With this option unset, the visible and editable states of a layer remain unchanged when you select that layer.
Give new objects most recent attributes (GNOMRA)
Examples of attributes are line width, dash pattern, arrowheads, color, fill color and type of fill.
With this option set, new objects take the attributes of the object that was last drawn or selected. For example, you might give an existing shape a red fill and green line color. If you then draw a new shape it will also have a red fill and green line color. See Current attributes for a full description of current attributes and this option.
This option is on by default.
Ask before setting current attribute
This applies when changing a current attribute (this happens when you change an attribute with no objects selected). With this option set, you are asked to confirm whether you want to change the attribute. With this option unset, the change is made without confirmation.
Improve editability of imported documents
This option affects what happens when you open a pdf, docx or pptx file that was created in another application. When the option is on, Designer will analyse the document to try to identify and apply text styles and named colors where it can, without changing the appearance of the document. This can make the document easier to edit in Designer. For example any components you insert will use the styles and colors that were identified and so they should better match the existing styles and colors in the document. Also of course using text styles and named colors makes it easier to change text and colors across the whole document. However, results can vary, so simply turn this option off if you don't want styles and colors added to your documents.
Maintain imported layer names
With this option set, layer information is preserved when you import templates or other files. With Import layers into the active layer instead selected, all imported objects appear in the current layer and the layering information in the incoming data is ignored. Import layers into new layers will create a layer for each imported layer.
IMPORTANT: Web Deigner and Designer Pro owners, note that you should not change this setting if you use any of the web templates in the Elements. Most web templates have multiple layers which are used to implement mouseover effects. These typically have layers MouseOff and MouseOver and so when importing these designs it's important that these layers are preserved and merged with the same layers in your document.
Recent files
The File menu shows a list of the most recently loaded or saved files in its 'Open recent' sub-menu. This list gives a quick way to reload any of those files. This option lets you change the number of files listed (between 1 and 20 files).
Marquee Object Selection
This option enables you to change the default setting for marquee selection (where you drag a selection rectangle over the objects you want to select). So you can choose to have objects touching the selection rectangle selected or only the objects wholly inside the rectangle.
Legacy web browser compatible line lengths
Older web browsers were not able to render text very accurately. When you asked for a certain font size they rounded it up or down, often displaying the wrong size and width (compared to the original font design, and how Xara, Word, PDF and all modern DTP programs would display it).
Older versions of Designer Pro / Web Designer attempted to compensate for these inaccuracies, by providing a Legacy web browser line length compatibility option which meant the text was slightly differently formatted - line lengths would be different compared to normal print documents, or the same text in Word, or PDF documents.
Most modern web browsers are getting better at rendering text accurately - you can now specify any px or pt font size, even fractional sizes, and the text will for the most part, be rendered accurately*. The text formatting should be the same as in print documents, PDF, and page layout documents. This includes auto-kerning, manual kerning and tracking (letter spacing).
If you load an older Xara web document, a dialog will appear prompting you to update the text formatting. This in effect prepares your web document so that it will display accurately on most modern web browsers.
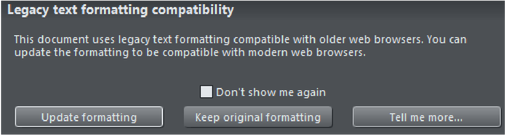
A consequence of updating the formatting to support the more modern browsers is that text may re-flow because of slightly different line lengths, causing text columns to be slightly longer or shorter than before. Once you update formatting the document will remain like this and you will not be asked again.
To turn formatting back to the old style use the General tab of "Utilities" > "Options" dialog and make sure that the Legacy web browser line length compatibility option is checked. Or if you are loading an older document into Xara just choose the Keep original formatting option.
*As of writing the Apple Safari and Chrome browsers when used on mobile devices such as phones and tablets still round font sizes to the nearest whole pixel size.
Document type
This determines the type of document, as indicated by the icon in the document's tab.
- Print – Used for documents that are intended for print work. See Printing for more details.
- Website – Use this type of document for creating websites and web graphics. See the Web Graphics and Websites chapter for more details.
- Photo – If you open a JPEG photo in Xara, the document type is Photo. Such a document doesn't have a defined page area for example. See the Photo Handling chapter for details
- Animation – Used for animation documents. See the Animations chapter for details.
- Presentation (Web) – These are specialized website documents that make a presentation. See the Web Presentations chapter for more information.
Normally you don't need to change the document type as the type is established when you first create it (for example using a template from Elements, or choosing a blank document from the "File" > "New menu"). But it's sometimes useful to convert between print, website and presentation documents if the purpose for which your document was created changes. You can't convert to or from Photo or Animation documents.
Word compatible line spacing
This option is on by default in all blank print documents, and it's best to leave it checked if you are planning on exporting a print document in Word (docx) format. The option makes Xara Designer render text line spacing in a way that more closely matches an exported Word document.
Angle constraint
This applies when rotating or moving an object with "Ctrl" pressed.
You can either select from the menu or type in a value in degrees.
Nudge size
This applies when moving objects using the arrow keys on the keyboard.
This text box defines how far the object moves for each key press. If the document uses scaled units (for example, 1inch to 1mile), this text box shows the distance in the scaled units.
When nudging, "Ctrl" and "Shift" increase the nudge distance by five and ten times, respectively.
Duplication distance
"Edit" > "Duplicate" (Ctrl + D) creates a duplicate which is offset from the original object. These text boxes set the offset distance.
Positive values create the duplicate above or to the right of the original object.
Negative values create the duplicate below or to the left.
Copyright © Xara