Integrated key shortcut utility
This utility provides an easy and direct way to configure key shortcuts. It allows you to define a shortcut for a command which doesn't have a shortcut by default, or to change a command's shortcut.
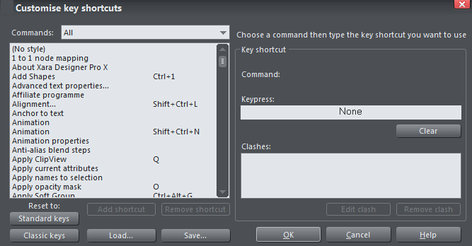
To open the Shortcut Tool, select Customize Key shortcuts... from the Utilities menu.
Command categories
There are many different commands which can be assigned to shortcuts and so they are split into several categories to help finding a command easier. The command categories are presented in a dropdown list and the "Commands" list below it lists all the commands in that category. Many categories correspond with the name of a menu (e.g. File, Edit, Arrange), so finding a command that is on one of the menus is easy. Choose "All" to display all available commands in the Commands list.
Commands
The Commands list shows all the commands for the selected category. Where a command already has a key shortcut, that shortcut is shown in the column to the right of the command name. Those commands that don't have any shortcut assigned show nothing in the shortcut column.
If a command has more than one shortcut assigned, then that command will appear more than once in the list of commands, once for each of its shortcuts.
To assign an additional shortcut to a command which already has a shortcut, select the command in the list and press the Add shortcut button.
Press the Remove shortcut button below the Commands list to remove the selected shortcut assignment from the list.
Key press
Once you've selected a command in the Commands list, assigning a shortcut key to it is easy. Simply press the key combination that you wish to use for the selected command. The keypress you choose will then appear in the Keypress field on the Shortcuts Tool dialog. Note that if the selected command already had a shortcut shown in the Commands list, that shor-cut is replaced by your new keypress.
If you want to add an additional shortcut, first use the Add shortcut button under the Commands list as described in the Commands section above.
Pressing the Clear button below the Keypress field removes the shortcut for the selected command and clears the Keypress field.
After entering a new keypress, check the Clashes list which is shown below the Keypress field.
Clashes
A keypress can be used as a shortcut for one command only. If the keypress you chose for a command shortcut is already assigned to another command, the Clashes list will show you this and will allow you to quickly resolve the clash.
If there is more than one command currently associated with the keypress shown in the Keypress field, the Clashes list shows you all the commands that are currently assigned to it. You need to remove all but one of the shortcut assignments for the keypress so that only one command is associated with it.
To do this simply select one of the clashing assignments shown in the Clashes list and then press the Remove clash button below it to remove the shortcut assignment.
Once only two assignments are shown in the Clashes list, deleting one of them will leave you with an empty Clashes list, because there is then only one assignment for the keypress and so there are no longer any clashes.
Alternatively you may wish to change the shortcut associated with one of the clashing commands. To do this, select the shortcut in the Clashes list and click the Edit clash button below it. This automatically locates the command and selects it in the Commands list on the left, ready for you to define a new keypress for it. Once it's selected, enter the keypress that you want to use for that command and once again resolve any clashes shown in the Clashes list.
Once the Clashes list is empty, your new keypress is defined as a shortcut. You can then either select other commands to which you want to assign shortcuts or commit your shortcuts changes by pressing OK. You don't need to keep track of all the clashes as you change shortcuts because when you click OK to commit your changes a check is done to make sure no clashes remain.
Standard keys / Classic keys
At any time you can press Standard Keys to set all the command shortcuts back to the default settings for Xara Designer Pro+.
Alternatively press Classic Keys to reset to a keyset that was used by early versions of Xara Designer Pro. Over time, as the product has evolved, various standard shortcuts that are commonly used by other applications have been adopted by Xara Designer Pro. Those who have become familiar with Xara's original shortcuts may prefer to use the 'classic' defaults instead.
Save
Use the Save button to save the current shortcut definitions as a ".ini" file, without necessarily applying them so they are used by Xara Designer Pro+ you to setup different sets of shortcut assignments and allows you to share the assignments between different computers or different users. For example, you could setup shortcut assignments that make Designer Pro compatible with the shortcuts of another application and save them in a .ini file so you can share them.
Load
Use the Load button to load the shortcuts defined in a .ini file. Once they are loaded, you can inspect or modify them in the Shortcuts Tool or apply them to Xara Designer Pro OK button.
Cancel
Press the Cancel button to discard all the shortcuts changes you have made since you opened the Shortcuts Tool.
OK
Use the OK button to commit the changes you have made since you opened the Shortcuts Tool. If there are any unresolved clashes, you will be told about them at this point. You are strongly advised to go back and fix any clashes because otherwise your chosen shortcuts may not work. Click the Back button on the warning alert to go back. When you do this the first keypress with clashes is automatically selected for you, so you can quickly resolve it.
If no clashes are reported when you click the OK button, your new shortcuts have been defined successfully.
Example
Here's an example of the process you would go through if you wanted to use "Ctrl + P" to bring up the Print Options dialog.
- Bring up the Shortcuts Tool dialog by choosing "Utilities -> Customize Key Shortcuts".
- The Print Options command is in the File menu, so choose the "File" category from the Commands category list.
- Select the Print Options command in the list of commands.
- Press "Ctrl + P". You'll see "Ctrl + P" appear in the Keypress field. Also the "Print Options..." command is now shown as having the "Ctrl + P" shortcut in the Commands list.
- You can also see that a clash has been identified. The Clashes list shows that Ctrl-P is now assigned to BOTH "Print..." and "Print Options...".
- Select "Print..." in the Clashes list and then click the button below it to remove this shortcut. This eliminates the clash.
- Now the Clashes list is empty, indicating that there are no clashes for "Ctrl + P".
- Click Ok to confirm your changes.
Now when you press "Ctrl + P" the Print Options dialog appears.
Temporary key shortcuts
Three of the most commonly used tools (Selector, Push and Zoom) have special shortcuts that allow quick temporary selection of the tool, and then return to the previously used tool after use.
What's more these shortcuts can be used two ways; either as a toggle (press the key once and it selects the tool, press it again and it returns to the previous) or as a temporary switch (hold key down and it switches to the tool, and release key to return to the previous tool).
The default key shortcuts for these tools are:
- "Alt + Z" for Zoom.
- Space or "Alt + X" for Push.
- "Alt + S" for Selector Tool.
These key combinations are deliberately chosen to be near the left hand to make very easy selection.
Note: If you have a mouse with a scroll wheel or center button, there is a better temporary shortcut to the Push Tool, namely to press and hold the wheel or button. Release it to return to the previous tool.
These three commands are listed at the top of the Tool group and described as Switch to Push tool (Hold Down to Switch and Return), etc. (you can see the full description of the command in the Status line).
Tip: Long term users of Xara Designer Pro will notice that the space bar no longer acts as a temporary Select Tool. This was changed to get a greater workflow compatibility with Adobe software and MAGIX Photo Designer 7 users will be used to using the space bar as a temporary Push Tool (although we believe the mouse button short cut is much better and is a more standard Windows shortcut— see note above).
Long-term users can quickly reconfigure the Spacebar to activate the Selector tool, and restore several other back-compatible key shortcuts, by clicking the "Classic keys" button. Note that this will reset all your current shortcuts and so we recommend that you save your current set first by using the "Save..." option.
Copyright © Xara