JPEG, PNG, GIF and BMP export dialog overview
|
|
The Export settings dialog has two preview windows, Image A on the left and Image B on the right, so you can compare alternative export settings or file types, side-by-side. Just click on the left or right preview window to change the active preview. Above the preview window is a small dropdown that lets you select from the most common four export type, JPEG, PNG, GIF and BMP. |
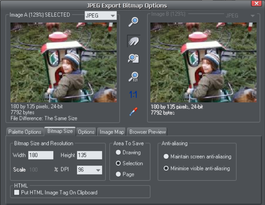
When you have selected preview A or B you can then adjust a wide range of export options using the five tabs below the preview. Some options, such as the Palette Options are only applicable to some file types such as PNG and not relevant to JPEG type.
Other options under the Options tab change depending on the file type. e.g. when exporting a JPEG this is where you can set the required quality.
So the process for exporting an image:
- Select the object or objects on the page you want to export
- Select the Export menu, or "Ctrl + Shift + E", enter a file name, and select file type from the drop down list. The main export type will display the above preview dialog.
- In this Preview dialog adjust the settings if you want, or skip this if you're happy with the default settings
- Click the Export button
For most commonly used JPEG and PNG formats, at step 2 you can instead use the direct operations available in the File menu: Export JPEG and Export PNG. The export dialog shown includes a "Settings" button which takes you to the export settings dialog shown above.
Most export settings are remembered for the next time you export. For example if you adjust the JPEG quality, the next time you export a JPEG it will remember the last quality setting.
Exported Image Size
When you export the normal default size is the same as you see on screen at 100% zoom. The pixel size is shown under the preview window. You can adjust the pixel dimensions either by adjusting the object size on the page before you export, or by entering alternative pixel or dpi values in the Bitmap size tab.
Preview Controls
These buttons alter the preview of the images, but do not affect the exported file:
|
|
|
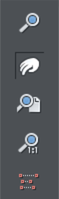
The following tool is only relevant to files using less than 256 colors (but you will see the result when you have the Palette Options tab selected):
|
|
Color Selector: Moving the pointer over the image highlights the color under the pointer. Click to select that color in the palette. You can then use Palette Options buttons (described below) to alter that color. |

Preview: The preview button is available on all tabs of this dialog. It updates the preview windows to reflect any changes you have made to the export options.
Palette Options tab
This tab allows you to alter the color settings of your exported image.
Dithering & Palette
The Dithering and Palette options only apply when you export with 256 color or less, and affect how the image is displayed and its color palette. It is recommended to always use an Optimized palette. Set Dither to none, which produces smaller files but may be banded, or Error Diffusion, which creates higher quality results, but larger files.
Color Depth
Choose the number of colors your bitmap requires. The more colors, the larger the file (usually), and the higher the quality. The True Color option supports up to 16 millions colors. True Color + Alpha includes semi-transparent features such as soft shadows and transparency. For applications that support alpha-channel PNG files this is the recommended format.
If you choose 256 colors of less, you have the option to use simple transparency (Wine glass icon-see below). This doesn't support semi-transparent pixels, only "on/off" fully opaque or fully transparency pixels, and so can produce jagged edges.
Max Colors
If you select a Color Depth of 256 or less you can control exactly how many colors are used in the file. This provides a high degree of control over quality vs. file size. Just enter the required number of colors and press the Preview button to preview.
Buttons
These buttons (except Transparent Background) apply when exporting 256 color images or less. These files are created with a limited palette of colors, and these controls provide a great degree of control over those palette colors. See Color Selector above on how to select a color, or click on a color in the Color Palette).
|
|
Lock a Color |

You can specify the number of colors you want in the palette of exported bitmaps. You may want to ensure that certain colors always appear in the palette; you can lock these colors. Click on a color to select it, then select the Lock button. A small square appears in the bottom left of the color to tell you it is a locked color.
|
|
Make a Palette Color Web Safe |

When clicked this button will shift the selected color to be one of the 216 common web browser palette colors. This is a legacy system that is no longer particularly important or relevant, as nearly all computers can display millions of colors, and there's no benefit in restricting web graphics to only this limited palette.
|
|
Make the Image Background Transparent |

Make any areas not covered by the selected objects transparent. Selecting this option automatically makes one entry in the palette transparent.
|
|
Make a Palette Color Transparent |

Make this color entry transparent. Note the difference between this option, which makes parts of the selected objects transparent, and Make The Image Background Transparent which makes those areas behind the selected objects transparent.
|
|
Delete a Palette Color |

Delete this color from the palette. Any areas in the bitmap that use the deleted color then use the nearest color in the palette. The fewer colors in the palette, the smaller the bitmap file.
|
|
Restore a Previously Deleted Color |

Undelete a deleted color.
|
|
Add system colors |

Adds 28 colors to the palette. These colors are the regular Windows system colors and a number of primary colors. This ensures the palette includes a spread of colors and may improve the quality of the image, particularly if it contains a wide range of colors. You may need to experiment with this option to get the best results.
Bitmap Size tab
With this tab, you can change the size of the exported image.
Bitmap Size and Resolution
You can change the size of the exported bitmap by changing:
- Size: Type the required width or height into one of the fields. Note that the aspect ratio of the bitmap is fixed, so changing one dimension automatically changes the other. Size is more suitable than Scale if you want to create a bitmap of a particular size in pixels.
- Scale: (Dimmed for JPEG & PNG). This lets you scale the bitmap up or down by a percentage. Scale is more suitable than Size if you want, for example, a bitmap 50% bigger than the original.
- Resolution: (Dimmed for GIF & BMP) Type the resolution into the DPI field. If you are exporting an image for viewing on screen (e.g. a website), you do not normally need a setting higher than 96dpi. (If you need to export for a Retina device you can automatically export a higher resolution 192dpi version as well).
Area to Save
The bitmap can be created using one of these areas of the document:
- Page: The whole page area.
- Drawing: The area covered by objects.
- Selection: The area covered by the objects in the selection. Only available when objects are selected.
Anti-aliasing
Anti-aliasing improves the appearance of graphics by smoothing jagged edges:
- Maintain Screen Anti-aliasing: The exported bitmap uses the exact same positioning as shown on screen, and so has identical anti-aliasing. This can result in the edges of objects being slightly blurred because they do not fall exactly on pixel boundaries.
- Minimize Visible Anti-aliasing: This will slightly reposition the objects by fractions of a pixel to minimize the anti-aliasing around the edge of the exported bitmap. If in doubt which option to use, select this.
Put HTML Image Tag on Clipboard
This lets you save out the basic HTML IMG tag information when you save the bitmap. You can then paste the tag into your text or external HTML page editor.
Also export Retina (192dpi) bitmap
With this option checked you can simultaneously export a 192 dpi high definition Retina image. This saves you exporting twice if you have a need to provide a 96dpi as well as a 192dpi resolution image for Retina devices. For JPEG and PNG the operation is only valid when you have the 96dpi option selected.
See High resolution images for more info on Retina images.
Options tab
With this tab you can alter JPEG compression and turn on progressive/interlacing for the GIF and PNG options if required.
JPEG Quality: (JPEG only) A low setting will result in a small file with a loss in quality whereas a high value will give only slight file size reductions, but high quality. Note that a setting of 100% will still compress the file. A setting of 85% gives good compression without causing a noticeable loss in quality for most uses.
Interlaced: (GIF and PNG only) This is like a JPEG. In the browser the picture first appears as a low resolution image. As more of the file loads, the resolution increases.
Transparent: (GIF and PNG only) This makes any areas not covered by the selected objects transparent. Selecting this option automatically makes one entry in the palette transparent.
Export each layer to a file of its own: (GIF and PNG only) Selecting this option when exporting a design that contains multiple layers results in a separate file being exported for each layer. The names of each layer (as set in the Page & Layer Gallery) are used to name the exported files.
Image Map tab
An image map lets you have "clickable" areas on the graphic when displayed in a browser. Clicking one of these areas jumps to a new web page. If you want to create an image map, use "Utilities -> Web Address" to add web addresses (URLs) to the different parts of your drawing.
Export Image Map to Clipboard: This copies the image map HTML to the clipboard so you can paste it into your text or web page editor. There is an option on the Bitmap Size tab to save the HTML IMG tab to the clipboard. Selecting either of these clipboard options automatically deselects the other option.
Export Image Map to File: This copies the image map text to a file. You can either:
- Insert Image Map into Existing File: This inserts the image map into the specified file. If the file already contains an image map with the same name, the existing image map is replaced. If this is a new image map, it is inserted at the end of the file.
- Replace Existing File: This overwrites any existing contents of the file. This option is useful if you want to save the image map text for use later.
Note that opening this file in a browser displays a blank window, i.e. you don't see the graphic. The reason is that the file does not include the IMG tag needed to display the graphic. The IMG tag might look like this: <img src="file name.gif" usemap="#example" />.
Adobe Dreamweaver Integration: With this option selected, the bitmap in Dreamweaver is linked to the original Xara document. If you later need to edit the bitmap, Dreamweaver can load Xara Designer and display the original document.
Image Map Options
- Name: Image maps are named. (Names must be unique within a document.) If you are merging this image map into an existing file, you can either type in a new map name or choose the name of an existing map. This lets you replace an existing map with new data.
- Approximate curves with lines: Image map polygons are a series of straight lines and this option lets you select how closely any curves in the clickable areas are followed. (Note that circles are a special case in image maps.) Very closely gives the best approximation. This increases the size of your web page and so makes it slower to download.
- Save all clickable areas as rectangles: Ignore the shape of clickable areas. Save all clickable areas as simple rectangles that totally enclose the clickable area.
Browser Preview tab
Using the A and B preview boxes in the Export dialog box (shown above), you can select the best compromise of file size and quality for web graphics. However the best test is checking how the graphic looks in a web browser. This tab provides a number of options for that preview. Click the Browser Preview button to launch your web browser and preview the graphics before exporting.
Copyright © Xara