Alignment
This lets you accurately align or distribute two or more objects.
Quick aligning
Select the objects you want to align, and right click the selection to choose Align from the drop-down menu, and then do one of the following:
- Align the objects vertically by choosing Left edges, Centers, Distribute Centers or Right edges.
- Align the objects horizontally by choosing Top edges, Centers, Distribute Centers or Bottom edges.
Aligning and distributing space
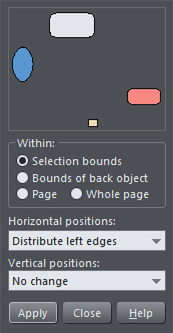
If you want to distribute space between the objects as well as align them, select the objects, right click the selection and choose "Align" > "Alignment" to display the Object Alignment dialog. Alternatively choose "Arrange" > "Alignment" ("Ctrl + + L").
|
|
The small diagram at the top of the dialog box shows you the effect of selecting each option. The selected objects in the document do not change until you click Apply. The alignment dialog is a non-modal dialog, which means you can keep it on screen and continue to work on the document at the same time. So you can change tools, draw, and change your object selection, and then easily select from the various alignment options. If you've got your selection wrong, you can change the selection, and just click the Apply button to apply the last alignment settings again. This can be a real-time saver. |
Within
This section of the dialog controls the boundaries within which you align or distribute the objects. The options are:
|
|
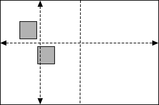
Selection bounds: The boundaries are the outer edges of the selected objects. Their relative position on the page or spread has no effect. |
|
|
Bounds of Back object: The boundaries are the outer edges of the backmost selected object. This object is not affected by the alignment. You can use this to define the "reference" object when you want to align several objects in a row, for instance. With the normal "Selection bounds" options on the leftmost object is the reference object (the one that won't move) |
|
|
Page: If the objects are on a single page, the boundaries are the edges of the page. (This lets you, for example, center objects on the page or align against the page edge.) |
|
|
Whole Page: In most cases, this is the same as Page unless you have a double page spread, in which case it will use the bounds of both pages. |
Aligning
To align objects, for example, so their left edges are aligned to the left.
- Select the objects and right click the selection.
- Choose "Align" > "Left Edges" from the drop-down list.
The selected objects move to align the left edges.
Alternatively:
- Choose "Align" > "Alignment" or press "Ctrl + Shift + L" or choose Alignment from the Arrange menu to open the Object Alignment dialog.
- Select the required Within option, e.g. Selection bounds.
- Select Align Left for horizontal positions.
- Leave vertical positions to No Change.
- Click Apply.
The selected objects move to align the left edges.
All the align options act in a similar way. For brevity, only the left align option, shown in the illustration of the dialog box is described. Experiment to learn about the other options.
To quick-select any combinations of vertical and horizontal alignment click with the mouse in the diagram in the alignment dialog:
- A simple mouse click aligns horizontal and vertical positions to the clicked position to any of the nine combinations of top-centrally-bottom/left-centrally-right.
- "Ctrl + mouse click" leaves the horizontal position unchanged and arranges the objects in a top, centrally, or bottom aligned row.
- "Shift+ mouse click" leaves the vertical position unchanged and arranges the objects in a left, centrally, or right-aligned column.
Distribute
The distribute options will position all the selected objects evenly across the "Within" area (usually within the selection bounds, but it could be the Page or Whole Page).
Again all the distribute options work in a similar way. The following examples show how the different vertical position options align objects:
|
|
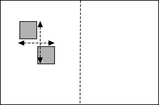
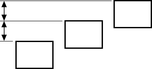
Top edges distribution: the tops of the objects are evenly spaced. Bottom edges distribution is the inverse—the bottom of the objects are evenly spaced. |
|
|
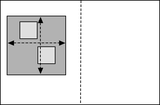
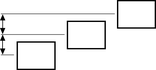
Centers distribution: the centers of the objects are evenly spaced. |
|
|
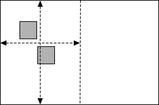
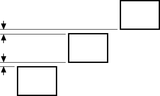
Equi-spaced distribution:the objects are evenly spaced from each other. |
The horizontal position options are similar but operate in the horizontal direction.
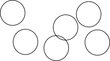
So, for example, to distribute this collection of randomly positioned ellipses, so they are all equally spaced and aligned to the top edge:
|
|
|
|
|
And they will now look like this, all equally spaced horizontally and aligned to the top. |

Remember if you make a mistake you can always undo the operation.
Copyright © Xara