An Example Using a Photo Region
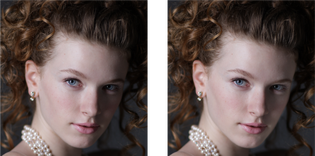
The left picture is rather under exposed on the right side of the girl's face. The version on the right has had just the right side of her face brightened.
These are the steps to re-create this effect:

Select the Region Painter Tool from the Photo Regions and Masks flyout, and paint over the region you want to adjust. It doesn't need to be especially accurate. It's usually best to make the region slightly larger than the area you want to adjust because later we will use feather to blend the edges.
The selection region is shown with an animated 'crawling ants' outline.
Now select the Photo Enhance tool and adjust the brightness slider (you can also adjust contrast, saturation, temperature and blur/sharpen).

This is what the photo now looks like, with a rather obvious brightened area. Using the Transparency tool you can adjust the strength of the effect.

In this example the transparency has been graduated across the area, so the effect fades right to left.
Just select the Transparency tool and adjust the main transparency slider. To create a graduated fade like in this example just drag across the image in the Transparency tool. This shows an arrow indicating the direction and size of the graduated transparency. You can adjust this by just dragging either end of the arrow and you can adjust the strength of the effect at each end using the transparency slider.
The final step is to blend the edges of the brightened area with the Feather tool. This gives the final result as shown top right.
Note: The region or mask is an editable vector shape and you can edit the vector outline to be as exact as you want. But using the Feather effect to blend the edge means you do not have to be that exact.
Secondly, as with most tools in Xara, these are non-destructive edits. Not only can you adjust the effect (and the region it covers, or any enhance effects) at any time in the future, but you can delete the effect to restore the original image.
Copyright © Xara