Screenshots
In combination with a built-in screen capture feature you can easily capture and create screen shots. You can either use the Screen Capture utility which is included in Xara Designer Pro+ or use the screenshot capability built into Windows.
Using Windows to capture screenshots
- Press the "Print screen" button on your keyboard. This places a screen capture of the whole screen on the clipboard. Alternatively, select "Alt + Print screen" which will capture just the current window.
- In Xara select "Ctrl + V" to paste, and select "Bitmap" to have the results pasted onto the page.
You can now crop, add text annotation, resize as required and save the results. It's best to save this type of image as a PNG file.
Screen capture utility (Designer Pro only)
This utility offers some advantages over the method above, including the option to capture the mouse pointer in the image. Open it by choosing Utilities > Screen Capture.
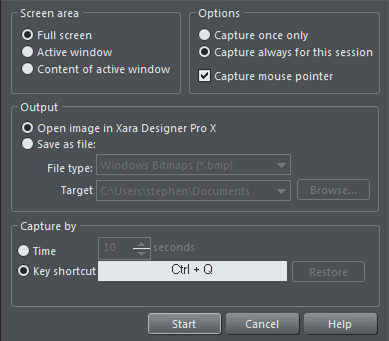
Screen area: Here you can choose the screen area you would like to capture. You can capture the full screen, the active window in its entirety, or just the content of the active window without the window border.
Options: Here you can choose whether or not the mouse pointer is included in the screenshot. Also choose whether you just want to capture one screenshot or whether to keep the utility turned on for the session so you can take successive shots each time you press the assigned key shortcut.
The output section lets you choose how to handle the captured screen image. By default it will be directly inserted into the current Xara Designer Pro+ design. Alternatively you can also save a BMP (Windows Bitmap) or PNG file for each screenshot into any folder. The files created are named "ScreenCapture", "ScreenCapture1", "ScreenCapture2", etc. Choose the Target folder for the files using the Browse... button.
You can define almost any hot-key combination (Shift, Alt, Ctrl + key) to trigger the screenshot. Just click in the key shortcut field and then press the desired key combination, e.g. "Ctrl+S". The chosen shortcut appears in the key shortcut field. If it clashes with any defined Designer Pro+ shortcut, you'll be warned with a message appearing at the bottom of the dialog, but this doesn't matter if you will have other windows active when taking the screenshots. Press Restore to return to the previous selected shortcut.
Instead of using a shortcut key to take the screenshot, you can instead use the Time option. This is useful in cases where any keyboard activity can change the display you want to capture, such as a pop-up tooltip which may disappear if you were to press a key. Select the time option and enter a delay value in seconds. The screenshot will then be taken for you automatically once the specified period of time has elapsed. The timer starts as soon as you click the Start button.
Pressing the Start button closes the Screen capture dialog and activates the system-wide hotkey. Switch to the window you want to capture and press the chosen key combination, or wait for the chosen time period to elapse if the timer option was chosen. The screenshot is taken and inserted into Designer Pro+ or saved to file, depending on the option chosen. If you selected the "Capture always" option you can take additional screenshots by pressing the key combination again (this is unavailable with the timer option). To deactivate the utility if you chose this option, close down Xara Designer Pro+ to end the session. Alternatively return to the Screenshot dialog, choose the "once only" option and take one more screenshot.
Copyright © Xara