Tracer
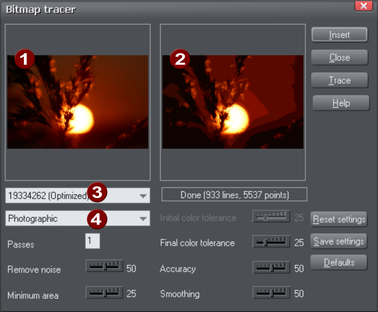
"Utilities" > "Bitmap editor" allows you to trace a bitmap, converting it to editable vector shapes. The tracer is typically used to trace two types of artwork-photographs and simple line art or logos. The tracer can be used for either type of work and selecting the correct trace mode is the easiest way to control this.
|
|
Original bitmap |
|
|
Traced output view |
|
|
Bitmap name |
|
|
Trace mode |


Initially, the tracer shows:
- If there is a selected bitmap or, if you copied a bitmap from the bitmap or Fill Gallery, that bitmap.
- Otherwise, the default bitmap.
You can select a different bitmap:
- From the dropdown list,
- From the Bitmap Gallery (click the "Trace" button), or
- By clicking on any bitmap in any Xara document.
By default, the tracer does a "photographic" trace. That is, it produces a drawing with lots of colored shapes to simulate the photographic bitmap being traced. If you want to trace a black-and-white scanned bitmap, such as a logo or symbol, select one of the other trace modes such as monochrome or 256 colors. These are optimized for producing simpler but generally more precise tracings.
Click "Insert" to copy the tracing into the document.
Click "Trace" to start the trace operation.
Press "Esc" to abort a trace operation.
Trace mode
This lets you specify the maximum number of colors in the final object:
- Monochrome-2 colors.
- Grayscale-256 shades of gray.
- 256 color-256 colors.
- Photographic-16 million (24 bit) colors.
Selecting more colors than exist in the original bitmap is usually not beneficial. The only time increasing the colors is useful is when tracing a heavily dithered 256-color bitmap and you want near-photographic quality.
Each of these modes can have different settings for passes, color tolerance and so on.
To restore the settings to their saved defaults click "Reset settings".
To make the current settings the default, click "Save settings".
To restore the settings to the factory defaults, click "Defaults".
Passes
(Range 1-5)
The greater the number of passes, the longer the trace operation takes and the greater the resultant file size, but the final result is closer to the original.
With each pass, the tracer attempts to more closely match any shading in the original bitmap. Obviously, this increases the memory required for the final object. You may require an object with minimum shading and just broad areas of color. Use one pass for this.
Alternatively you may require color shading to closely match the bitmap. Use multiple passes for this.
Remove noise
If you scan a photograph you often scan small specks of dust sticking to the photo's surface. These produce "noise", or small, unwanted areas of a different color.
Also many bitmaps try to improve the look by "dithering" pixels and this introduces unwanted noise (especially common for 256 or fewer color bitmaps).
When tracing 256-color bitmaps that are heavily dithered, you should set remove noise to high (if you zoom into the bitmap in the document, you can see if it is dithered).
This control removes noise and dithering by ignoring very small areas of color.
Minimum area
Areas smaller than the size set in this control are ignored (size is in pixels). Examples are scanned photographs with a lot of fine detail such as blades of grass.
Initial and final color tolerance
Color tolerance is how great a color change is required before the tracer considers two areas to be of a different color.
Initial color tolerance is used for the first of multiple passes. It is similar to the broad brush strokes used to create the underlying colors on a conventional painting.
Final color tolerance is used for the last pass. It is similar to merging the edges of color transitions to simulate shading.
On multiple passes, the tracer gradually reduces color tolerance from the initial value to the final value. Thus, initial color tolerance should always be set higher than final color tolerance. On a single pass, only the final value has any effect.
Accuracy
This controls how accurately the tracer follows the outlines of the original bitmap. The more accurately it traces the outlines, the more control handles are required on each shape and hence the more memory is required for the final object.
This option has no effect on corners, only on smooth curves.
Smoothing
This controls how accurately corners (sharp changes of direction) are traced. Increasing the smoothing takes longer to trace the image but can reduce the final file size.
Copyright © Xara