Panorama Stitching
|
|
Xara Designer Pro+ includes a tool that can automatically stitch together up to 8 photographs into a single wide, high-resolution panorama. |

Creating high-quality panoramas can be a very complex and technical process, often requiring special equipment or lenses and accurately exposed and aligned photographs. The panoramic stitching feature built into Xara Designer Pro+ requires none of these, and can use an every-day digital camera so that anyone can create outstanding quality panoramic images in a few minutes.
This tool features:
- Automatic estimation of the focal length to warp the images to reduce fisheye effects
- Automatic barrel, pin cushion and vignette adjustments
- Automatic exposure correction
- Automatic detection of shared overlap points and seamless blending of joins
- Automatic cropping of the final result.
- The option of using PanoramaStudio 3.0 - a more advanced version of the panorama stitcher. (download and install using the option in the Help menu, after you've unlocked Designer Pro+).
To create a panorama you need to take a series of separate photos from a central position. Ideally each photo would overlap the next by approximately 30%, although it will work with more or less overlap.
The process of creating a panorama is very straightforward:
- Import each of the photos. There is no need to try and position the overlaps correctly
- Select all the photos you want to stitch together - they don't have to be in order.
- Click the Panorama button on the Photo Tool fly-out bar.
It will start the process of stitching and continue as a background process. A popup status window shows the progress through the various stages, although you can continue using Xara Designer Pro+ like normal while this happens. When the process is complete the resulting panorama image is imported onto the page. Note that it does not replace the original images, which you can delete if you no longer require them.
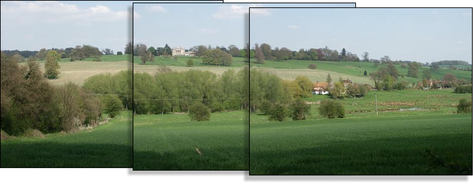
Three example photos of a landscape. Each overlaps the other (in this case a bit more than necessary).
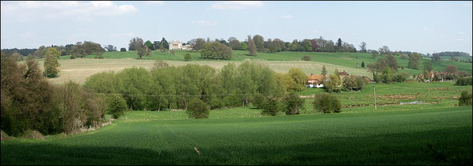
The resulting single panorama image, with seamless integration.
Optimizing images
Xara Designer Pro+ will always stitch photos at the full resolution, even if you reduce the size of the image on the page. This is often a desirable thing since it produces the maximum quality, highest resolution results. But it does mean that the stitching process can take a few minutes. So sometimes you may prefer to reduce the resolution of the images before you stitch them together, especially if you only require a medium resolution final result, perhaps for the web.
To reduce the resolution of any image, reduce its size on the page to the required size and then use the "Utilities" > "Optimize Photo" option. Note that the panorama stitcher works better with higher resolution images (it's easier for it to find matching points on the photos).
When you get the stitched image back, this is stored as a PNG image in Xara Designer Pro+. This is the highest quality, but takes a lot of memory and file space, especially if it's a high-resolution panorama. (The Bitmap Gallery will show you how much). Therefore you can usually benefit from reducing the resolution of the final image and converting it to a JPEG instead. Again use the "Utilities" > "Optimize Photo" option for this.
Notes:
- The panorama stitcher expects the images to be the same resolution and size.
- Try to avoid taking pictures with moving objects in. These can confuse the system since the same object might appear in different places, or not at all.
- Try to keep the horizon at the same approximate position on each photo
Hint: By taking photos in a portrait orientation, you can get maximum vertical coverage.
Copyright © Xara