Imagesetting dialog
The Imagesetting dialog gives control over printer's marks and film settings.
To open it, choose "File -> Print Options", then select the Imagesetting tab. Or, from the Print dialog, click "Options", then select the Imagesetting tab.
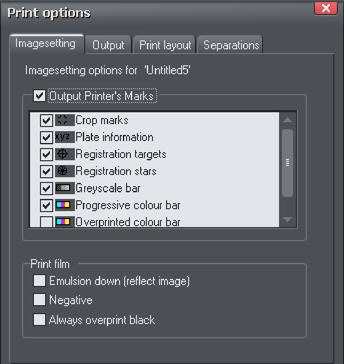
Output Printer’s Marks
This switches selected printer's marks on or off in one operation. Printer's marks provide useful information when printing professionally, for example indicating the edge of the document so that it can be cropped to the proper size after printing.
The default options that are then selected will be suitable for most print jobs. Only change them if asked to do so by your print company.
As well as for printing, these settings also apply to PDF/X export if the Include Crop and Printer Marks option is selected in the Advanced Options, Layers tab of the PDF export dialog.
See PDF Export for more information on exporting as PDF/X.
These are the various printer's marks options that you can turned on or off.
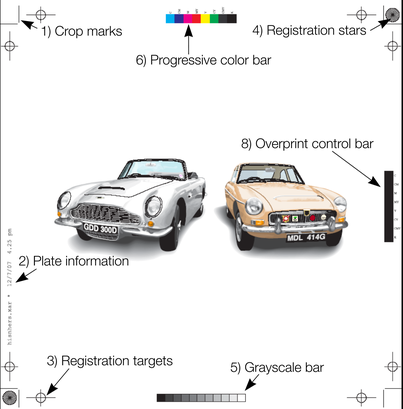
1) Crop marks
These are used for jobs that will be trimmed to size after printing. They tell the print shop where to cut the paper.
2) Plate information
This is information such as plate name, file name and date & time.
3) Registration targets
Registration targets appear in the same position on each separation so the print company can align the separations when making printing plates and when printing.
4) Registration stars
These are a further check that the separations are lined up.
5) Grayscale bar
This shows that the imagesetter or printer has rendered the full range of gray tones from 10% to 100%. It also provides the print shop with useful information during printing. Useful for both monochrome and color work.
6) Progressive color bar
Similar to the grayscale bar. Provides the print company with useful information when printing multicolor work.
7) Long registration targets (Not shown in the example)
These are an alternative form of registration targets. Some print companies may prefer to work with this type of target. They replace the registration marks shown (option number three) with this target type:

8) Overprinted color bar
Similar to the grayscale bar. If your document uses overprint, this provides the print company with useful information during printing.
Print films
Films used to be used for press printing, but have been phased out by most print companies in favor of PDF/X. But if you need to create films, these settings may be relevant, and again only change them if asked to do so by your print company.
Emulsion down (reflect image): Creates a mirror image. This option, if enabled, will only work when outputting to PostScript printers. The imagesetting material is coated with photographic emulsion on only one side. With this option off, the emulsion is on the top of the film when you can read it normally. This may be known as "right reading, emulsion up". With this option on, the emulsion is on the back of the film as you read it. Called "right reading, emulsion down" or "wrong reading, emulsion up".
Negative: Produces a negative image. This option, if enabled, will only work when outputting to PostScript printers. Leave off if you are asked for "positive" or just "pos". Turn on for "negative" or "neg".
Always overprint black: Overprints any objects that are over 95% Key (CMYK black). Black is a relatively opaque ink and overprinting reduces registration problems. This option is particularly useful if you have a lot of black text. If your document has large areas of solid black, overprinting all black can cause problems with over-inking on the press. Overprinting is described later in the chapter.
Copyright © Xara