Separations dialog
The Separations dialog gives control over separations and PostScript settings.
To open it, choose "File -> Print Options" then select the Separations tab. Or, from the Print dialog, click Options then select the Separations tab.
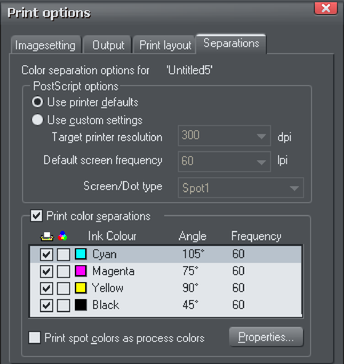
PostScript options
The settings give you control when sending to a PostScript printer. They are ignored by any other type of printer. It is unlikely you will need to change these, but if asked to do so you can change the settings described below.
Use printer defaults: Selecting Use Printer Defaults uses the standard settings for the selected printer. Generally these give good results, but if you want greater control choose Use Custom Settings.
Use custom settings: Selecting Use Custom Settings lets you configure the printer settings to suit your requirements. Note: No check is made whether the settings you choose are suitable for the type of printer; it is assumed you know your requirements.
Target printer resolution: Specified in dots-per-inch (DPI).
Default screen frequency: Specified in lines-per-inch (LPI). Tints of the basic ink color are printed as small dots called halftone dots. The dots are arranged in rows and the number of rows to the inch is the screen frequency. The lower the screen frequency, the larger the individual halftone dots and the more noticeable they are. Your print company may ask for "120 line screen" which would be a screen frequency of 120LPI.
Screen/dot type: PostScript printers can print halftone dots in a variety of shapes. Generally round dots give the best results but some presses work better with a different dot shape.
Print Color Separations
If you want to print all the colors in one pass through the printer, deselect Print Color Separations. This full color output is referred to as a composite output.
If you want to produce output separated into the CMYK process colors and any spot colors, select Print Color Separations. If you have one spot color, for example, you will get five printouts: one for each of the CMYK colors, and one for the spot color.
Your print company can advise you on whether they want composite or separated files. Separating to a local printer is useful if you want to view each separation.
You can now set options for the individual separations.
To output a separation for an ink color, select the left-hand check box. By default all plates are set to print.
You can also view each separation within Xara (Designer Pro or Photo & Graphic Designer) with the "Window -> Show Printer Colors" options.
To set an ink color to overprint, select the right-hand check box. Overprinting is described later in the chapter.
|
To change the screen angle and frequency, click on the ink name to select it then click Properties. This opens the Separation Properties dialog: |
|
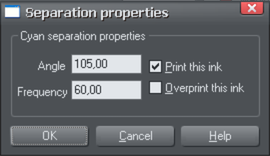
Angle: To change the screen angle for this color, type in a new value in degrees.
Frequency: To change the screen frequency for this color, type in a new value. This overrides the default screen frequency (described in PostScript options earlier) for this color.
Print this ink: This duplicates the check box in the main Separations dialog.
Overprint this ink: This duplicates the check box in the main Separations dialog. It protects the selected color from being knocked-out, so works in the reverse to object-level overprinting. Overprinting is described later in the chapter.
Print spot colors as process colors: Desktop printers and some printing processes can only print process (CMYK) colors. Select this option to print any spot colors as their equivalent CMYK color. Note: some spot colors look very different when output as CMYK, and it removes the ability to use PANTONE COLOR BRIDGE (Xara Designer Pro only) colors or any special inks. The main use of this option is when checking your artwork on a local printer.
Copyright © Xara