Combining shapes
The Combine shapes option (select the objects, right click and choose Combine shapes) provides you with a range of advanced options to combine shapes to make new shapes, such as adding, cutting, or slicing. You can use combine shapes on any type of object, including bitmaps.
When subtracting, intersecting and slicing, you can either use the topmost selected shape to do the "cutting" of the lower shapes, or (in Photo & Graphic Designer or Designer Pro) you can use one of the Photo Region tools.
|
Select one of the Photo Region tools to draw your cutting shape over the lower shapes. The selected area will be outlined with a dashed 'marching ants' effect. |
|

Then right click and choose Combine Shapes and then one of the options. The Photo Regions shape is used to cut the shapes underneath.
See Photo Regions and Masks for more information on the Photo Regions tools.
Creating holes in shapes
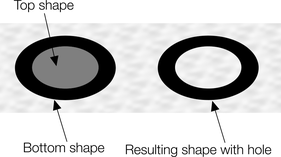
Right click and choose "Combine shapes" > "Subtract shapes". This is similar to using join shapes (described above). The differences are:
- The top shape (or mask shape if the mask layer is used) becomes a hole through the other shapes.
- The line attributes and colors of the underlying shapes are unchanged.
- Combine shapes physically alters the lines. The only way to restore the original shapes is by using undo.
- The number of overlapping shapes has no effect.
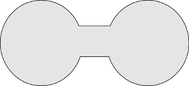
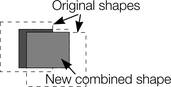
Merging several shapes into one
For example, to produce the shape on the right from the three shapes on the left:
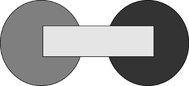
- Create the two circles and the rectangle.
- Select all three shapes
- Right click and choose "Combine shapes" > "Add shapes".
The new shape takes line attributes and colors from the top shape (in this case the rectangle in the illustration).
Selecting multiple shapes and then stroking over them with the Shape Painter Tool (in Photo & Graphic Designer or Designer Pro) also merges the shapes you touch together.
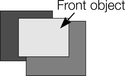
Intersecting shapes
With the Intersect Shapes option, the new object is created from those parts of lower shapes that are covered by the top object, or (in Photo & Graphic Designer or Designer Pro) by a mask shape using one of the Photo Region or Mask tools.
|
Select the shapes you want to mask and the front (mask) shape. Or put the mask shape on the mask layer. |
|
|
Right click and choose "Combine shapes" > "Intersect shapes". This creates a new shape. The top shape or mask disappears. |
|
The line attributes and colors of the underlying shapes are unchanged. Areas not covered by the top shape or mask are discarded. The top shape can be a group for more complex subtracting. Groups are described in Object handling.
Slicing shapes
Xara lets you easily slice shapes into two or more pieces, and you can use either a solid object or a line for slicing. For example, to cut a segment from a circle:
|
|
|
|
You can also use a line to cut an object: The line should be drawn completely though the object and extend beyond it (as shown in the illustration). If the line is too short, this operation cuts out a thin slice. |
|
|


Slicing complex shapes
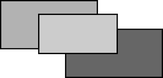
When you use the Intersect All Shapes option, selected objects are sliced along their lines of intersection.
|
Three selected rectangles, with a 1px border. |
|
|
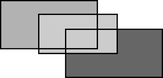
"Arrange" > "Combine Shapes" > "Intersect All Shapes" slices the shapes along the intersected lines. The 1pt borders show the outlines of the new shapes. |
|
|
You can then pull the rectangles apart to reveal the new shapes. |
|
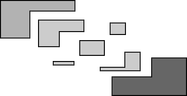
The line attributes and colors of the intersected shapes are unchanged.
Copyright © Xara