Anchored Graphics
You can position any graphic, or group, so it's tied (anchored) to a position in some text, so that as the text moves because of editing, the graphic object will move to remain at the same relative position. However anchoring should only normally be used for objects that sit outside the margins of the text (eg. a photo sitting to the right or left of a text column), or behind the text. Use Embedding for objects that sit within the text bounds (see below).
- The quickest way to anchor a graphic or group is to right click it and choose the Anchor to text option. However, if you also want to edit anchoring properties, you can right click on the object and select Repelling & Anchoring to display the Text repelling & anchoring dialog.
- Click the Move graphic with text checkbox.
- By default Move vertically only is also selected, so that your anchored graphic will only move vertically as the text is edited. This is usually the most useful option – if you want the object to track the anchor position horizontally as well, embedding the object is usually a better option.
- An anchor symbol appears in the top left of the object, indicating it's now anchored.
- Using either the Selector Tool or Text Tool, click and drag the anchor symbol so that a red arrow appears.
- Move the arrow head and drop it in the location in the text where you would like the object anchored. A red caret (inverted 'T' mark) indicates the anchor position.
- As you edit the text around this caret mark, the anchor point and anchored object moves with the text.
- When an anchored object reaches the bottom of the text area to which it is anchored the text to which the object is anchored flows to the next page or column, taking the anchored object with it. This is the default behavior for newly anchored objects. However it's controlled with the Affect text flow checkbox in the Repelling & Anchoring dialog, so you can turn this off if required. For legacy documents the setting is turned off to avoid changing the way these documents are formatted.
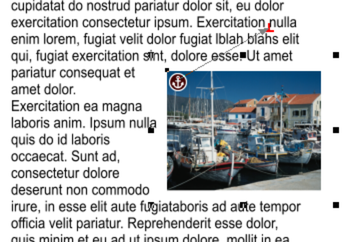
An anchored object displays an anchor symbol and an arrow pointing to the anchor point, shown as a red caret mark.These disappear as you type, unless you're close to the anchor point.
Note: If you drag the anchoring arrow to a place on the page where there is no text, the arrow turns into a red anchor that indicates the object's anchoring properties will be lost if it's dropped here. This also happens when the arrow is dropped on the object itself.
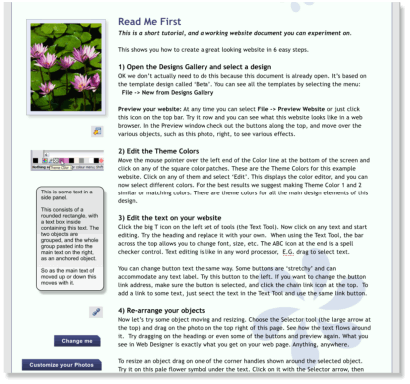
This is an example column of text with various graphic elements hanging to the left. Each of these is anchored to the start of a line of text immediately to its right.
It's possible to anchor any graphic object or group, including groups containing text, such as the example side-panel, shown above. If the group consists of a single object you can directly select that object instead of selecting the group that encloses it. Look at the Status Bar and the Page & Layer Gallery to see this in action.
It's also possible to anchor objects to appear on top of, or below the text. The example pale blue flower graphic, shown above, is anchored this way and will flow with the text.
Note: If an anchored object is also set to repel, only the text that the object is anchored to is repelled.
Note: Repelling is restricted for repeating objects: Text inside a repeating group is only repelled by repelling objects inside the repeating group. Individual repelling objects inside a repeating group only repel text that is also inside the repeating group. Repeating groups as a whole can repel any text stacked below on the page.
Moving Anchored Objects
As new text is added or deleted, the object moves as the text flows, but will always maintain its new position relative to the anchor point. You can move an anchored graphic by dragging on it as usual. This changes its position relative to the anchor point, but does not move the anchor point, which remains visible at the end of the anchor symbol arrow as you click/move the graphic.
If you want to move the anchor point to another location within the text, click and drag on the anchor symbol again to create a new arrow and drag it to the new location.
If you cut and paste the text containing the caret mark, the anchored object is also cut and pasted.
Viewing the anchor point
The anchor point of an anchored object is only visible if you click the anchored object in the Selector Tool or click in the surrounding text area in the Text Tool.
When you click in a region of text with the Text Tool, it shows any anchors points within an inverted 'T' symbol, and also draws an arrow from the anchor point to the anchor symbol in the top left of each anchored object. So the easiest way to see all the anchor points for any text is to click in it with the Text Tool.
However, when you start to edit the text, the red caret, arrow and anchored symbol temporarily disappear until you stop typing. If you are close to the anchor point, Xara displays the caret mark, along with an arrow pointing to the anchor symbol, to let you know when you're close.
Removing an anchor
To remove an anchor from an object, right click it and choose Anchor to text again to disable the option. Now when you click the object in the Selector Tool or in the text in the Text Tool, the anchor symbol is no longer displayed.
Copyright © Xara