Cells
Selecting Cells
Selecting cells you want to change is easy. First click to select the whole table, then in the Table Tool you can click on individual cells to select them. Or click-drag to select a rectangular range of cells. You can also Ctrl+click on a cell to add it to the current selection, or Shift+click to extend the current cell selection range.
You can also select multiple cells while in the Text Tool, by just click-dragging.
Cell Contents
Once you have selected the cell(s) a simple Delete will delete the contents. The usual copy and paste commands will work, Ctrl C and Ctrl V. Font, font size and color can be changed like regular text.
You can enter your content by simply typing into the cell, or you can copy and paste text and numbers from your spreadsheets and other sources into Xara tables. Simply copy the cells you want to copy in your spreadsheet, then in the Table Tool select a table cell and paste (Ctrl+V).
This should work with data from any application that is able to place TSV (Tab Separated Values) as unformatted text onto the clipboard, when you copy it.
Cell Justifications
You can choose between left, right and center justified text using the buttons on the InfoBar.

Click the vertical alignment icon to reveal the dropdown, and choose between top, center or bottom aligned.
Cell Background Color
By default cell background color is white. To change this, select the cell or cells you want to change, and click the new color you want in the Cell color background dropdown on the right side of the InfoBar, which includes all the theme colors in the current document. If you select the Edit option in that dropdown, you can open the color editor to create a custom color. Alternatively you can right click any color on the color line and select Set Table Cell Background.
Note there is also a table background color behind the cells, which you will see if you open up spacing between the cells; see Table Spacing below.
Cell Borders
Click the Borders button at the right end of the InfoBar to open the Borders dialog:

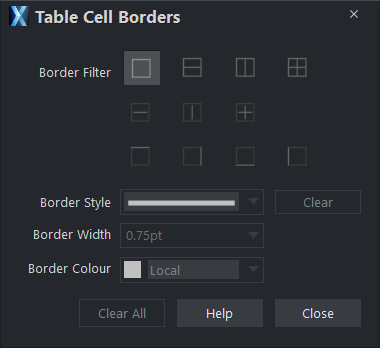
First select the cell(s) you want to change as this dialog always works on the selected cells only. In the top Border Filter section of the dialog you first choose which borders you want to change. For example if you want to change only the right side of the whole cell selection, select the  filter. Then as you change the border style, width and color in the lower half of the dialog, only that right side border will change. If you want to change all borders of every individual cell in the selection, choose the
  filter, then again choose the border settings you want.
If you have a lot of different border colors, styles and widths in your table, you may have to perform several border changing operations on different cell selections with different Border Filters, but every possible combination of borders on a table is possible! When you've made your selection, simply click Close.
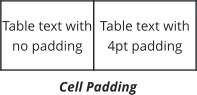
Cell Padding
Cell padding is the space you see between the text in a cell and the borders of that cell. In most cases it’s desirable to have some non-zero padding applied, so text doesn’t appear too close to the cell borders.
Cell Spacing and Table Background color
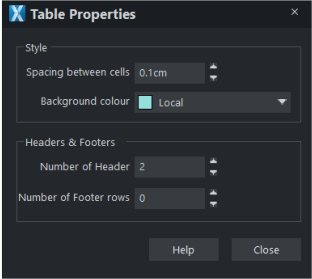
Most tables tend to have zero spacing between cells, meaning that cell borders overlap with no space between one cell and the next. But you can add space between all the cells of the table if you wish too, and set the table background color (which is only visible if you have positive value spacing set).

The color you see in the spaces between cells, blue in the example above, is the Table Background Color.Click the second button on the InfoBar to open the dialog where you set the spacing and color.

You can also set the table background color with a right click on a color in the color line > Set Table Background.
Related Articles:
Some handy time-saving tips Table Shortcuts
And check out our demo movie on YouTube:
An introduction to the Table Tool
Copyright © Xara