Opacity Masks
As described above, the Transparency Tool allows you to apply either flat or graduated transparency to any object or group. But sometimes you need more advanced control over the transparency (or opacity) of an object. Opacity masks are a very powerful way of achieving this.
The Opacity Mask system takes any object, or group of objects, and uses the color (usually black to white shading) of these objects to define which parts of any other object are transparent or opaque.

|
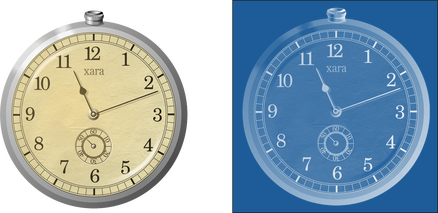
Original watch design |
Watch applied as an opacity mask to a rectangle |
First draw the shapes you want to define the opacity (the opacity mask). It can be anything from a simple shape, or blend, to a complex grouped drawing. Any black color will become 100% transparent, while white will be 100% opaque and shades in-between will create varying degrees of transparency.
You can apply the opacity mask to other objects in your design in two different ways (both give the same results). Also if you use the Shape Eraser tool with a soft nib setting, it will create an opacity mask using your erase strokes to achieve the erasing effect on the selected objects.
Applying using the clipboard
Select the object which is to be the mask and copy it to the clipboard. Then select the object, photo, or group to which you want to apply this mask and select Edit -> Paste Opacity Mask. There are two options, the first will position the opacity mask into the center of the selected object. The second option 'Paste opacity mask in place' will paste it into the selected object based on the original position of the mask.
Apply directly
Place the object to which you want to apply the mask behind the object(s) that you want to apply as a mask. Then select both the mask object(s) and the object to which the mask is to be applied, and select Arrange->Apply opacity mask.
The backmost object is taken as the target for the mask and all other objects in the selection make up the opacity mask. So if you want to apply a mask to multiple objects this way, you need to group them first and place them behind the mask objects.
You now have a special type of group called an 'Opacity mask group'.
Soft erasing using the Eraser Tool

Just select the object(s) you want to erase, go into the Eraser Tool and make the softness setting on the InfoBar a value greater than 0 (when softness is 0 a 'hard erase' is performed, which is used for permanently cutting objects and this does not use an opacity mask). Choose an appropriate nib size on the InfoBar and draw over the objects. An opacity mask is created automatically and your erase strokes are used as the mask.
Editing inside an opacity mask group
You can select objects inside the Opacity Mask Group directly on canvas. Ctrl+click operations will select the objects that are being masked, not the mask objects that form the mask itself. To select the mask objects directly, use Ctrl+Alt+click. The first Ctrl+Alt+click selects the whole opacity mask group. Ctrl+Alt+click again and it will select the group of mask objects, so you can then drag around the whole mask inside. Ctrl+Alt+click again and it will select individual mask objects.
You can also select any of the objects inside an opacity mask group using the Page & Layer gallery, which lets you see the structure of the group in its entirety.
It can be difficult to make changes to the masked objects or to the masking objects as they appear on the canvas. So you can edit either of these in a separate sub-document view, just as you can edit inside normal groups. Right click on the opacity mask group and choose Open Opacity mask group to edit just the objects that are being masked (or just double click on the opacity mask group). Or choose Open Opacity mask from the same right click menu (in the Opacity mask sub-menu) to edit just the objects that are forming the mask.
Advanced options
If you right click on an opacity mask group, the context menu includes an "Opacity mask" sub-menu with the following operations.
Open opacity mask
This is described above – it allows the masking objects to be edited in a separate document view.
Invert opacity mask
This inverts the nature of the transparency in the opacity mask group, so transparent parts become opaque and vice versa. This operation actually just changes the Clipped and Inverted settings described below, since fully inverting the opacity mask group involves changing both those settings.

|
Initial opacity mask |
Inverted |
Detach opacity mask from selection
This operation extracts the masking objects from the opacity mask group, making them become normal objects on the page and makes the opacity mask group into an ordinary group.
Clipped (Ctrl+Alt+C)
This option makes the opacity mask group be clipped to the outline of the mask object(s).

|
Unclipped (default) |
Clipped to mask object |
Uses only alpha (Ctrl+Alt+A)
This makes the rendering of the opacity mask ignore color saturation levels and use only transparency levels in the mask object(s) to set the transparency on the opacity mask group.
Inverted (Ctrl+Alt+V)
This inverts the nature of the transparency produced by the mask objects, as demonstrated by this simple example.

|
Default |
Inverted |
See the Photo Handling chapter for an example of opacity masks in action and for other tips.
Copyright © Xara