Theme Colors
Most templates use a small set of theme colors, and various shades of those theme colors (also sometimes referred to as 'Named colors'). Most themes provide a selection of alternative color schemes in Elements along with all the pages, graphics and other items that make up the theme. You can re-color your design instantly by simply dragging and dropping one of these color schemes onto your page!
If you don't like the provided color schemes you can easily edit the theme colors since Theme Colors appear on the left side of the Color Line along the bottom of the window.

|
|
Current Outline and Fill Color |
|
|
Color Editor |
|
|
Eye dropper color picker |
|
|
'No color' patch. |
|
|
Named 'Theme' Colors and Linked Colors |
|
|
Fixed palette of standard colors |
|
|
Hold pointer over a color to see its name |
|
|
Status line. Shows what is selected, and provides hints |


Simply right-click on any of the Theme/Named Color and select the Edit option (if you hover the mouse pointer over the color you will see a tooltip name).

|
|
When editing a color you can drag the eye dropper to pick colors off screen, even from other open windows |
|
|
Select the color to edit: Fill color/Line color of the selected object or any of the named theme colors |
|
|
Click the label icon to create a Named Color |
|
|
Click to show extended color controls |
|
|
Previous Color |
|
|
Actual color |
|
|
Drag here to select any shade of the selected hue |
|
|
Drag here to select any hue |
The Color Editor provides easy way of choosing any color. Click the Extended Controls to enter RGB values.
Note that when you change a Theme Color in this way, all the related shades used throughout the document will change as well.
Coloring Shapes
You can fill any drawn shape with a color, either by dragging the color from the Color Line and dropping it on to the shape, or by first selecting the object and then clicking on the Color Line.
|
|
Alternatively right click the shape and choose Fill Color or click the small Color Editor icon (or press "Ctrl + E") to display the Color Editor, where you can set any color you like. |

You can give drawn objects a graduated color fill using the Fill Tool.
Coloring Imported Clipart
When you import a clipart graphic by dragging from Elements, using the "File" > "Import" option, or dragging a .web or .xar file onto your page, you will usually be asked whether you want to match the colors. If you select Don't Match, then any named colors used in this graphic will be added to the Color Line. Clicking on any color on the Color Line will give you the option to edit the color.
You can also change the colors of any multi-colored object by selecting it and clicking a color on the color line. A dialog appears showing you the set of colors currently used in the object – just click the one you want to change. Or bring up the color editor and the color list at the top includes the same set of colors – choose the one you want to edit.
Coloring Photos
If you try to color a photo it turns it into a 'contoned' photo. For example, to make any photo black and white, right click and choose "Contone" > "Make black and white" or select it and click on the white color patch on the end of the Color Line. You can set the light or dark color to be any two colors, not just white and black - right click, choose "Contone" > "Light" and click a color in the Color Editor.

You can also use the Enhance Tool to provide a direct and very fast way of adjusting the brightness, contrast, color adjustment levels and sharpening of photos, You can also adjust the individual colors and tints within a photo as well as the shadows and highlights - even for ultra high-resolution images.
Note: If the photo is inside a group, as many of the photo objects in the templates or clipart are, then you will have to select the photo inside the group first. You can do this by holding "Ctrl" down when clicking on the object in the Selector Tool. Another way of directly selecting the photo is to click on it in the Photo Tool.
Page Background Color
NOTE: This is normally only useful for documents you intend to export as a website.
To set the page background color, right click a page, choose Change Page Background and click a color in the Color Editor. Alternatively you can drag a color from the Color Line over the page and drop it on an empty part of the page.
|
|
To set a repeating background texture, drag the photo or bitmap onto your document. Open the Bitmap Gallery, scroll to the photo you just loaded, click on it to select it, and then click the Background button on the gallery. |

Creating your own Named Colors
If you want to use a color many times throughout a document, you can create your own named color by clicking the Name label on the top of the Color Editor. This color will now appear on the Color Line.

Click the label icon to create a Named Color
The power of a named color is that when you edit it later (right click the color in the Color Line, select Edit) all objects using this color are instantly changed.
Linked shades
You can create colors that are lighter or darker shades of another color, so that when you alter the 'parent' color, all the lighter and darker shades change to match the new hue. For example a graduated color shade on a button, such as this:
|
|
This is a simple rounded rectangle with a graduated color fill created with the Fill Tool. In the Fill Tool you can click on the either end of the arrow to set the color. |

If you create the main green color as a named color, and then make a lighter or darker shade of the color, as a linked shade, when you now edit the named color the shades change as well, so you get simple re-coloring of complex shaded objects.

To create a linked shade, open the extra controls in the Color Editor and select the 'Normal Color' drop-down menu and choose 'Shade of another color'.
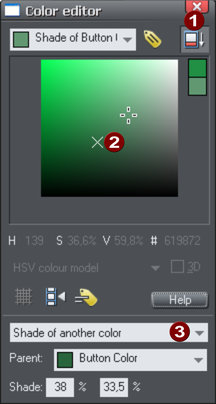
|
|
Click this button to reveal the extra controls. |
|
|
You can now select any light or darker shade of the parent color. The cross marks the parent color. |
|
|
Select Shade from this drop-down list and then the parent color. |
You can also create a Linked Shade that appears on the Color Line (so you can easily apply it to other objects). When you select to create a new Named Color you can choose to make this a linked 'Shade of another color'.
Copyright © Xara