Extrude Tool InfoBar

|
|
Extrude on/off |
|
|
Slider type list |
|
|
Slider and numeric value for selected parameter |
|
|
Bevel type |
|
|
Bevel size slider and value |
|
|
Lights on/off |
|
|
Gloss/matt |
|
|
Rounded/mitred corner |


You can adjust a 3D extruded object by manipulating it directly on the page as described above, or by selecting it and using the controls on the InfoBar of the Extrude Tool.
Turning extrudes on and off
|
|
Extrude on/off |

Once a shape or other object has been extruded, there are only limited modifications that can be made to the original object with the extrusion in place. For example, if you've extruded a shape, it's not possible to then edit that shape in the Shape Tool because it's no longer a simple 2D shape that you can interact with. However, using this control you can temporarily turn the extrusion off, so that you can see and modify the underlying object using other tools, before turning the extrude on again. After making a modification and turning the extrusion on again the extrusion is re-applied to your modified 2D object, with all the same 3D attributes that it had when you turned off the extrude.
Note that in some cases if you dramatically change the form of the object while the extrusion is turned off (such as changing it to a completely different type of object), the 3D extrude attributes you applied may not be preserved. In such cases you should be able to use Paste format/attributes to copy the attributes from a copy of your original extrude before the modification. See Copying styles: Paste attributes.
Extrusion depth
The easiest way to adjust the depth of an extrusion is to simply click and drag on it, as described above. However, you can also use the slider on the left of the Extrude Tool InfoBar to adjust it. Make sure that Extrude depth is selected in the dropdown list to the left of the slider (this is the default setting) and then use the slider to adjust the extrude depth. The current extrude depth is shown in a numeric field to the right of the slider, and you can also enter extrude depth values directly into that field to set an exact extrude depth.
Bevel Type & Size
The bevel type determines the profile of the extruded side of your 3D shape and of its edges and corners. By default it's set to rounded which gives a flat side with rounded corners. The bevel type dropdown list contains a large selection of different bevel types you can choose from. You can adjust the size of the bevel using the slider to the right of the bevel type list. To the right of the bevel size slider is a numeric field showing the current bevel size and you can enter exact bevel sizes into this field.
An alternative shortcut to adjust the bevel size is to drag on the side of the 3D object holding "Ctrl" (while in the Extrude Tool).
Lights
|
|
Lights on/off |

You can adjust the lighting of your shape in 3D space by turning on the lights. There are 3 lights, each of which can be given their own color and position in 3D space around the 3D shape.
|
|
In this example the face color of the shape is set to white. But you can see that it appears green because there is a green light shining almost directly onto the front face of the shape.
By adjusting the colors of the face and extrude and the positions and colors of the three lights, you can enhance the realism of the 3D objects in your design. |
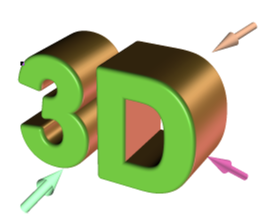
Behind the object is a beige / orange colored light and another that is a purple color. Both lights cause reflections down the side, and changing the color, or direction of the lights behind will change the reflected highlights.
To move a light around the 3D object, simply drag on the light arrow. If you happen to drop a light so that it is behind the 3D object and therefore isn't selectable, you can retrieve it by using the left slider on the Extrude InfoBar. Select one of the light angles from the dropdown list to the left of the slider (e.g. "Light 2 Angle 1") and then adjust the slider. The light moves around the 3D object in your design. The various "light angle" options in this dropdown list allow you to move any of the lights in any direction in 3D space to achieve the positions you want. However for most purposes you can achieve good results most easily by dragging the light arrows directly on the page.
To change the colors of the lights, you can simply drag colors from the color bar and drop them directly onto the light arrows. To edit a light color with the color editor, double click on the light arrow you want to change and the color editor opens with that light color selected. You can now edit the light's color. With the color editor open, as you click on the different light arrows, extrude face and extrude sides, the color selected in the color editor dropdown list changes to match your selection, so you can quickly select the different colors on your extrude to modify them.
Gloss / Matt
|
|
Use this toggle button to make the surface of a 3D object more or less reflective. With the gloss option on lights placed at the correct position behind the object will "bounce off" the sides to good effect. |

Mitred corner / Rounded corner
|
|
You can choose either Mitred or Rounded corners for your 3D object. "Mitre" gives square edges, while "Round" produces rounded edges. |
Copyright © Xara