Editing named colors
There are four ways to display the color in the Color Editor so it can be edited:
- Choose from the menu in the Color Editor.
- Or right click on the color on the Color Line and choose Edit from the menu that appears.
- Or drag & drop a color from the Color Line onto the Color Editor.
- Or drag & drop a color from the Color Gallery (described later) onto the Color Editor.
You can then edit the color as required. All objects that use this color are automatically and immediately updated to show the new color across all pages of your document.
Renaming named colors
While editing a Named Color, right click on the Color Editor and select Rename
- Or select the color in the Color Gallery and select the Name button, or
- Or right click the color on the Color Line and select Rename.
Deleting named colors
To delete a named color:
- In the Color Gallery, select the color or colors you want to delete.
- Click delete in the Color Gallery.
Or:
Right click on the color on the Color Line and choose Delete.
Importing named colors
When a design is imported into the current document (e.g. import from the , import a XAR file or paste objects in from another design) if there are any named colors in the imported design which have the same names but different color values as colors in the current design, an alert appears as follows:
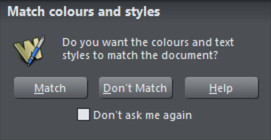
If you want the imported objects to inherit the colors of your current design, choose the "Match" option. This makes all objects using a given named color use the existing instance of that color as it appears in the current document.
Alternatively if you want the imported objects to keep their own independent colors, select the "Don't Match" option. This adds new named colors into your design, with a number appended to the color names to distinguish them from the colors already in the current design. This allows the imported objects to keep their original colors.
Note that if you import objects from lots of different designs and choose "Don't Match" each time, you will end up with a large number of separate Named Colors on your color line. This is rarely useful. So a better option is to use the Replace Color facility described above to change the colors of objects where you don't want them to pick up the theme colors of your document.
The same prompt is shown if there are Text Style definition differences between the document and the imported design. So seeing this prompt does not necessarily mean that there are different named color definitions – it could just be due to Text Style differences. See the Text Styles section of the Text Handling chapter for details.
The match prompt above includes a "Don't ask me again" checkbox. If you check this, the option you choose will be assumed for all future imports, without asking you again. However this only applies during the current session, so after a program restart you will be asked again on the next import if there is a color clash.
Using the Match option means that you can choose a template, change its theme colors and then import more templates of the same theme and the imported designs will immediately pick up your modified theme colors.
For example, import a red graphical button from Elements, change its main theme color from red to green, then import a red logo graphic of the same theme and choose the "Match" option. When the logo appears in your design, instead of being red it will have picked up your chosen green theme color automatically. Since most themes have their main theme color named "Theme color 1", you will also usually get good results when importing graphics from different themes and matching the colors.
Make Named Color local to Frame/Layer
|
|
When you click this button, a new named color is created which is identical to the one you have selected. |

This new color is then applied to all objects in the current frame or layer that use the selected named color. This means that with one click you can localize a color to the frame/layer. You can then independently edit the original color and this localized color.
This feature is useful when you are creating animations and you want an object's color to change part way through the animation.
This button is dimmed unless you are editing a named color that is also used in another frame or layer.
Copyright © Xara