Multi-page Documents
Xara Designer Pro supports multi-page documents to make DTP and website building projects simple.
You can easily create documents that are comprised of many pages, for example newsletters, PDF eBooks, brochures, small magazines or even complete HTML websites. When working on a website document, each page in the Designer Pro document is exported as one page of the website.
By default when you open or create a new web document, Designer Pro shows only one page. Print documents however are displayed in multiple page view by default. Right click a page and select/deselect Multiple Page View to toggle between display modes.
Double page spreads in multi-page documents
|
|
Your illustration may run across two facing pages. This is called a double-page spread. |
|
|
Single |
Double page |
|

To switch between single or double-page spreads, right click the page and choose "Page options", and then check or uncheck the "Double-page spread" option.
Note: If All pages in document the same (on the same Page Options tab) is turned on, then any changes you make will apply to all pages in your document. So if you want only some of your pages to be double-page spreads, turn off the All pages in document the same option.
If you change from a double-page spread to single pages in an existing document, your spreads will be split into single pages. Similarly, converting to a double-page spread will cause the pages in your document to be "paired up" into spreads.
The result of converting a double page spread document to individual pages, and then back again.
Note: it is possible for objects to overlap the pages of a spread (i.e. on pages 1 and 2 in the illustration above) but not over separate pages or spreads (i.e. 1 and 3; if you did want to do this, you would need to copy the object from page1 and paste it on to page 3 so that it appears there as well).
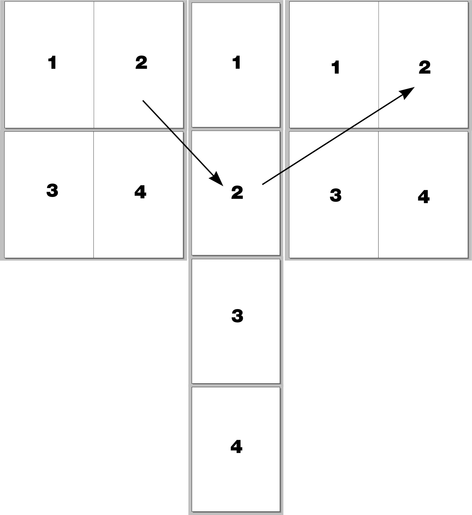
The current page
If you click a page in a multi-page document it will become the current page.
|
|
The current page is relevant when inserting, duplicating, or moving pages as described in the following sections. The current page in the document is shown by indicators on the page's corners. |

Inserting pages into your document
Right click a page and choose New Page or New double page spread. A new blank page is inserted after the page.
or
Right click a page and choose Duplicate current page. A duplicate of the current page is inserted after the page.
|
|
The new page will be the same as the original page, including its size and orientation, and will include all its content so that you can use it as a template for new content.
You can also use the Menu items under "Edit" > "Pages" |
In addition, the standard toolbar has a flyout bar which allows you to add, duplicate and delete pages quickly.

Hold the mouse pointer over each icon in the bar to see a tooltip for each available operation. You can add a new blank page, duplicate the current page or delete the current page.
Copying and pasting pages
You can copy and paste whole pages in the current document or paste pages to another document. This copies the page dimensions, layers and other page attributes in addition to all the objects on the page.
To copy the current page, clear any current selection by pressing Esc or by clicking on an empty part of the page or pasteboard. The status line says "No objects selected". Right click an empty part of a page and choose Copy Page (or press "Ctrl + C").
When you paste a copied page, it is added immediately following the current page. To paste use "Ctrl + V" or right click the page and choose Paste > Page from the context menu.
Note: If the document into which you paste a page has the All pages in document the same option enabled in File > Page Options, the dimensions of the pasted page will be overridden by the page dimensions of the document. So the new page will be given the same dimensions as all the other pages in the document.
New page from template
|
|
To insert a new page into your document using a pre-designed template, open the Elements, import your chosen page. The new page is added immediately following the current selected page. |

Automatic addition of pages
If the Automatically create new pages option is turned on for a text area, a new page will be added to your document automatically if you enter text into the text area so it overflows.
Simply click on the arrow at the bottom of the text area and select Automatically create new pages. You can also find this option is in the Advanced text properties dialog, which you can get to by right clicking in text and choosing Advanced text properties…
With this option on you can add any amount of text to your document without ever adding a page manually.
See Text areas for more detail.
Copyright © Xara