Exporting files
To export a file:
- Right click and choose Export
- Or select "File" > "Export".
- Or press "Ctrl + Shift + E".
An Export dialog box will appear. Choose a name for your file, and select the required format from the Save As Type dropdown list. Some of the supported formats are detailed below.
Exporting as PDF (Photo & Graphic Designer and Designer Pro)
The PDF format is an ideal way to distribute your document for a variety of uses. It can be used to supply artwork to a printing company, or it can be used to import in to other programs such as Adobe Illustrator 9 and later. This is described in detail in the next section.
Exporting to a Word document
Select "File" > "Export" and then choose the Microsoft word (.docx) option from the drop-down menu.
Exporting as AVI
Select File > Export animation and choose the AVI type from the type list. Click the Options button on the file dialog to change the codec and other settings used for the export.
Exporting HTML (Web Designer and Designer Pro)
You can easily create multi-page websites with full WYSIWYG (what you see is what you get) using the HTML export option. See the separate chapter Web Graphics & Websites for a detailed description!
|
|
You can use "File" > "Export website" or press the 'Export website' button on the Website toolbar to export HTML quickly, to save choosing HTML from the long list of export formats shown in the File->Export dialog. |

Exporting as Xara EPS (Photo & Graphic Designer and Designer Pro)
This saves the document as an EPS file. It is the recommended EPS format for exporting to (for example) DTP programs, as all information is retained.
Exporting as ArtWorks EPS (Photo & Graphic Designer and Designer Pro)
This saves the document so that you can load it into ArtWorks, Computer Concepts' illustration program for Acorn RISC computers. Files in this format cannot be loaded into other programs on the PC. Some features, such as transparency, do not exist on ArtWorks.
Exporting as Adobe Illustrator EPS (Photo & Graphic Designer and Designer Pro)
This is recommended for older versions of Adobe Illustrator (for version 9 onwards we recommend using PDF export, see above).
Exporting as SVG
Export either the currently selected objects or the whole page area as an SVG (Scalable Vector Graphic) file.
The export dialog allows the setting of a dpi value (96 dpi default) for bitmaps should they be included on the page and also the following formatting options:
- Pattern (Inkscape)
- Clip path (Adobe)
- Non-repeating as clip path
Exporting as Windows metafiles (.wmf)
Files in this format can be read by Word and several other programs.
Exporting as Extended Metafile Format (EMF)
Modern Windows applications support this enhanced type of vector graphic format. This format is also available to applications that provide a Paste Special menu option.
Note that Xara Designer can contain features, such as advanced fill styles, that cannot be represented in vector formats such as EMF. In this case parts of the image will be exported as bitmaps. Those vector parts that can be exported as vectors are exported as vectors.
Exporting as a bitmap
JPEG, GIF and PNG are universal formats supported by most modern computer applications. PNG is the highest quality. JPEG is better suited to photographic work, but can produce acceptable, compact files (you can control the quality and file size).
GIF format only supports 256 colors, and although common on many websites, PNG is a better format. PNG also supports semi-transparent graphics (use the True Color + Alpha option), but this is not correctly supported by older Microsoft Internet Explorer versions (it is by all other web browsers).
The fewer colors you have in a file, the smaller the file and the lower the quality. However, when using 256 colors or less Xara provides very advanced techniques to simulate a much wider range of colors, and so you can get very high, near photographic quality results using only 256 colors or less.
See also GIF, PNG, BMP and JPEG export dialog overview.
Important
|
|
Bitmaps are output at the current view quality so for best results make sure that "Window" > "Quality" or the slider on the Standard control bar is set to anti-aliased. |

Exporting a Photoshop PSD file (Photo & Graphic Designer and Designer Pro)
Photoshop is a bitmap editor, so when exporting to PSD format all the vector objects in Xara are rasterized. You can select the resolution (dpi) when exporting.
Always save your work in Xara prior to exporting. Then, if you wish to alter your original objects in the future, just run Xara, make any changes and then export the required objects again.
To export as a PSD file choose "File" > "Export" then select Adobe Photoshop in the Save as Type list.
PSD Export settings
The PSD export dialog gives you several options.
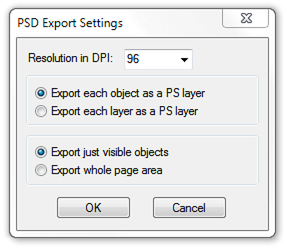
Resolution in DPI
A DPI of 96 is the normal Windows screen resolution, and so exporting at 96dpi will appear in Photoshop at the same size at 100% as it does at 100% in Xara. For print work you should choose a higher DPI.
Export each object as a PS Layer
Xara objects are mapped to PS layers so each object becomes a separate layer in Photoshop. This is a good fit between the two applications, because whereas in Photoshop effects and blend modes are applied to whole layers, in Xara the same tools are applied to objects, not layers. So it's more useful to map Xara objects to and from PSD layers where they will remain editable. This is the default option.
Export each layer as a PS Layer
Each Xara layer is exported as a separate layer in Photoshop. All objects on the same layer (including the layer names) are exported as one bitmap. If you choose this method and want to have objects like text and transparency (blends in Photoshop) remain editable then they have to be placed on their own separate layers before export. If objects using different types of transparency are combined on the same layer in Xara, an alert - warning you of this will pop up when you export.
Export just visible objects
Exports all visible objects on the page and pasteboard areas.
Export whole page area
Exports the whole page area together with visible objects on the page area only.
Transparency and layers
Xara's transparency types are all compatible with Photoshop transparency (blending mode) types (apart from Enhance mode). But because Xara Designer is vector object-based, it's possible for each individual object to have its own transparency type and value. In Photoshop this is not possible, and you can only set the opacity or blending mode for a whole layer.
If you are exporting using the legacy method of mapping Xara layers to Photoshop layers rather than the default option of exporting Xara objects to Photoshop layers - then combining objects that use different types of transparency on the same layer in Xara will prompt an alert - warning you of this when you export. This may look OK when you export.
Text
You can export text from Xara to be editable text in Photoshop, but the text must be on a layer on its own (on import you may be asked to update the text objects for them to be editable in Photoshop.)
Text that is on a layer with any other graphic objects will be rasterized into that layer, and thus not be editable. So for this reason it is recommended that you choose the default export option - Export each object as a PS layer.
Export DPI
You will be able to set the DPI of the bitmaps in the exported PSD file.
|
|
A DPI of 96 is the normal Windows screen resolution, and so exporting at 96dpi will appear in Photoshop at the same size at 100% as it does at 100% in Xara Designer Pro+. |
For print work you should choose a higher DPI.
You can select to export the whole Xara page area or just the areas of the visible objects only.
Exporting as Microsoft XPS (XML Paper Specification) (Designer Pro only)
This is an entirely new "page description" file format invented by Microsoft. Designed for Vista, this is also supported on older versions of Windows by getting a free download. The benefit of XPS format is that it is vector based, and so is ideal as a resolution-independent portable document format. Fonts are embedded into the document and so you are ensured very high quality WYSIWYG documents. If you're using Windows Vista or later, you can view and print these documents directly. If you're using older versions of Windows, you can obtain a free XPS Viewer download from the Microsoft website, enabling the viewing and printing of these files.
It should be noted that the Xara XPS export does not use the Microsoft standard XPS print system, but writes XPS files directly, which ensures far higher fidelity and far smaller XPS files.
XPS supports advanced vector features such as transparency, CMYK colors and embedded fonts.
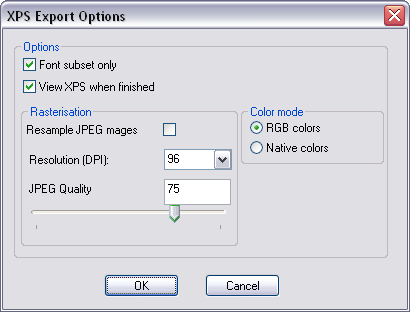
XPS export dialog
Font Subset: Any fonts used in your document are automatically embedded into the XPS document to enable the viewer to correctly display all text. Selecting this option embeds fonts containing only those characters used in the document. This can significantly reduce the XPS file size.
View XPS when finished: This will automatically open the XPS viewer and display the saved file.
Rasterization
XPS is a vector format, but it doesn't support some of the advanced effects, fill and transparency types supported by Xara. Files containing, for example, objects with feathered edges will result in that object being rasterized, that is converted into an alpha-channel bitmap. The resolution of this rasterization process is controlled by these fields.
Resample JPEG images
JPEG photo images contained in a Xara file are usually embedded as the full resolution original JPEG file (and is thus a lossless process). However, for many applications this might be overkill. E.g. a typical modern digital camera can easily create a 4Mbyte JPEG file, 3000 pixel across or more. If this is placed on the page in Xara and scaled to be say 2 inches across, that photo would be at a resolution of more than 1500dpi – way more than is required for any printing application. (The resolution of bitmap object is shown on the Status line in Xara).
You can therefore choose to resample JPEG photos to a lower resolution more suited for viewing on screen (e.g. 96dpi) or printing (typically not more than 300 dpi)., and thus reduce the size of the XPS file. The JPEG quality slider controls the quality of the resampled JPG. The lower the quality, the smaller the resultant XPS file. A quality of 85 is the recommended setting which is actually a very high quality image.
Color Mode
XPS files, like Xara documents can contain a mix of both RGB and CMYK colors. However, the XPS viewer shows CMYK colors as color corrected for the printer. Xara on the other hand shows all colors (CMYK and RGB) as screen colors or printer colors (depending on the Show Printer Color menu option). This slightly different approach to displaying colors can result in significant differences between RGB and CMYK version of the same color. In Xara, for example, cyan is shown as the same color on screen whether it's been defined as CMYK or RGB. XPS displays the same color completely differently.
Selecting the RGB colors option will force all colors to be converted to RGB to provide consistency with the way Xara displays colors. Selecting Native colors will export objects using whichever color model you've used in Designer Pro+, but this will likely result in color changes where you've mixed RGB and CMYK colors in the same document.
Copyright © Xara