View tab
This page describes the View tab of the Utilities, Options dialog of Photo & Graphic Designer and Designer Pro.
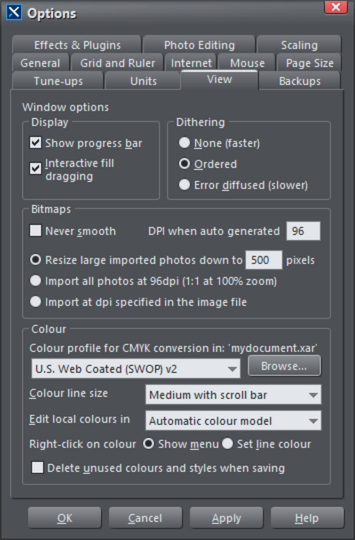
Display
Show progress bar: During long operations Xara can display a progress bar on the status line. If instead you'd prefer an hourglass to replace the mouse pointer until the operation is completed, uncheck the Show Progress Bar setting.
The hourglass and progress bar are for information only-they have no effect on the document itself.
Interactive fill dragging: Interactive fill dragging allows you to see how fills and transparencies look as you drag the fill handles. This is on by default.
Dithering
These options set the dithering method used to display your document on the screen.
It is recommended that you leave this on its default setting.
Bitmaps
These options apply only to the current document. They have no affect on any other documents currently loaded.
Never smooth: When Xara scales a bitmap, it usually smooths (interpolates) between the individual pixels to give a smooth look to the bitmap. Usually this gives the best results. Check this option if you if you do not want this effect.
DPI when auto-generated: Some features such as shadows and bevels are created using bitmaps. Xara calculates the resolution of these bitmaps when they are displayed. However, when you perform actions on shadows and bevels such as Convert to Editable Shapes, Combine Shapes, Export as EPS and Export as Flash, Xara creates a new bitmap using the resolution you specify here. For on-screen use (such as web page graphics) 96 DPI is the best value. For work that will be printed, you may need a higher value. Changes to this value apply to new auto-generated bitmaps; it has no effect on existing bitmaps.
The 3 radio button group allows you to choose how large photos should be handled when you import them. Given the large size of digital camera photos, often if you're working on a document the photo you import will be many times the size of your page.
Resize large imported images down to ... pixels: This is the default option. Large images are scaled down to a more manageable 500 pixels wide, or whatever size you set here. The document zoom is not altered.
Import all photos at 96DPI (1:1 at 100% zoom): With this option the DPI of the image is ignored and it is loaded as if the DPI is 96 (screen 1:1 size). So if an image is 1000 pixels wide, it will display as 1000 pixels wide in Xara. Also Xara will automatically zoom out if required, so that the whole photo fits into the view.
Import at dpi specified in the image: With this option, any DPI value specified inside the image itself is read and the image is imported at that DPI. Note that some digital cameras write incorrect or unhelpful DPI values into photos and so this option may not always give you the results you expect.
Note that the above import options do not apply to photo documents. Photos are always imported/opened at their full size in photo documents.
Color
Color profile for CMYK conversion: Select an ICC color profile to use for on-screen CMYK conversation.
Click on Browse to select an ICC profile from your device to embed within the document. The profile selected will be used when exporting to PDF/X by default. Click here for more information.
Color line size:This lets you select the size of the color bar at the bottom of the screen. A scroll bar is displayed when the number of colors is wider than the width of the color bar.
Edit local colors in: This affects the color model displayed when editing a local color.
Automatic displays the color model of the original color style that the local color is based upon. For example, the HSV color model for a color style defined in HSV. This is important if you need to ensure your objects are in CMYK, for example.
The other options let you select which of the four color models (RGB, CMYK, HSV, grayscale) to always use by default.
Right click on color: This option is to turn off the color-line right-click menu and make right click set the line color.
Delete unused colors when saving and loading: When this option is selected, any unused named colors in your document will be deleted when you save/load. This prevents your Color Line becoming cluttered with named colors which are not used in the design. This is particularly useful when loading older designs, because earlier versions of Xara used to create named colors implicitly. So many older designs contain numerous unused named colors. Load them with this option turned off and it's hard to identify the important used named colors on the Color Line from the unused ones.
Copyright © Xara