Snapping
Snapping makes it easier to position edges, or specific points on objects, exactly where required. It can be used to align edges to a specific point or line, or to evenly space objects, using the grid.
Xara offers three types of snapping:
- Snap to grid
- Magnetic snapping (snap to objects)
- Snap to guidelines or guide objects.
Grid snap is useful for making objects evenly spaced, or making the sizes exact multiples of a given value. Guidelines are useful for aligning edges (although it's a lot more powerful using guide objects) and lastly magnetic snap is a general purpose way of accurately positioning lines, points or object edges relative to other objects or to the page center or edges.
Snap to grid
When Snap to Grid is selected, grid points act like magnets. Right click on the pasteboard and choose "Snap to" > "Snap to Grid" or use the menu option "Window" > "Snap to grid", (or press "." (decimal point) on the numeric keypad). You can control the grid spacing from the options dialog (right click and choose Page Options or use the menu command "Utilities" > "Options") on the Grid and Ruler tab.
When dragging objects the edges will snap to grid points. If the size of the object is such that opposing edges can't both be snapped, the edge that snaps depends on the direction the object is dragged in.
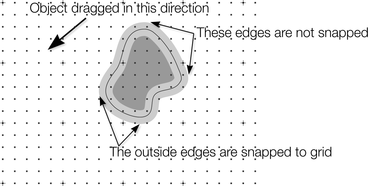
This shows a coarse grid with 5 subdivisions between major divisions. The shape has a very thick gray outline. Because the object has been dragged down and to the left, the lower and left outside edges are snapped to the nearest grid point.
Note: The default grid spacing is 50 pixel spacing for major grid lines with 50 subdivisions. This means the grid is spaced at exactly one screen pixel and so may appear not to be working at a normal 100% zoom. If you zoom in to say 500% then you can see it does snap correctly.
Alternatively, change the grid values to have, say, 10 subdivisions which means that the grid points are on 5 pixel boundaries.
Snapping and line widths
|
|
The Scale line widths control on the Selector Tool InfoBar affects whether snapping happens to the bounds of objects including their outlines. |

The above example shows a shape with a very thick gray outline. It also shows (thin black line) the outline of the shape itself (you can see the thick outline is drawn equally on either side of the center line so that it partly overlaps the inside of the shape and partially goes outside).
With scale line widths on, the width of the outline is deemed to be important and so 'snap to grid' will snap the bounds of objects, including outlines, to the grid. Snap to objects will allow you to snap using the bounds or the outline center lines. If the outlines as they appear on screen are small, so there is little difference between these two snapping positions, bounds snaps are favored. So zoom in if you want to snap outline centers in this case.
With scale line widths off, 'snap to grid' and 'snap to objects' will snap the center lines of objects, ignoring the outline widths.
Because snapping honors the Scale line widths switch it means that the bounds used by snapping are always the same bounds that are reported in the Selector Tool InfoBar.
Magnetic object snapping (snap to objects)
Magnetic object snapping makes it much easier to accurately position objects relative to each other or relative to the page center or edges.
So, for example, if you want several lines to start at exactly the same point, or want a line to exactly join the edge of a circle, then using "magnetic object snap" is useful.
You can even use this to align the centers of objects, or align objects to the center of the page, or align them horizontally and vertically anywhere in the middle of the page.
Magnetic snapping works when either moving or scaling objects using the Selector Tool.
|
|
To toggle Magnetic snapping to objects on and off, click the Snap to Objects button in the top toolbar. Alternatively right click the pasteboard and choose "Snap to" > "Snap to Objects", or use the menu option "Window" > "Snap to objects". You can also toggle it on/off during dragging by tapping 's'. |

Click and drag on the object you want to snap. As you drag, Xara displays a magnet icon, blue lines and red points whenever you are near a "point of interest" that it has snapped to.
Snap indicators

Snap indicators are shown whenever a snap occurs. That is whenever a point of interest on the object you are dragging comes in range of a point of interest in the document (which could be on another object or be part of the page). Xara snaps to the point of interest and the mouse pointer changes to show a magnet symbol so you know a snap has happened. Also further indications are shown dynamically on screen to help you see what snap has occurred.
- A red dot indicates that a specific point has snapped
- A blue line indicates a snap to some feature of another object (e.g. to the edge of a rectangle).
- An orange line indicates a snap to a page feature (corners, edges, center)
The snap indicator lines pulse to show that they are temporary "live" indicators and to help them be seen over different background colors.
The snapping distance is controlled by the Mouse tab of the Options dialog box ("Utilities" > "Options" or right click a page and choose Page Options).

You can specify two snap distances in the "Magnetic snap radii" section, which control how close things need to be before they will snap together. The size of a circle around points (point) and the distance either side of lines (lines). It's usually best to make the point value larger than the line value, so that it's easier to snap to the end points of lines.
Customizing Designer has full details of the Options dialog.
Snapping modes
You can change the behavior of snap to objects while dragging by tapping a key to toggle different modes on and off. These mode changes are effective only for the duration of the current drag.
|
S |
Toggle 'snap to objects' on and off. This temporarily overrides the Windows->Snap to objects setting. |
|
G |
Group snapping. By default, to minimize the complexity and numbers of snapping lines shown, objects inside groups are ignored and only the bounds and center of the whole group are considered for snapping. Pressing G turns on group snapping so that objects inside groups also contribute to snapping just as if they were not grouped. |
|
A |
Angled snapping. See Angled snapping below. |
Snapping to original position
When 'snap to objects' is on and you drag an object to move it, the bounding box of the original position of the object is indicated by a red dashed rectangle. This also contributes to snapping making it easy for you to (for example) move an object in one dimension only. However note that you can also constrain the angle of any drag by holding down "Ctrl" while you drag.
Angled snapping
Xara is not restricted to axis-aligned snapping. With Angled snapping turned on, the snapping system can snap parallel lines, whatever their alignment, and find the intersections between crossing line constraints. So for example you can snap the edge of a shape that runs at 30º with the edge of another running at the same angle.
Angled snapping is not on by default, because in most cases it's not useful. To activate it while dragging, simply press the 'A' (for Angle) key. Press again to turn off.
Snapping notes
Note: Only the objects that are fully or partly visible in the current view are considered for snapping. You cannot snap to objects outside the view (except the page).
Note: Snapping distances are measured in screen pixels so if you have several snapping positions close together it's best to zoom in to make sure you snap to the one you want.
Note: When snapping text to text, the baseline of the text is favored over any other snaps that are within snapping distance. This makes it easy to vertically align one text object to another with matching baselines, which is normally more useful than snapping the centers or bounding boxes of text for example.
Copyright © Xara