Clip Tool
Alternatively you can enter Clip Tool by selecting the Clip icon on the Photo Tool fly-out bar. This provides a range of additional crop options. You can enter exact pixel values, and select from various crop aspect ratios
|
|
For interactive clipping and some more options regarding aspect ratio, enter the Clip Tool with the Clip Tool button. |

This alters the InfoBar to look like this:

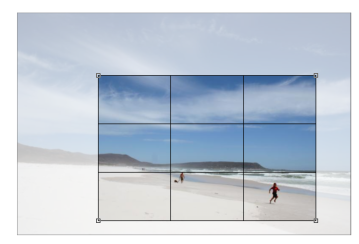
As you drag over the photo, the clip rectangle is highlighted.
- You can adjust the region by dragging on the corner or side handles
- You can push the region around by just dragging inside the clip region
- Select the Clip button or just double click inside the clip region to perform the clip operation.
You can tell whether a photo has been clipped or not from the status bar which will describe it as a "clipped photo".
Clear
Press the "Clear" button, or just click outside the marked clip region to clear the current clip rectangle.
Un-clip
Press the Un-clip button with any clipped photo selected, to restore the original photo. This restores the clip rectangle, which you can adjust or clear by clicking outside it.
The Un-clip button in the Clip Tool will change the outline of any clipped photo, and also arbitrarily formed shapes with a bitmap fill, to that rectangular outline of the complete photo or bitmap used as the fill. You may have to select the Clear button to clear the crop rectangle (or click outside the rectangle).
Adjusting the clip region
Because the un-clip button restores the clip rectangle (showing the area outside faded), you can easily make fine adjustments to a clipped photo. Just select the photo, press the Un-clip button and adjust the sides of the clip rectangle as required. Double click inside the photo to clip it again.
Width / Height
After drawing a clip rectangle, you can enter values directly into the width and height fields on the InfoBar to set the clip rectangle dimensions to exact values.
Lock Aspect
Select the "Lock aspect" check-box to constrain the clip rectangle to a specific aspect ratio as you drag. The radio buttons to the right of the check-box determine the aspect ratio used. Select "Current" to maintain the aspect ratio to that of the photo before the clip. Note that the clip rectangle automatically changes between landscape and portrait orientation as you drag a corner of the rectangle. So if you drag sideways it tends to create a clip in landscape orientation. If you drag downwards more, then it will create a clip region in portrait orientation.
The common preset crop aspect ratios are available of 4:3 (most consumer digital cameras and old-style TVs and monitors), 3:2 (that of traditional film cameras and higher end SLR digital cameras), and 16:9 (aspect ratio of widescreen TVs).
You can override the lock-aspect option by using "Ctrl" while dragging. So if you're dragging out a clip rectangle (or adjusting one) without aspect ratio lock, then holding "Ctrl" will lock the aspect to the last selected aspect ratio. Similarly if you have lock aspect option on then "Ctrl" will temporarily un-lock the aspect ratio.
Clipping in Photo Documents
In photo mode, there is a one-pixel grid applied to the photo (when at 96dpi, the default resolution) and the clip rectangle snaps to this grid. This makes it very easy to get pixel exact clipping. For highly accurate or exact pixel snapping, it's recommended to operate in photo mode and to zoom in so you can see the pixels clearly.
See Photo documents for more information.
Copyright © Xara