Content Aware Photo Resize
Phot & Graphic Designer and Designer Pro include the ability to stretch photos using a new technique that retains the proportions of key aspects of the photo.
The human eye is particularly sensitive to changes in aspect ratio of everyday objects, and most people can tell something is wrong with images that are even slightly squashed or stretched.
|
|
Here is an example photo of the famous Torii Gate in Japan. Clearly the gate itself is the main subject of this picture.
|
|
|
|
Here the photo has been stretched using the normal stretching method of the Selector Tool. Even with this moderate stretching it's obvious the proportions of the gate have been badly distorted. |
|
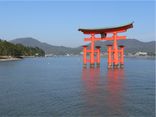


Stretching using Content Aware Scaling. It still looks perfectly natural. The gate proportions are intact, even at this extreme stretch, which is twice as wide as the original. The stretched coastline remains looking natural.
Preparing Your Photo
The content aware scaling feature is part of the Photo tools.
|
|
Select your photo and from the Photo Tool fly-out bar. Select the Content Aware Scaling button. The right end of the InfoBar will now show a set of buttons. |


Select a photo, go into the Photo Tool, and the InfoBar should look like this;
First click the Prepare button to prepare the photo for the scaling. This starts an analysis of the photo to calculate which parts of the image can be stretched and which parts should be kept. This process can take some time depending on the resolution of the photo, and how many processors your computer has.
For really high resolution images it's recommended that the image resolution be reduced if you do not require the maximum resolution. Do this before you select the Prepare buttons. To reduce the resolution of your photo select the Optimize button and enter a pixel width or dpi resolution into the dialog. The image size on the page will not change, only the resolution or number of pixels inside the photo changes.
Once you've prepared the image, new resize arrows will appear on the sides of the photo. Just drag on these to stretch or squash the image in the desired direction.
Content-aware photo zoom
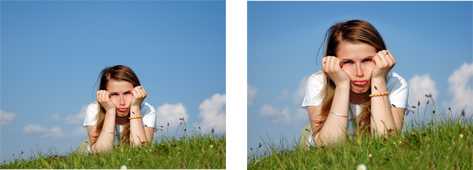
An alternative to content aware scaling is the whereby the photo remains the same size and the content is intelligently zoomed inside it. Here's an example of the effect.
|
|
Use the zoom slider on the InfoBar to control content-aware photo zoom. |

The picture remains the same size, but the program automatically detects and scales (zooms) the 'interesting' content. Note this is not just a crop of the girl, but that every element, cloud, and grass that appears in the original is still there in the zoomed version. The program automatically detects the girl is the 'region of interest' and so enlarges her only.
Using Masks With Content Aware Scaling
Using the Mask Painter tool you can provide further control by protecting areas of the picture from being distorted. Masked areas will not be distorted at all. See the Masks chapter to find out more about masks, but here's a brief summary of how to use masks with Content Aware Scaling.
To protect one or more areas of the photo from being distorted;
|
1. |
Select the Mask Painter tool from the Mask tool flyout bar and mark the part or parts of the photo you wish to protect. |
|
|
2. |
Now go into the Content Aware photo resize tool and click on the photo. |
|

Now when you use the Prepare button this area will be protected from distortion. You may need to select the photo to enable the Prepare button.
Note: You can't mask more than half the image. The prepare operation will give an error if you try this.
Adjusting a mask, or adding a new mask
You can't add a mask to an image that has already been stretched. Instead, if you want to add a new mask or adjust an existing one, you have these options:
- Click the Reset button and draw a new mask
- Click undo as many times as necessary to get back the mask, and then use the mask painter tool to adjust the mask shapes.
- Or, before you select the Prepare buttons, copy the mask to the clipboard. If you want to use this later, perform a Reset on the image, then re-enter the Mask Painter tool and paste the shape back onto the mask layer.
There is another alternative that you can 'fix' a stretched image using the Optimize feature, and then apply a new mask. This is not recommended in most cases because it will produce lower quality results than resetting the image and applying a mask to the original image.
Alternative Content Aware Scaling
When stretching photos there are two alternative ways to scale the image. The method of just dragging the size arrows sometimes doesn't work so well with some image types.
However by holding the "Alt" key when dragging one of the side handles in the Content-aware photo resize Tool performs a different intelligent scale using an alternative algorithm.
Content Aware Scaling notes
- You can only compress an image to half its initial width or height
- If you save a document with a photo that has been prepared for Content Aware resizing, then it saves the resizing information in the document. The advantage of this is that you can later re-adjust the photo using the Content Aware feature. There is a significant file size overhead of saving photos like this.
Copyright © Xara