Publishing to your web host
1. FTP web host is the default selection shown when clicking on the publish icon  on the top toolbar.
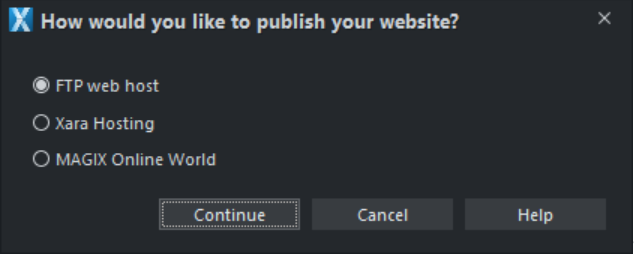
2. Click on continue to enter your FTP web host details.
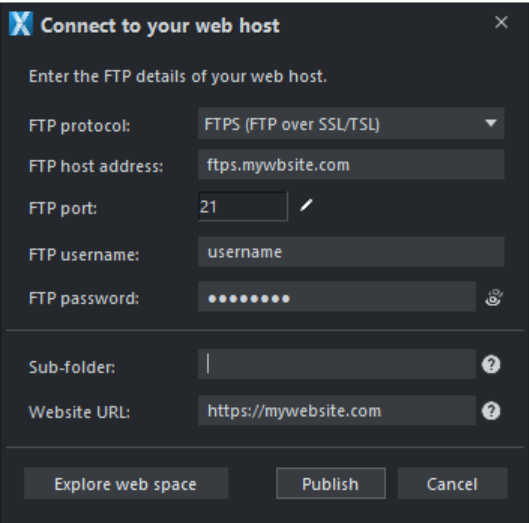
3. Complete your FTP details
FTP Protocol:
Apart from standard FTP (file transfer protocol) Xara also supports the more secure FTPS and SFTP protocols. Some web hosting require you to upload your site using one of these instead of insecure FTP.
Click on the dropdown menu following Connect using: on the Other web host settings dialog and you will see the following options...

Choose from one of the three options - there is the normal FTP option and then the secure FTPS and SFTP options. You will need to know which of the FTP protocols your hosting company supports first - and then fill in your FTP details as described above.
FTP port:
FTP and FTPS is usually assigned to Port 21 and SFTP is assigned to Port 22 as part of the host's IP network address. This is not something you would usually have to be concerned about as Xara automatically manages this for you, but sometimes in the interests of further security, a host's system administrator will assign a different port number. Click on the edit icon next to the port field to change the value
For further information read our How do I publish via SFTP or FTPS? knowledgebase article.
FTP host address:
The FTP address to connect to your host. Your host will provide this for you and it is often different to your actual website's URL.
FTP username:
This is the username you use to connect. Some hosts will ask you to create an FTP username, others will create it automatically and provide it for you.
FTP password:
The password to log into your FTP account, often different to the password you use to log into your host.
Sub-folder:
If you leave this blank, Xara will publish to the root (top level) folder. If your host requires your website files to go into a specific folder, enter the folder name here. If you need to navigate through several folders, use '/'. For example:
root/website/ . A quick way to set the sub-folder path is by clicking the button labelled Explore web space The dialog allows you to view files and folder on your hosting server, navigate, delete files as well as set up a sub-folder path.
When you have completed the FTP host address, FTP username and FTP password boxes, click the optional Explore web space button. A dialog will open allowing you to browse your hosting directory. Navigate within the folder you wish to publish to and click on the set as subfolder path icon  to automatically populate the sub-folder path.
You can also delete individual or multiple files. Select multiple files by clicking and holding down Shift or Ctrl, as in Windows Explorer. Click on each column header to sort files using that column's criteria.
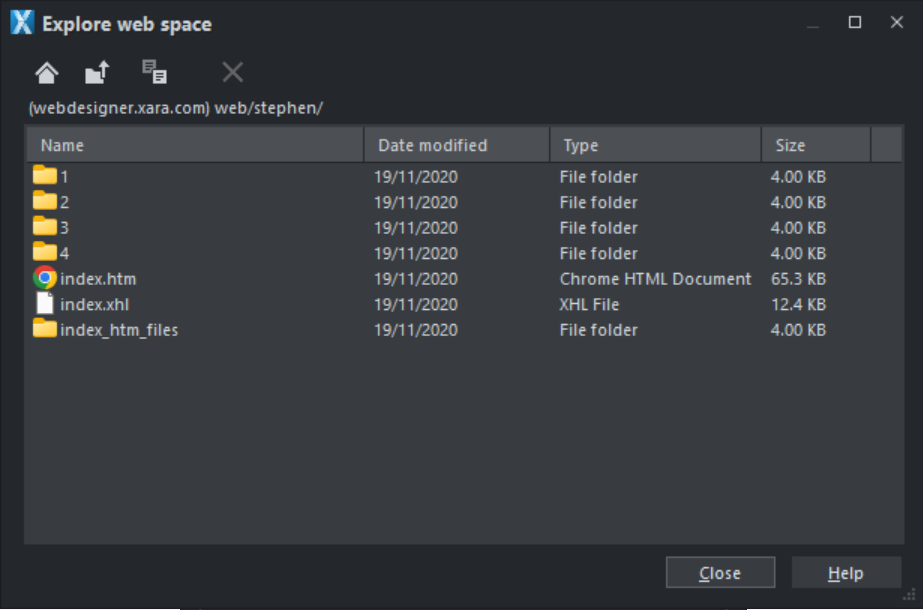
Scroll through a list of files you have uploaded to your ftp server.
|
|
Returns to the original file view that opened when you launched the Explore web space dialog |
|
|
Takes you up a folder level |
|
|
Places the current folder path in the "Other web host settings" > "Sub-folder" field so you don't have to enter it manually. |
|
|
Deletes individual or multiple selected files |


Website URL:
Enter the URL for your website (not the host address) in order to generate a sitemap. Sitemaps are used by search engines to learn about the pages in your website. You can read more about it here - https://developers.google.com/search/docs/advanced/sitemaps/overview#what-is-a-sitemap
Tip: You can set canonical tags to avoid the potential SEO damage caused by 'duplicate content'. Just make sure you enter the URL you want to set as canonical - the one search engines index - in this Website URL field.
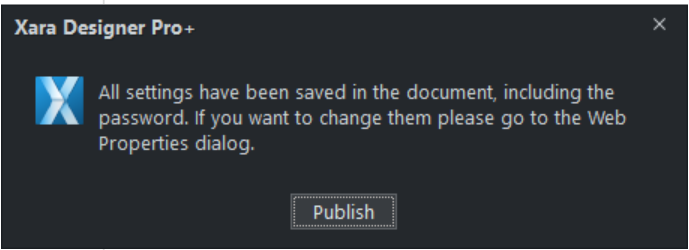
4. Click on the publish button. Your FTP settings including the password will be saved to the document. Click on the publish button again.
After you have clicked Publish, Xara displays a small window that shows the progress of data transmission and tells you when the publish is complete. If you entered your website's URL with the FTP details then you can go straight to it from this location. Alternatively, as soon as the transfer is finished, you can open a browser window and navigate to the URL of your published website.
Important: If you have not set any specific page names in the Page & Layer Gallery, then the name you exported to last will be used as the basis for all the pages in your website. E.g., if you open a template website, and export this as 'test' to your file system, and now publish this, it will be published as test.htm to your web server, and all additional pages will be test_2.htm, test_3.htm etc.
index.htm is the usual name for the first page of a website.
Note: Many web servers use case-sensitive filenames. So, for example, the web address xara.com/products.htm is not the same thing as xara.com/Products.htm. To reduce confusion and the likelihood of errors Xara enforces lower-case for all page names and that they only contain allowable characters. This means that spaces are not allowed in page names for example. We suggest using an underscore as an alternative separator.
Re-publishing my website
A document that has been previously published will have the FTP settings saved within the document
1. Click on thePublish button on the toolbar, or File > Publish website / Publish webdocument / Publish presentation
2. You can review the FTP server and Sub folder here. Once you are happy, click Publish and the process will begin.

Copyright © Xara