Placeholder Tab in Website Properties

The Placeholder tab is used to add and edit manually editable widgets. These are widgets you insert onto your web page by manually pasting in HTML code for the widget or by importing a movie file. You won't normally need to use the Placeholder tab on widgets that you've added from Elements, because the code and files that make those widgets function are handled for you automatically. See the Website Widgets chapter for full details.
To turn any normal object into a placeholder for a widget, select it and then open this tab of the Web Properties dialog. Choose whether you want the widget to be based on a piece of HTML code you've obtained from a widget website or a graphic file. Browse for the file or paste in the HTML code. Click OK and now your object is a placeholder object.
This means the object represents the dimensions and position of the content you've added, but in your exported web page the object is replaced by the actual code or file that you inserted.
However there is an easier way to add files or code to your site. Simply drag and drop an animated GIF files from Windows File Explorer onto your page. A placeholder image is automatically generated for you and is placed on your page. A copy of the file is added to the support folder of your design so that it gets exported and published with your site. When you export and publish your site, the placeholder image is replaced by the actual file you imported.
Similarly if you've copied some HTML code from a third-party widget website, you can simply paste that code into Xara (make sure you are in the Selector Tool when you do this, not the Text Tool or it will be inserted as text!). Xara detects the HTML and uses it to render a placeholder image which appears on your page. You can also add a placeholder for HTML code directly into either the body or head of a page by clicking the HTML code (body) and HTML (head) buttons, which bring up a scrolling dialog where you can paste or edit large amounts of code, if necessary.
When you export/publish your site the placeholder is replaced by the actual code so that your widget functions. See the Website Widgets chapter for more details.
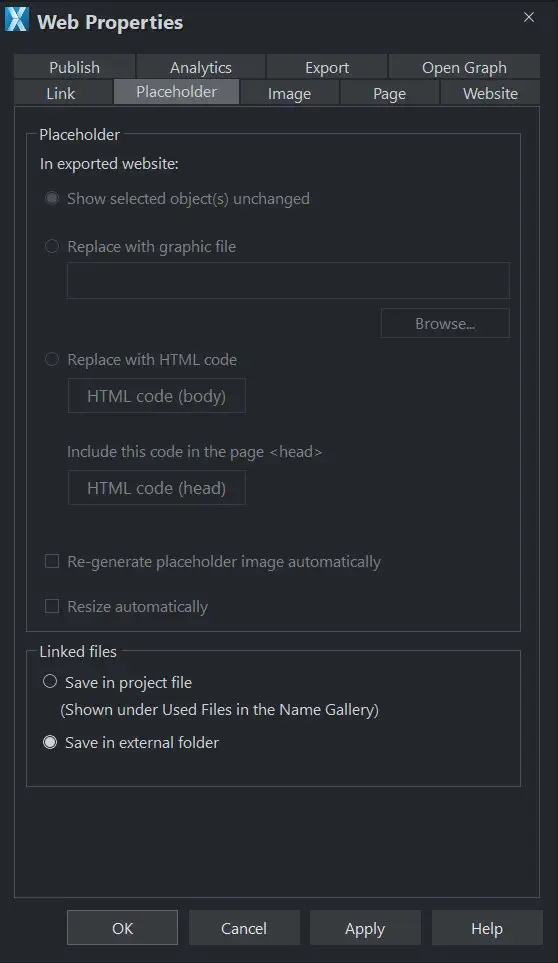
Replace with graphic file
Select this option if you want to insert a graphic or image into your website in place of the placeholder object (eg. a PNG, GIF or other web compatible image file). Use the Browse button to select the file.
The chosen file is automatically copied to the support folder for the current design, so that when you export your website the file will be included in the _htm_files folder along with all the generated images for your site. See the Document Handling chapter for information about support folders.
Replace with HTML code
With this option you can paste HTML code which you've obtained from somewhere else into the head and/or body sections of your page; i.e., between the <body></body> tags or <head></head> tags. For example many sites provide widgets that you can add to your page by pasting the HTML in here. Follow the instructions given by the provider. In most cases you need to add body code only, but some widgets also require you to include some code in the head, which is why the head code option is also provided.
As mentioned above, you can just paste the HTML code directly onto your page instead of inserting it in this dialog (while in the Selector Tool). And using that approach automatically gives you a placeholder image that looks just like the actual widget, so it's the recommended way to insert widget HTML code.
Warning: You need to be careful to insert only code which you know is safe and from a trustworthy source. Invalid or broken code will affect your published web page because Xara simply inserts the code as you provide it, unmodified and unchecked, into your page when it is exported.
If the HTML code that you enter references external files which are expected to be found in your website, then you need to copy those external files into the support folder for your design. See the Document Handling chapter for information about support folders. Once in the support folder, the files will be automatically copied to the _htm_files folder of your website when you export. Therefore you also need to make sure that any references to these files in the HTML code references them at the right location.
Let's take a simple example to make this clearer. Suppose I want to insert a small piece of HTML code which adds an image to my website. The HTML code I add will need to reference the image file somewhere. First I copy the image file, say "myLogo.gif", into the support folder of my document. If the document is "mySite.web", the support folder will be "mySite_web_files". I know that when I export this website, It will export it to the name "index.htm" because the default name for the first page of the web site is always index.htm regardless of the name of the .web file. This means that all the generated images for my site, and a copy of "myLogo.gif" which I put in the support folder, will be exported to the folder "index_htm_files". Therefore I must make the HTML code I'm inserting reference the image file in that location. So I may insert:-
<img src="index_htm_files/myLogo.gif" />
Note that this references the image file in the exported image folder location (_htm_files), NOT directly in the support folder (_web_files), because only the exported image folder gets copied to the web server along with my web page when the site is published.
Of course if I really only wanted to put an image on my website, it's much easier to just import the image into Xara directly! But this is a simple example that shows how to add HTML code which references an external file.
Check Embedding YouTube, GIF And Other Widgets for more examples!
Adding code to page head
Some code needs to be inserted into the head (<head> tag) section of the exported HTML code, instead of to the body (<body> tag) section as it is by default.
To do this, click the HTML code (head) button in the Placeholder, Website or Page tab of the Web Properties dialog and type in or paste your code.
Placeholder objects
Regenerate placeholder image automatically: If this option at the bottom of the Placeholder tab is selected, then the placeholder image gets automatically generated from the content you have added, whenever the content changes or when you resize the placeholder object.
When you paste code or import files directly onto your page, as recommended above, this option is selected automatically for the placeholder image that gets generated. Sometimes it's useful to turn it off after inserting content this way, if you are happy with the preview image and no longer want it to be re-generated if you change the content in some way.
Linked files
Linked files are saved within the project file by default. See External files for more information.
Copyright © Xara