Guide Objects and Guidelines
Guide objects and guidelines are objects on a special layer, the guides layer. A guide layer is automatically created when you create a guideline (see below), or you can create one manually by right clicking in the Page & Layer Gallery and selecting Create Guide Layer (see "Page & Layer Gallery" for more information on layers).
Use Snap to guides in the Window menu (or key 2 on the numeric keypad) to turn on snapping to guide objects.
Any object placed on the guides layer becomes a guide object. These can be any object type including lines at any angle, irregular shapes, and QuickShapes. You can create, scale, and delete objects on the guides layer as usual, but they always appear as thin dotted red outlines; any applied line width or fill color is ignored. This information is retained, and if you later move the object from the guides layer to a normal layer, line thickness, and colors are shown again.
You can use guide objects to draw construction lines such as lines passing through a vanishing point for perspective drawing.
Placing objects onto the Guides Layer
First ensure there is a guide layer in the Page & Layer Gallery, see above. You can create objects directly on the guides layer by selecting it and creating objects as usual.
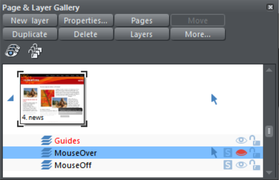
|
The Page & Layer Gallery showing a guides layer above two other layers, and selected. |
You can also cut or copy objects from another layer and then paste those objects into the guides layer. To paste the objects in the same relative position on the guides layer use the keyboard shortcut "Ctrl + Shift + V".
|
Move to layer in front and Move to layer behind on the Arrange menu (or right click and choose "Arrange" > "Move to layer in front/behind") will skip the guides layer and so cannot be used to move objects onto the guides layer.
Creating a guideline
Guidelines are vertical or horizontal lines and are a quick and easy way to align a series of objects on the page.
- Turn rulers on ("Ctrl + L").
- Drag from a ruler onto the page.
Or
- Double click on the ruler to create a guideline aligned to the click point.
This automatically creates a guides layer and puts the guidelines on that layer.
Or, using the Page & Layer Gallery:
- Right click in the Page & Layer Gallery and choose Properties.
- If necessary, click the Guides tab.
- Select horizontal or vertical.
- Click new.
- Type in the required position.
Deleting a guideline
Using the Selector Tool drag the guideline onto the appropriate ruler (the vertical ruler for vertical guidelines, horizontal ruler for horizontal).
Or, right click on the guideline and then choose Delete.
Customers sometimes report objects are added to the document with red outlines or with a transparent fill. This would occur if the guide layer is selected as the current layer from the Page & Layer Gallery. The Gallery can be used to select objects incorrectly added to the guide layer and dragged onto the required layer .
Copyright © Xara