Rotating objects

This is part of the Selector Tool.
|
|
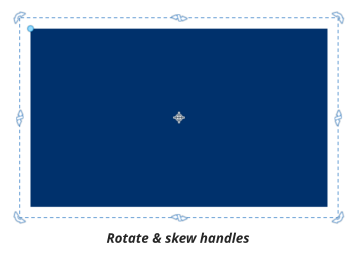
When in rotate mode, the transformation center (around which the object rotates) initially appears in the center of the object, as shown by a small target like this. |
Simply click on an already selected object to change into rotate mode, or click the rotation handles button on the InfoBar.

To move the transformation center:
- Drag the transformation center target where required.
- Or use the 3x3 matrix on the InfoBar for accurate positioning.
|
|

- This moves the transformation center to the corners, the center or the side mid-points of the object or selection. The transformation center aligns with the outer edges of the object. This means that if the object has a thick line applied, the transformation center can be outside of the object.
Attention: If the rotation center is moved, it remains in this location for any selected object until all objects are deselected, at which point it returns to the center of any selected object.
Rotating using the mouse
If you click a second time on an object that is already selected, the selection handles change to show rotation and skew handles. Each time you click, the handles toggle between the two modes. You can also change this mode using the handle on the Selector Tool InfoBar.
Drag on the rotation arrow. As you drag, the object rotates around the transformation center. The InfoBar shows the current rotate angle.
"Shift + drag" to rotate the object around its center (the transformation center is ignored).
Hold down "Ctrl" to restrict rotation to the constrain angles. Note that the set of constrain angles includes those rotations which align the object with the screen. This makes it very easy to 'straighten' any object with a straight edge – just hold down the Ctrl key and rotate until the object snaps to the screen-aligned rotation you want.
The constrain angles are user definable. Refer to "Customizing Designer".
To create a copy while rotating, click "+" on the numeric keypad while rotating, or click the right mouse button.
|
|
To quickly create a fan like this, draw a single line, then position the transformation center in the bottom right (click the bottom left button of the 3x3 transformation center control on the InfoBar), and then as you drag rotate the object, right click for each successive line you require. |

Rotating by exact angles (using the InfoBar)
Type an angle into the rotate box and press Return. Xara will remember the angle of rotation you enter. Positive angles will rotate anti-clockwise and negative angles will rotate clockwise, the same direction as the symbol.
|
|
Click the arrows to the right to nudge the rotate angle. |

Angle values that are entered are absolute, not relative. This means if your object is at an angle of 30 degrees, and you enter 45 degrees, it will not increase it by 45 degrees but rather set it at that. If you wanted to instead increase it by 45 degrees, you can enter #45 to do so (so the angle becomes 75 degrees), and #-45 to decrease the angle by 45.
Some points to note about the rotation angle:
- If several objects are selected that all have the same angle of rotation, that value will be shown in the rotation field.
- If the values are different, the field will show Many. Typing a value will then rotate all objects to that angle around their individual centers.
- Groups have their own angles which is independent from the objects within it.
- When several objects that have the same rotation are grouped, the new group will be given that same angle.
Copyright © Xara