Removing pages from your document
To delete the current page from your document right click and choose "Delete current page/double page spread".
Or to cut the current page, right click an empty part of the page and choose Cut Page.
Or select the page in the Pages & Layer Gallery and click the Delete button. The current page and all its content will be deleted. In the case of a spread, the entire spread will be deleted along with its content.
Navigating between pages
As well as the usual methods of moving through your document (such as scrollbars and the mouse wheel), there are also some other ways to navigate through the pages using the set of keys to the right of your keyboard:
Page up: Moves up the document. The amount moved depends on your zoom level. The further you are zoomed out the bigger the move.
Ctrl + Page up: Go to and center on the previous page.
Page down: Moves down the document. The amount moved depends on your zoom level. The further you are zoomed out the greater the move.
Ctrl + Page down: Go to and center on the next page.
|
Or click the up or down arrow on the status line: |
|

The status line is also useful for knowing what page(s) you are currently viewing.
Note: All of these movements are relative to the page you are viewing, not the current page.
The Page & Layer Gallery also makes it easy to go to find a specific page in your document. Click the Pages button in the gallery, so it shows a simple list of pages. Then as you click on each page in the gallery, the document view is scrolled automatically to show that page.
Pages with different sizes and layers
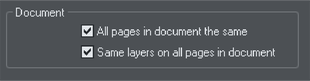
You can choose whether the pages in your document should be all the same size or not, and whether or not all pages should have the same layers. See the Document section on the Page Size tab of the Utilities > Options dialog or right click a page and choose "Page options".
Naming pages
When creating website documents it is important to give each page a name, which is then used to name the HTML file which is exported for each page. If pages are not named the exported filenames will be distinguished from each other only by an index number appended to the filename provided at the time of export. Eg. index.htm, index_2.htm, index_3.htm, etc. Using page names makes it easier to identify each page.
You can set the name of the current page using the Page tab of the "Utilities" > "Web Properties" dialog. Set the Page filename field. Or you can use the Page & Layer Gallery. Click on a page name to select it, then click again to start editing the page name.
Even if your document is not to be exported as a website, you may still wish to name your pages in order to make them easier to find and identify using the Page & Layer Gallery.
Note that page names are forced to lower case and some characters are disallowed. These restrictions are intended to minimize the risk of web page filenames causing problems with some web servers and to eliminate case sensitivity problems when linking to the web pages.
Page & Layer Gallery
You can also use the Page & Layer Gallery to conveniently manage the pages in your document. It allows you to view, add, duplicate, delete, re-order pages all from a single view. For more information see Page & Layer Gallery.
Copyright © Xara