Importing Photos
Xara supports a very wide range of photo or bitmap types including JPEG, PNG, TIFF and (Photo & Graphic Designer and Designer Pro only) RAW digital camera images, as well as many more types. The term "bitmap" is the general term encompassing all types, but interchangeable with the word "photo".
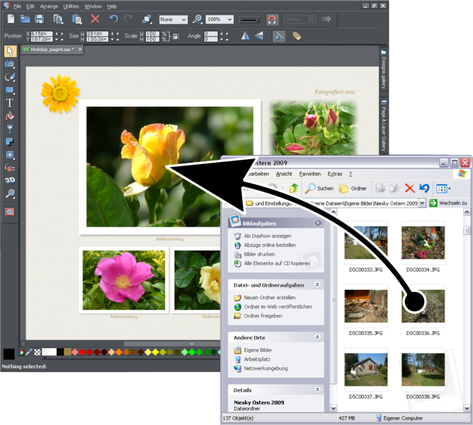
The easiest way to open an image is to drag the photo or bitmap file from your Windows file explorer onto the Xara Designer Window. The photo is imported at the position you drop it. Or you can select the "File" > "Open" or Import menu options.
You can select multiple photo files in the file dialog by clicking with Shift or Ctrl held down to add to the selection, just as in Windows Explorer, to open or import multiple photos.
You can also import stock photos from the through the File menu "File" > "New from Elements". Or you can replace a photo by right-clicking it, and then choosing "Replace photo" > "With Stock Photo" from the context menu.
Replacing photos
If you drag and drop a photo file (from Windows Explorer or from the Bitmap Gallery) onto an existing photo it will replace that photo, but keep the same container or frame size.
The same is true if you replace an existing photo with a stock photo from Elements - right click on your photo and select "Replace photo" > "With Stock Photo".
This makes it very easy to replace photos on templates. You can use the photo adjustment handles to quickly adjust the scale, rotation, and position of the photo inside its outline, as well as being able to resize, rotate and even add rounded corners to the frame itself. This is not true for photo documents, where dropping a photo on the page will always import it as a new photo document.
When replacing a photo or bitmap this way, it is sized to best fit in the existing picture outline. If you hold "Shift" when replacing a photo, the new one will inherit the same scale and rotation as the old photo, instead of being 'best fitted'. This is useful where you've manually adjusted the scale or rotation of a fill and then want to replace the image with another which has the same aspect ratio.
When you drop a new photo onto a Photo Group, the entire Photo Group is replaced, leaving you with a photo object showing the new image.
Using photos as fills
You can also use any bitmap as a fill style for any drawn shape. Simply drag the file over the shape (which can be from your file system, or from the Bitmap or Fill galleries), and hold the "Shift" key down before you drop. This will replace the existing color fill with a bitmap, fitted to the object. Again you can use the smart photo adjustment handles to change the scale, angle, position etc.
Optimization on import
When importing high resolution photos (anything above 1920 pixels either wide or high) into a web document, Xara automatically resizes the photo down to HD screen size without asking you if you want to import a lower resolution version. For a web document, even at the reduced size, there should be more than enough resolution in your photos for high quality results on your website, so it's rarely necessary to import digital camera images at full resolution for web use.
However, if you are importing a large photo into a print or animation document, Xara asks you if you want to import a lower resolution version of your photos. If your document is to include many photos, you may want to choose this reduced resolution option. Otherwise with large photos you may find that your saved design file is much bigger than it needs to be (because it contains a copy of each of your photos) and you may not have enough memory in your computer to load, edit and export your documents.
Automatic conversion to JPEG
The JPEG image format is usually the best choice for photo images, because it maintains high quality with smaller file sizes. So when you import non-JPEG photo files, Xara will examine the image to see if it would be more appropriate as a JPEG. If so, a prompt is shown giving you the option to convert it to JPEG on import. This reduces the size of your document files and reduces memory usage when editing.
When pasting in images from the clipboard, the same analysis is done and the image is imported as JPEG if that's appropriate. This is done silently with no prompts. This is particularly useful when copying and pasting in images from web browsers because although the images are often JPEGs in the web page, some browsers don't communicate this to the clipboard.
Initial Photo size - controlling the image size on import
When you import a photo into a document, by default if it's bigger than 500 pixels wide the photo is automatically scaled down to 500 pixels. This is because it's rarely useful to drop a huge digital camera photo into a drawing document and have it displayed at its full size, so it's scaled down to a more manageable size. You can control how an image is scaled on import from the View tab of the Utilities > Options dialog:
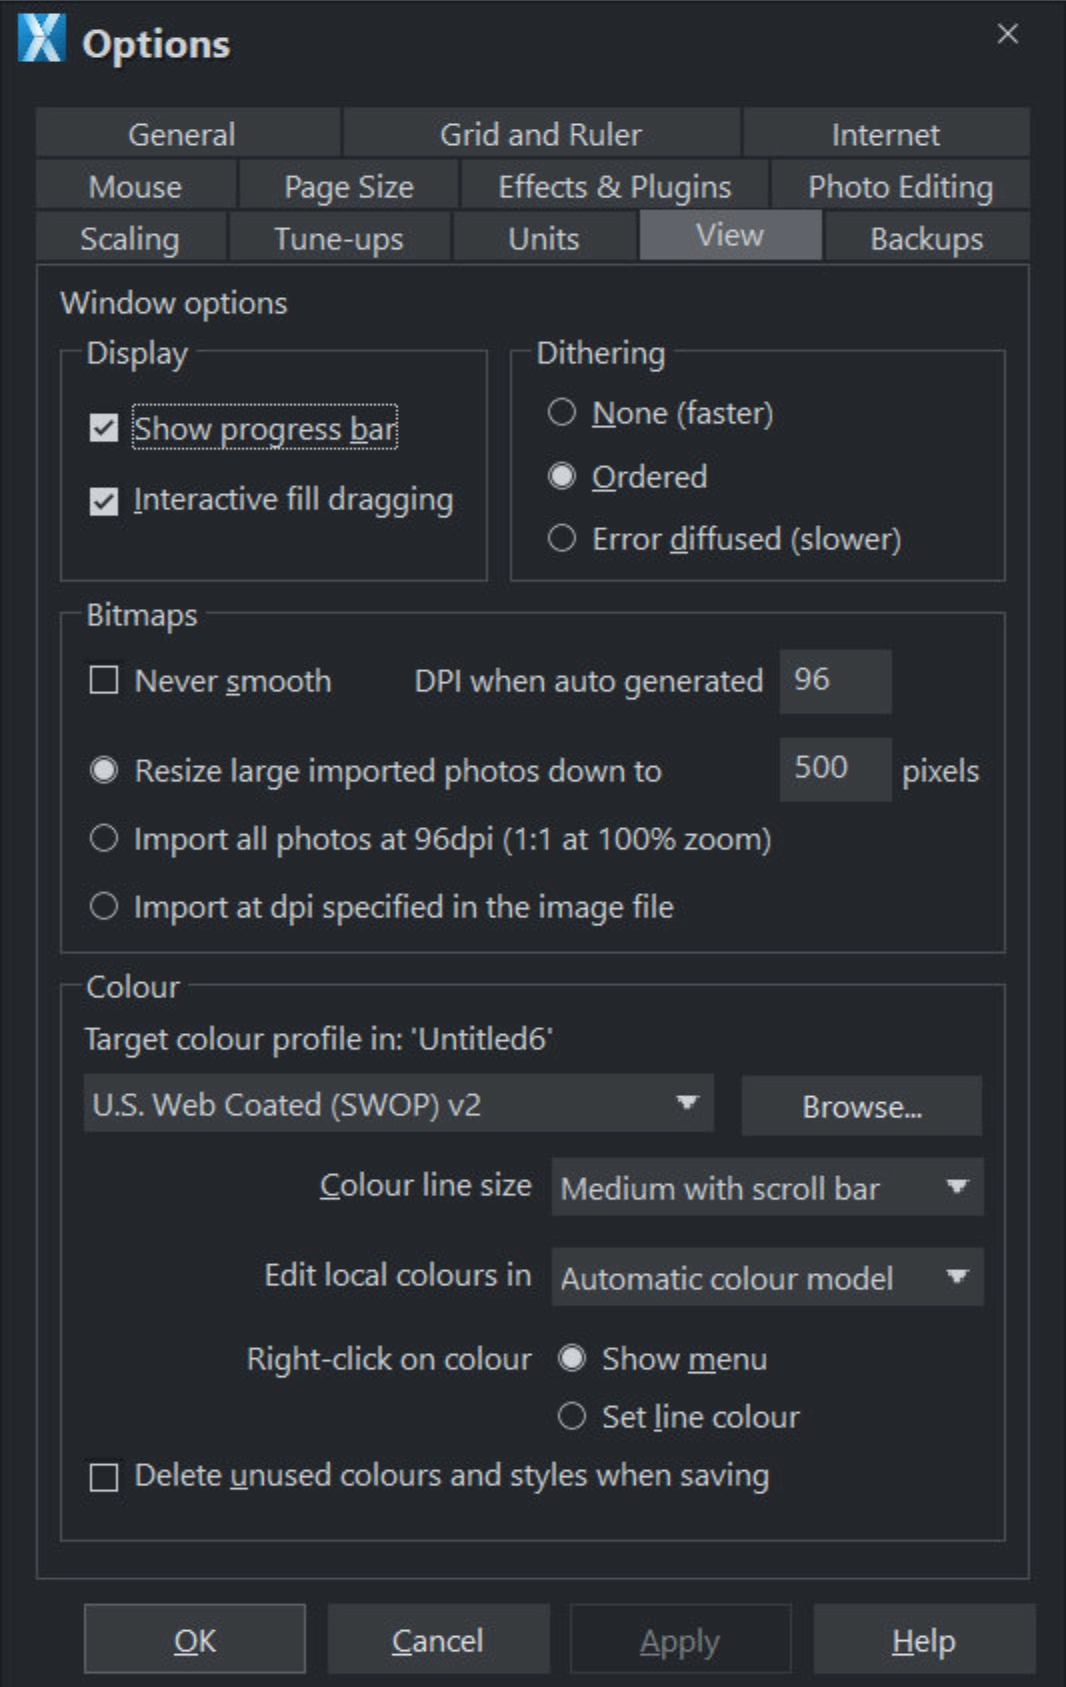
You can choose a different size to which photos should be scaled, or elect for them to be imported at 96dpi (default screen resolution) so that at 100% zoom they are displayed at 1:1. Or you can choose to have photos imported at the dpi which is indicated in the photo file itself. Note that some digital cameras set this dpi value wrongly and so this third option may not always give you the results you expect.
When importing at 96dpi each pixel of the photo takes one pixel of screen, so you're seeing the full resolution image when viewing at 100%.
However because most digital photos are very high resolution, this means you may only see a small part of your photo, so initially Xara will automatically alter the zoom scale to zoom out so you can see the whole image. This also means that a typical digital photo will be far, far larger than your page size (your screen is probably only about 1200 pixels across, and a typical digital photo is 3 or 4 times as wide, sometimes a lot more)
To reduce the size, just drag one of the photo adjustment handles, or one of the Selector Tool, corner handles or enter a new width in the Selector Tool InfoBar width field.
Copyright © Xara