The Bitmap Gallery
The Document handling chapter has general information about galleries. If you are looking for pre-made designs or stock images, then a huge selection of stock photos, illustrations and Icons (symbols) can be found in Elements as well as the Symbols Gallery.
The Bitmap Gallery shows all the bitmaps or photos used in any document, along with information about its pixel size and file size.
|
|
You can open it by clicking it in the Galleries bar, or from within the "Utilities" > "Galleries" menu, or "F11". |

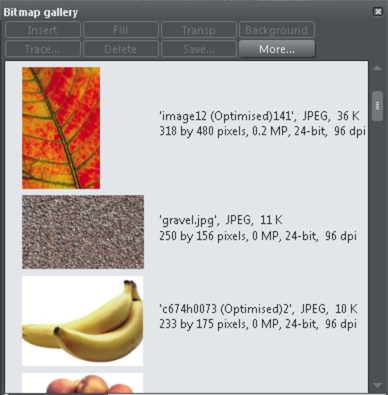
The following useful information is displayed about the original image:
- Filename of the original JPEG
- The file type, in this case a JPEG, and the file size, 1,006K. (This is the original size of the file, and also how much of the .xar file will be taken up by this image.)
- The pixel dimensions of the original, the Megapixel size (in this case just under 2MP)
- The color depth, in this case "24 bit" which is sometimes called true color.
- The original resolution of the image, in these cases 96dpi
The Bitmap Gallery always contains a default bitmap, with the gray default image. This is used as the default bitmap for bitmap fills and in cases where other bitmaps are missing. It's useful to have as a placeholder as well.
As with all galleries, you can drag the objects from the gallery onto the page to create a new copy. Or you can select an image in the gallery and click one of the buttons across the top. The following section details the operation of the Bitmap Gallery controls, most of which are for the more advanced user.
Filling shapes with a bitmap
Select the shape on the page, then select the bitmap in the gallery and click the fill button. Alternatively drag the image from the Bitmap Gallery and drop it onto any shape while holding "Shift". You can adjust the size, angle etc using the smart photo adjustment handles.
Setting a Bitmap Transparency
This is for the more advanced user. You can use any bitmap as a transparency mask on any filled shape or bitmap. The lightness of the bitmap affects how transparent the selected object is. The bitmap transparency size, rotation and tiling can be controlled from the Transparency Tool InfoBar.
Deleting images from the Gallery
When you delete a bitmap from the page, it remains in the Bitmap Gallery. Any unused bitmaps will be deleted from the file when saved and re-opened. However you can force the deletion of any bitmap by selecting it and pressing the Delete button. If the bitmap is used in the document, it will be replaced by the standard X bitmap.
Setting the page background to a bitmap
Select the bitmap in the gallery and click the Background button. This reveals a menu allowing you to choose between setting the Pasteboard background or the Page background. When setting the pasteboard background, if the image is narrower than the page, it's assumed you want to have the image tiled to fill the whole browser background. Otherwise the image is applied single tiled. You can change these settings by right clicking on the pasteboard and looking under the Pasteboard Background sub-menu.
You can also apply an image to the background without using this gallery – just right click on the image and see the options in the context menu.
See Website Backgrounds for more information.
Save
Select the bitmap and click Save will save the original image. In the case of an embedded JPEG this will save the original JPEG file. Other bitmap types are best saved as PNG bitmap type.
Bitmap Properties
The Properties button will display information about the selected bitmap in the gallery. It also provides a way to stop image smoothing when bitmaps are enlarged. Usually all bitmaps are smoothed when enlarged, or zoomed into, on screen. There is a check-box option in the Properties dialog to turn this feature off, so that individual pixels are visible when you zoom in.
Note that this option only affects scaled up bitmaps. Note also that Never smooth in the View tab of the Options dialog box overrides this check box.
It also provides information about the Animation properties of the bitmap. This is only really applicable to animated GIF images
GIF Animation:
- Delay (the time this frame is left on screen)
- Restore: The Animated GIF Restore setting sets what happens between each frame in an animated GIF. Nothing means no action is taken. Many browsers take this as meaning the same as the Leave As Is option. Leave As Is displays the frames one on top of another - this leaves many frames visible in a stack if some are transparent. Some browsers clear the animation before it loops again, some do not. Background restores the area covered by the graphic to the background color of the GIF (usually white). Restore Previous restores the area covered by the frame to what it was before the frame was displayed. This is interpreted by some browsers to mean that the frame should be cleared to the background before each frame is displayed and by others to mean that the frame should be shown on top of the previous frame. As browsers interpret these values in different ways, you may need to experiment to achieve the desired result.
Copyright © Xara