Enhance Tool
|
|
Click the Camera icon to enter the Enhance tool. |

The Enhance Tool provides a direct and very fast way of adjusting the brightness, contrast, color adjustment levels and sharpening of photos, You can also adjust the individual colors within a photo, even for ultra high-resolution images.
The tool provides:
- One-click auto-enhance your photos; this is particularly good for dull, underexposed images.
- Manually adjust the brightness, contrast, color saturation, color temperature, hue, and blur or sharpness of photos.
- Manually adjusts the brightness of the shadows in a photo.
- Manually adjusts the brightness of the highlights in a photo.
- Display a brightness levels histogram of your photo.
- Adjust the brightness levels curve for more advanced levels control.
- Correct color casts or white balance.
- Enhances the individual colors of a photo.
- A single-click "Compare" function to quickly compare changes against the original.
- Crop images. This is "live crop" so you can un-crop and adjust the crop at any time.
- Easy copy / paste all photo enhance edits between different images.
All these operations are interactive with live update. As you adjust the values, the image is updated instantly. They are also all non-destructive, meaning that your original image is not altered and you can always adjust or remove any adjustment.
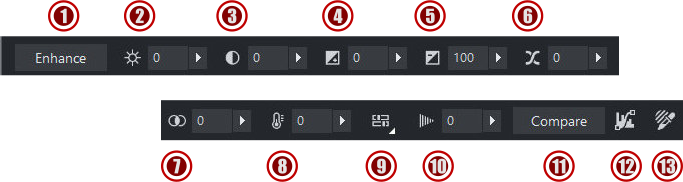
The first six InfoBar buttons to the left (not shown above) are common to all tools and are described above
|
|
Auto-Enhance |
|
|
Brightness |
|
|
Contrast |
|
|
Shadows brightness [Photo & Graphic Designer and Designer Pro only] |
|
|
Highlights brightness [Photo & Graphic Designer and Designer Pro only] |
|
|
X-Process effect [Photo & Graphic Designer and Designer Pro only] |
|
|
Color saturation |
|
|
Color temperature |
|
|
Photo hue |
|
|
Blur / Sharpness control |
|
|
Compare current with original settings |
|
|
Brightness levels dialog [Photo & Graphic Designer and Designer Pro only] |
|
|
Select colors to enhance [Photo & Graphic Designer and Designer Pro only] |


You can either enter values directly into the text fields or use a small pop-up slider for adjusting the values interactively.
Pop-up slider controls
The pop-up sliders can be used in one of two ways:
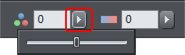
- Click and release the pop-up arrow. The slider control now remains on screen and you can adjust the values as many times as you like by dragging the slider control. Alternatively, if the mouse is held over the control, the mouse-wheel can be used to make small adjustments up or down. The slider will hide when you click anywhere else in the document.
- Or you can click & hold the mouse button down, and drag over the slider bar to adjust the value. When you release the mouse the pop-up vanishes. This is a quicker more direct way, since it requires only one click & release to alter the values.
Auto Enhance
Clicking the "Enhance" button will analyze the overall brightness and contrast of the picture and automatically adjust the enhance values to obtain the best image. It is particularly effective with under-exposed (dark) images. After applying automatic enhancement to a photo you can adjust the values that were chosen, using the controls to the right of the "enhance" button. Clicking the "Compare" button will restore the original, clicking it again restores the last enhance values.
Brightness/Contrast/Color Temperature/Saturation/Hue
|
|
Brightness |
|
Contrast |
|
Saturation |
|
Color Temperature |


The image is altered as you adjust these values. The saturation alters the color intensity. At the minimum setting of -100 this will make a picture black and white. The Color Temperature control makes a picture more 'warm' or 'cool'. The Hue control applies a particular color tint to the image and allows you to control the intensity of the selected color.
|
|
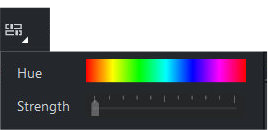
Hue The Hue slider lets you choose the color to apply and the Strength slider sets the intensity of the color change applied. |
Shadows brightness (Photo & Graphic Designer and Designer Pro)

The Shadows brightness control allows you to bring out the detail in the shadows (darker areas) of your photo without affecting the rest of the image.
The slider is initially positioned on the far left of the slider scale as it is assumed that you would always want to increase the shadow detail.
Highlights brightness (Photo & Graphic Designer and Designer Pro)

The Highlights brightness controls the intensity of the highlights (bright areas) in a photo. This allows you to bring out the detail in the highlights which might not normally be visible. Bear in mind though that there may be areas in certain photos which have all the detail in the highlights "crushed" or totally burnt out, in which case the control will have no effect.
The slider is initially positioned on the far right of the slider scale as it is assumed that you would always want to decrease the intensity.
X-Process effect (Photo & Graphic Designer and Designer Pro)

Cross processing simulates a photographic processing technique which historically used the 'wrong' chemicals to develop film - thus resulting in some dramatic contrast and saturation effects. Xara Designer, and other photo editing programs, achieve this by manipulating the red, green and blue color channels. Use the slider to experiment.
Blur/Sharpen
This control blurs images if the slider is dragged to a value below 0, and sharpens images when dragged above 0. For sharpen it's recommended that only small values be used, and typically only on images that have been reduced in size a lot. You can enter blur values larger than the -100 maximum value available on the slider. E.g. entering -400 will produce a very blurred image.
Select Colors to Enhance (Photo & Graphic Designer and Designer Pro)

Normally the Enhance controls will apply to the whole of a selected photo - but if you just want to make changes to a particular color within your photo then use the Select colors to enhance option. You might want to change the color of the sky or tweak the brightness and contrast of a patch of grass for example. Additionally there is also the option to make a selected color transparent.
Just click on the Select Colors to Enhance button on the Enhance tool InfoBar to switch into Enhance Photo Colors mode. Now you can click on the part of the photo you want to adjust.

Cross positioned over the color to be selected.
The color at the click point determines the color that gets selected in the photo - you will see a brief flash of a checkerboard pattern on your photo, indicating how much of your photo has been selected.
Also a red color point appears at your click point.

Red color point at click point
You can click-drag on this to move it around, if you didn't quite hit the color you wanted to select. As you drag, the checkerboard pattern appears again and it updates dynamically as you do so, so you can see what parts of the photo have been selected. Or to review what you have selected, just click and hold over a point without dragging it to reveal the checkerboard pattern again.
If you haven't selected all the colors you wanted, you can simply click again to add another selection point. So for example if you are trying to select all of the blue sky in your photo, there may be various different shades of blue in the sky and so you may need to click on several different parts of the sky to capture them all so that the checkerboard pattern covers the whole sky. You can do this as many times as you want, to extend the selection.
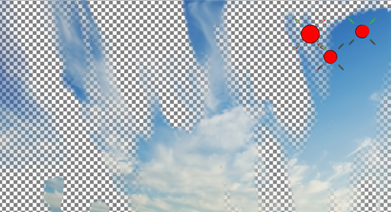
checkerboard pattern indicating color selections
You may also find that you've selected parts of the photo you didn't want to select. There are two ways to help solve this problem. You can adjust the extent of the color selection by adjusting fade and tolerance values, and/or you can use a region or mask to limit the area of the photo to which the color selection is applied. See sections below.
Note that enhance photo colors mode is turned off automatically when you leave the Photo Tool or switch to another document.
Applying Enhance
Now choose any of the Enhance functions to alter the selection.
- Brightness
- Contrast
- Photo saturation
- Photo temperature
- Hue
- Sharpness
- Brightness levels
Or, to make the color selection transparent, use the option on the right-click context menu.
Even after you've started to enhance your color selection, you can still go back and modify the selection as described above, by moving points, adding more points, etc.
Context Menu
If you move the mouse pointer over a color selection point and right-click the mouse button, a context menu appears with the following options.
|
Deselect |
Deselect the current color selection so you can start a new color selection. You can also deselect by pressing the Esc key. |
|
Delete color selection |
Delete the color selection to which the point you clicked on belongs. Therefore all the points that are part of the same color selection will disappear. |
|
Delete this color point |
Delete only the point you clicked on. Any other points in the same color selection remain. |
|
Make transparent |
Makes the current color selection transparent. You can toggle on or off. |
.
Using masks or regions
If you want to just enhance a particular area of your photo, first use one of the Photo Region tools to mark the region of the photo you want to modify. Or use a Mask tool to protect parts of the photo you don't want modified.
Then switch to the Enhance Tool and make your changes. The mask or region is used to limit the parts of the photo the enhance operation is applied to and afterwards you are left with a region inside the Photo Group. Whenever this region is selected inside the Photo Group, its outline is shown with "marching ants". To select such a region inside a Photo Group, Ctrl+click on it or select it from the Page and Layer gallery where it will appear as a Region within a Photo Group. Looking at the Status line will also clearly show you when you have a region or mask selected inside a Photo Group.
Note that you should almost always apply feathering to a region inside a Photo Group, to soften its edges and blend the enhance effect seamlessly into the photo. Hard-edged regions are rarely useful. See the Feather tool for details. You can apply and adjust the feathering on the region inside the Photo Group once it's selected inside, or you can apply feathering to the mask or region before you apply the enhance effect.
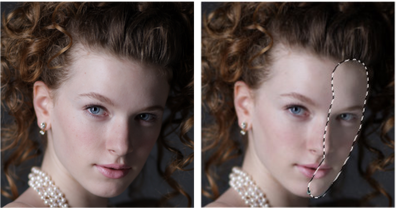
Left photo in partial shadow, right photo enhanced with brightness and feathering to soften and blend the outline.
If you want to make adjustments to the shape of a region inside a Photo Group then just switch back to a mask or region tool and make your changes ensuring that the region or mask is selected (shown with marching ants outline). Again, even while in the Region/Mask tools, you can select regions inside a Photo Group using Ctrl+click.
|
|
If you want to be able to work on selected regions inside a Photo Group without seeing the marching ants outlines, you can temporarily turn off the outlines using the button on the InfoBar of the region and mask tools. |

The outlines are turned on again as soon as you clear the selection or move to a different photo or document.
Resizing color points
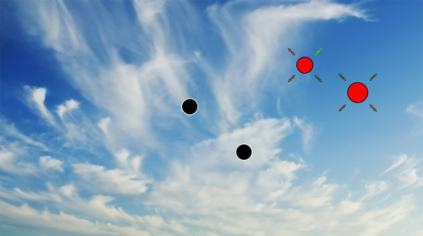
Selected color points are shown in red and have resize handles shown around them.

Color points with resize handles
Drag on the resize handles to change the size of the color point. This is useful if you need to be very accurate with your selection and you find that it's difficult to place a color point over just the color that you want to select. Make the point smaller to make this easier.
The color selected by a color point is the average color over the area it covers, so by using a smaller point size you can control this color more accurately.
Enhancing different colors
As described above, when you are trying to select a color in your photo you can click as many times as you want to keep extending the selection. Each point appears in red to show it is selected and is part of the same color selection. But what if you want to start selecting a different part of your photo so you can apply different enhance settings to that? For example, after adjusting the sky you may want to start work on another part of the picture.
To start a new color selection, you first need to deselect the first color selection you've been working on. Do this by right-clicking on one of the red color points and choosing "Deselect" from the context menu, or just press the Escape key. Now you see the color selection points you've already added are shown in black instead of red. This shows you they are no longer selected.

Now you can start clicking again on a different part of your photo and new red points appear. This is a new color selection and you can extend and adjust it just as you did for the first, then start enhancing it.
So now you have two separate color selections. To modify or extend either of them, just click on one of the points. All the points in that color selection turn red to show that color selection is selected. Clicking on the photo will add more points to that current color selection and the enhance controls on the InfoBar show the current settings for that color selection.
So in summary, clicking on a photo to add new points will add them to the current color selection (whose points are shown in red) . To start a brand new color selection, first make sure you start with all existing points shown in black (not selected), by choosing Deselect from the context menu. Then you can start adding the new color selection.
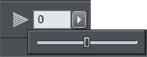
Adjusting tolerance and fade
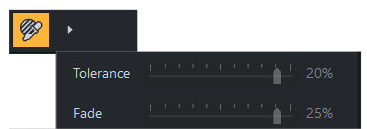
Tolerance and Fade slider controls.
You can adjust the extent to which colors are selected using the Tolerance and Fade controls. These are available from the button next to the Select Colors to Enhance button, but this only appears when you have Enhance Photo Colors mode turned on. The Tolerance slider affects the range of a particular color selection - capturing a wider range of hues and tones of the selected color, whilst the Fade slider controls the extent to which the selection bleeds into the adjacent areas.
Tolerance: This value determines how colors are treated that are close to, but not the same as, the sample point color. If the tolerance is set to 0, only colors exactly matching the color at the sample point are selected. As the tolerance is increased, colors further and further away from the color of the sample point are also selected, just as if they matched the sample color exactly.
Fade: This value determines how colors that fall just outside the color tolerance are treated. If fade is 0, then colors are either selected or not, depending on whether they fall inside or outside the tolerance. This can result in 'hard edges' since every color is either fully selected or not at all. So as this value is increased, colors outside the tolerance are partially selected, proportionally to how far outside the tolerance they are. This gives a softer color selection.
Easy crop
While in the Enhance tool you can drag on the adjustment handles shown around the edge of the selected photo to quickly adjust the cropping of the photo without needing to go into the Clip Tool.
Copyright © Xara