The print dialog box
Choose "File" > "Print" ("Ctrl + P").
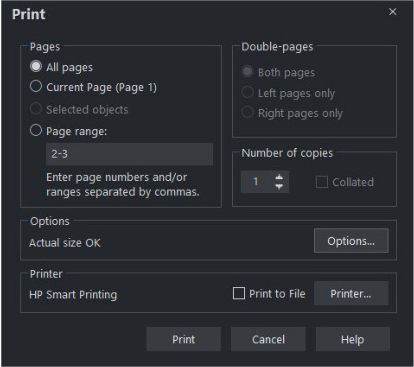
Print button
When you have selected the required options click this to start printing.
Printer… button
This opens the "Print Setup" dialog box (described earlier).
Options button
This opens a tabbed dialog box that lets you set additional print options. These are described later.
Pages
All Pages: Prints every page of the document.
Current Page(s): Prints the currently selected page or spread.
Selected Objects: This option is available when any objects in the document are selected. When active, only the selected objects are printed. Note that other objects within the bounds of the selected objects are not printed – only the objects which are actually selected are printed.
Hidden objects, objects on hidden layers and the guides layer never print. See Page & Layer Gallery for more details.
Page Range: Allows you specific control over which pages you wish to print. You can type specific pages numbers, separated by commas, or page ranges by typing two numbers with a hyphen in between them.
Page range examples:
2 will print just page 2.
1,3,5-7 will print pages 1, 3, 5, 6 and 7.
2,3,6-8,11-12 will print pages 2,3,6,7, 8,11 and 12.
The Options section of the dialog will indicate if your page range is OK or invalid.
Double page spreads
If the document comprises a double-page spread, you can print both sides or just the left or just the right page.
This option is dimmed when the spread comprises a single page (see Document handling for how to select single or double-page spreads). Or the "Print/export individual pages" is active in the Page Options, so that the two pages of a double-page spread are treated as individual single pages.
Print to File
You can select the Print to File option to create a document that you can give to a printing company (if they are able to accept this type of file).
After checking this option, when you click Print Xara displays the standard Windows Save dialog box so you can specify a file name and location for the file.
Print files have a default extension of .prn.
If you want to create a PDF file we recommend selecting the "File -> Export…" option and selecting PDF. This produces a higher quality, and usually more compact PDF file than you'd get from printing to a PDF file.
For more information on exporting as PDF refer to Importing and Exporting.
Number of copies
Sets how many copies of the document to print.
Collated
This is dimmed except when printing multiple copies of a double-page spread as two separate pages. With this option selected, pages are printed as left-right-left-right, etc. With this option deselected, all the left-hand pages are printed then all the right-hand pages.
Printers that hold a page image in memory take some time to process the image. The printer can then print multiple copies at its maximum speed. For such printers it is often faster to manually collate the pages after printing.
Other types of printers have to process the page for each copy. For these, select collate copies and save yourself the chore of collating.
Copyright © Xara