Embedding Graphics
If you take a graphic, a photo or other object you can paste it "embedded" into text. You can control how the text is formatted around embedded objects, and have the object resize automatically according to the width of its containing text area or column. You can also embed graphics into repeating text - like that which appears in headers and footers and have objects anchored to repeating text too.
This is particularly useful when you have the same text content with embedded graphics appearing in columns of different widths in multiple variants of a website. See mobile websites.
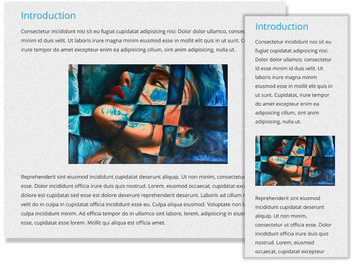
An embedded graphic reformatted and resized for a main (left) and mobile (right) variant.
To embed an object, copy or cut it to the clipboard, go into the Text Tool and place the text caret at the point in the text where you want to insert it, and then paste. Now if the object you insert is wider than the text area or text column, the object is automatically resized down to the width of the text column. Right-click on the embedded object and choose "Embedded graphic options..." from the context menu - or in the Arrange menu.
A dialog appears with the following options...

The Scaling options allow you to specify how the embedded graphic should behave if the width of the text column/area is changed, or if the graphic flows into a text area with a different width.
- Resize for narrower columns - With this option (the default), the object will resize down if it's too wide for the text column, but it will not grow up above its original size if the column is wider than the object.
- Resize relative to column width - This option allows you to specify that the embedded object should always be a fixed % of the column width.
- Fixed size - This option turns off the automatic resizing, so the object will never change its size.
- Scale only in horizontal direction - This option is useful mainly for simple divider or Rule-off graphics, where you want the object to just stretch horizontally without getting taller or shorter depending on the column width. It's useful only for very simple designs because more elaborate graphical divider designs are not likely to stretch well without looking distorted.
Add a simple Rule-off divider at the carat position using the "Insert" > "Rule-off" menu option.
The Positioning options allow you to choose how the graphic should be formatted into the text.
- Inline with text - This is the default option. The graphic stays inline with the text with no text wrapping, like this
 , and behaves as though it's a large text character in the text.
 - Text wraps right - The graphic will be positioned to the left of the text column with text wrapping to the right.
- Text wraps left - The graphic will be positioned to the right of the text column with text wrapping to the left.
The Margins options allow you to add some space around your graphic, so it doesn't appear too close to the text or to the edge of the column. You can specify different values for each of the 4 sides of your graphic, or use the lock  buttons if you want to have the same margin top and bottom, or left and right, without entering the same values repeatedly.
Additionally in the "Insert" menu, the "Break" > "Move below embedded graphic" option enables you to force the next paragraph of text to start below the graphic when you have text flowing to the left or right of the embedded graphic.
After embedding the graphic, to move it around within the text area, simply click and drag. You will see a blue rectangle appear to indicate where the object will be repositioned if you release. If the object is inline and on a line of its own (no text to its left or right), dragging it left or right within the same paragraph changes only justification. If the embedded object is set to have text flowing to its left or right, or the object is dragged from one paragraph to another, the drag behavior is different
- Dragging the object near to the left edge of the text will set it to text flows to the right.
- Dragging the object near to the right edge of the text will set it to text flows to the left.
- And dragging it near to the center will set it to be inline center justified on a line of its own (no text shown on either side).
You can't embed an object by dragging it over text, you will still have to cut / copy it to the clipboard, insert the text caret into the paragraph and then paste. If you drag an object out from any text, it will become its own independent entity.
When you embed a single object in text, you can directly select that object in the text instead of selecting the "Embedded group" that encloses it. Look at the Status Line and the Page & Layer Gallery to see this in action.
Copyright © Xara