Tabs, Margins and Indents
Rulers
To adjust tabs, margins and indents you need to turn on rulers in your document.
To do this:
- Choose "Window" > "Bars" > "Rulers" or right click a page and choose "Show Grid/Guides" > "Show Rulers".
- Or press "Ctrl + Shift + R".
- Or press "Ctrl + L" (when not in the Text Tool).
|
The enhanced text features will only appear on the ruler when you are using the Text Tool and when the text cursor is in a text story or the text object is selected when in the Text Tool. |
|

In the Text Tool when you drag the margins or tabs on the ruler, you get a temporary vertical guide to make it easier to align the tabs or margins to objects elsewhere on the page. In addition when dragging tabs or margins, if you have magnetic snap switched on, these will snap to each other making it easier to position tabs and margins.
Margins and indents
Any changes you make are made to the current paragraph of text. (i.e. the paragraph containing the text cursor) or, if you have a selected region of text, to the paragraphs of the selected region.
You can apply changes to all text in a text story by selecting all the text within that story ("Ctrl + A"). To change more than one text story, select the text objects while in the Selector Tool then change to the Text Tool and make the required changes.
|
|
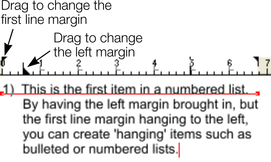
Left margin. Drag this to change the left margin of the text. |
|
|
First line margin. Drag this to change the left margin for the first line of the paragraph (useful for lists, as shown below). |
|
|
Right margin. Drag this to change the right margin of the text. |
|
Demonstrating the left margin and first line margin |
Demonstrating a right margin |

Tabs
By default, text stories are created with tabs set 0.5 cm apart. This means you can just press "Tab" and your text will be moved along to the next tab stop. You only need to define new tab stop positions if you want alternative tab spacing.
These default tabs are shown as faint Ls on the ruler:

Standard tabs, indicated by faint "L"s
Custom tabs
To create a custom tab position, just click on the ruler where you wish to place the new tab. It will replace default tabs up to that point on the ruler.
For example:
 The triangle indicates a custom tab
- To set more than one tab click multiple times on the ruler.
- To move a custom tab drag it along the ruler.
- To remove a tab drag it off of the ruler (default tabs will come back).
After creating a tab stop, you can edit the properties of the tab by double clicking on the tab stop, right-clicking on the tab stop > Tab Stop Properties, or by right-clicking within the tab space > Tab Stop Properties.
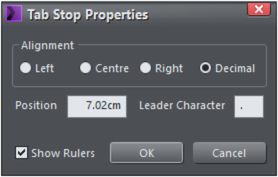
In the Tab Stop Properties dialog, you will see these settings:
Alignment
This allows you to change the alignment of the text at an existing tab stop to Left, Center, Right and Decimal (see Custom tab types).
Position
Normally the position of a tab stop is set by markers on the Ruler, however here you can now set the value numerically.
Leader Character
Type any character into this field to fill the selected tab space with that character.
Show Rulers
This checkbox is provided for convenience to enable or disable the page rulers (see Rulers).
Custom tab types
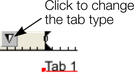
You can set different types of custom tab. By default, custom tabs are left align tabs. This means that text will be aligned with the tab on the left of the text.
|
To change the tab type, click the tab icon on the ruler.
The following custom tab types are available. You are not limited to just one type in a story, and can choose a different type then set additional tabs. |
|
|
|
|
Left align: The text will be aligned with the tab to the left. |
|
|
|
|
|
|
|
Right align: The text will be aligned with the tab to the right. |
|
|
|
|
|
|
|
Center align: The text will be centered on the tab. |
|
|
|
|
|
|
|
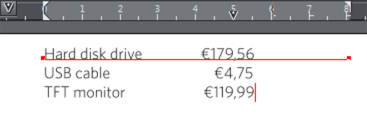
Decimal point align: The decimal points in the text will be aligned with the tab. This is useful for lists and, however long the number, the decimal points will be tab-aligned. |
|
|
|
|
|


You can also change the tab type after creating the tab stop by double clicking on it to open the settings Tab Stop Properties dialog, and changing the alignment there.
Tab Leaders
You can use Tab Leaders to fill the tab spaces with any character you wish. For example:
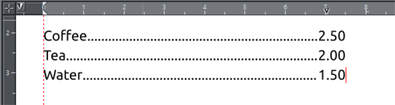
So the space between the tabs is filled with a period. You can setup the character to be used in the Tab Stop Properties dialog.
Note: Not all export formats support all characters as tab leaders, and they may be replaced for another character or omitted from the document. For example, if you use '@' as a tab leader, when exported to the .docx format and opened in MS Word, it will show as '.' instead.
How to create hanging indents
Hanging Indents, as they are known, are where the first line of a paragraph has a negative margin or a margin that hangs to the left of the normal left margin. Numbered or bulleted lists are examples of hanging indents.
To create hanging indents:
- Drag the left margin inwards.
- Click on the ruler away from the left margin (creates a new tab stop) and drag this tab stop to be exactly over the left margin.
- Now each line will start outdented—you can insert any special character or number and press "Tab" to move to the left margin. And all subsequent lines of text are indented to the left margin.
Copyright © Xara