Text Styles
Text Styles are a powerful way to alter the appearance of text throughout a document with a few clicks.
A Text Style is a named collection of attributes, such as font, size, color, line spacing and other text attributes. For example, the main heading at the top of this document might have a style called 'Heading 1', whereas the smaller sub-headings could have a style called 'Heading 2'.
If you update the definition of 'Heading 2', say, to be a different font, then every similar heading throughout the document will be updated instantly.
Similarly the main text, sometimes called the 'body text' of a document is also a particular style, which Xara calls the "Normal text" style. If you update that style to be, say, 12 point Times New Roman, then all "Normal text" throughout the document can be changed in one go, without having to select and apply the same font change over and over again.
Text Styles are, therefore, rather like the "Named Colors" feature that Xara also supports, where you can update "Theme Color 1" to be a new color and all parts of the document using that Named Color take on the new color.
Text Styles InfoBar
There is a Styles drop-down menu on the Text Tool InfoBar, that allows you to create Styles, apply them to any text, and to update the definition of the Style.
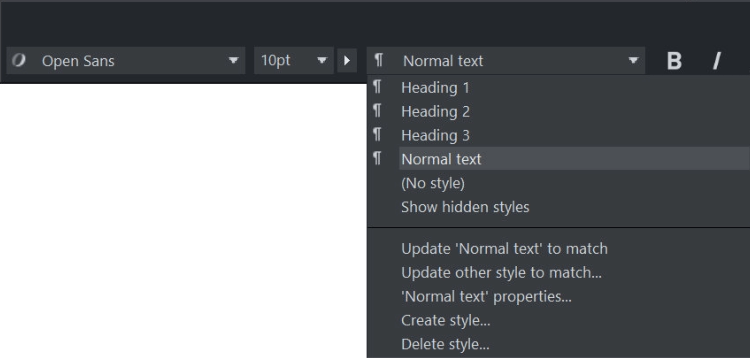
By default there is a small set of pre-defined Styles, including 'Normal text', and three heading styles - Heading 1,2,3.
Paragraph Styles and Character Styles
Text Styles come in two varieties. Paragraph Styles and Character Styles.
A Paragraph Style is denoted by a ¶ symbol on the style menu. An a symbol denotes a Character Style.
Paragraph Styles apply to whole paragraphs, and are also typically used for headings. It's not possible to apply a Paragraph Style to a smaller section than a paragraph, so you cannot, for example, apply a Paragraph Style to a single word within a paragraph. If you try, then the whole surrounding paragraph will take on this Style.
Just place the text cursor anywhere on the line and select a Paragraph Style from the style menu, and the whole paragraph will take on that style.
Character Styles, on the other hand, can be applied to any selection of text, from a single character upwards. For example, if you wanted to highlight certain words in your text in a different color a Character Style would be ideal. The advantage is that you can then change the color (or font, etc) of all these highlighted words with a single Style update.
Create a Character Style by clicking Create style in the Style menu dropdown and checking the Character style option from the dialog as you create a new text style. See Creating new Styles for more info.
Paragraph styles can define all text attributes even bulleted/numbered list properties. Character styles can only define text attributes that can be applied to individual characters, such as text color, font size, font weight, etc.
List Styles
You can also apply Styles to bulleted and numbered lists. The style will take on all the attributes of the bullet or numbered list. Once you have applied a style to a list a "." appears in the Style menu to indicate that it is a List Style and to enable you to distinguish it from a Paragraph or a Character style.

To make a list style, first create a list and customize it using the List Properties dialog. Then place the text caret in the list, or select part of the list, and choose Create style … from the text styles dropdown list. Choose a name for your list style and click ok.
List styles include all the list settings you see in the List Properties dialog, from indents to bullet symbols and colors. Each level within a list can have different settings and these are also all recorded in the list style. The example below has only 2 levels of list, but you can have as many levels as you like.

To update a list style, simply modify a list that uses the style and then use the Update option in the styles list, the same way you update ordinary Paragraph styles. The list will update whatever list level the text cursor is placed in - or all selected levels if you have more than one level selected - with the Update option reflecting your choice.
Note: Graphical lists (where you can use any graphical object as the bullet or number) are not yet supported with list styles.
Next paragraph style
This is one of the settings for a text style - look at the list's Properties… option in the style menu.
For Paragraph styles it determines what style should be applied by default to a new paragraph created following the current paragraph. For example, heading styles normally set the Next paragraph style to Normal text, because that's usually what you want immediately following a heading. With a list style however, it's more likely that you want another list item to be added when you hit return at the end of a list item. So for list styles the Next paragraph setting is only used when you end a list. End a list by hitting return once to add an empty list item, then hit return again. The new non-list paragraph will then use whatever Next paragraph style you chose for the list style.
For more detail on editing lists see Bulleted and numbered lists.
Updating Text Styles
To update an existing Text Style:
- Select some text already in the style you want to update.
- Apply whatever changes you require, say an alternative font, or font size, or maybe in the case of a list style a bullet or number style change.
- Select "Update 'style name' to match" from the Style drop-down menu on the Text InfoBar.
For example to change all the Normal text to be a different font, select a few words in the Normal text Style, change the font (and any other attribute) and then Select Update 'Normal' to match from the Style Menu on the Text Tool InfoBar.
Web Designer and Designer Pro: When you are working on a web document with responsive web design variants, it is possible to update a Text Style for an individual variant. This is useful for example when you need the text in a mobile variant to be a larger and/or different font. To update the style for an individual variant, change the text as above and then select Update 'style name' in this variant from the Style drop down menu on the Text InfoBar. This is an additional option that is shown in the Styles menu when you are working in a document that has multiple variants.
See Responsive Web Design for more information about variants.
Redefining Text Styles
Sometimes you may want to make an existing text style to look like some text that does not already have that text style applied. Perhaps some text that you imported from some other document. You can't just apply the existing style to that text, because you would then lose its appearance. Instead use the Update other style to match… option in the style menu.
- Place the text cursor within the text (or select some of the text).
- Select Update other style to match... from the Style drop-down menu on the Text InfoBar.
- Choose the Style you wish to update from the Update style to match... dialog.
- Tick the appropriate checkboxes to decide if you want the Text Style to match only the new text, and/or all similar text in the document. Uncheck Apply to all similar text in this document if you only want the Style to be applied to the paragraph containing the text cursor.
- Click Apply. The text is now redefined as the selected Text Style.
The Apply to all similar text in this document option is useful for applying text styles to existing documents that don't already use text styles, such as imported PDFs. For a style to be applied to all similar text within the document, the text must have the same font and font size over more than 50% of a paragraph, and it must also have the same justification and indentation settings (within a small tolerance).
Styles based on other styles
In Xara Designer, you can base one style upon another. For example, if you wanted another variant of Heading 2 style, that was identical in every respect, except a different color, then when you create the new style you would make it based on "Heading 2" in the Create Style dialog. This means that if you update "Heading 2" to be, for example, a new font or size, your new Style would also take on that new font or font size.
New Character Styles are typically based on the "Underlying Paragraph Style", but just with the changes you want. So this means if you have a Character Style that just sets the text color and nothing else, applied to a single word, then when you altered the Paragraph Style of the paragraph, this word would change to match, except its color.
Creating new Styles
To create a completely new Style, change a selection of text to appear how you want and then select the Create style... option from the Style list drop-down on the Text Tool InfoBar.
If you want to create a new Paragraph Style it's recommended that you select and apply your changes to a whole paragraph, before selecting the Create style... menu option.
Clicking Create style... shows the following dialog.
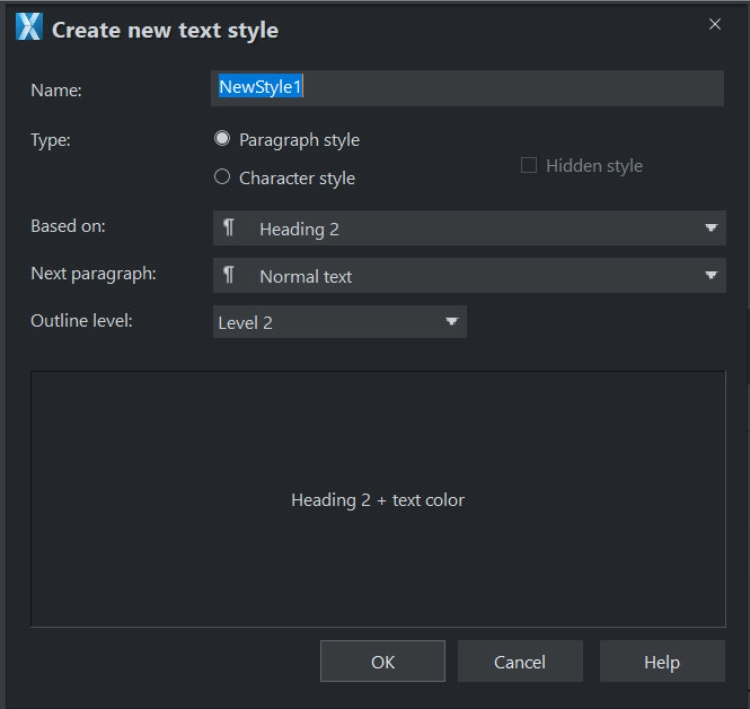
This dialog shows a new style, (NewStyle2) being created that is a Paragraph Style, based on an existing Heading 2 style. The Next paragraph option determines what style will be used for the subsequent paragraph when typing.
The Outline level is used to set the outline level of a heading style when inserting a table of contents in Designer Pro. The level determines the indentation level in the table and you can specify the maximum level of headings that should be included in the table. For example you might want to only include levels 1 and 2 (Heading 1 and Heading 2), to keep the size of the table down.
The lower section of the dialog shows the complete definition of this Style. In this case you can see it's based on Heading 2, with only a color change.
To create a Style that is based on no other Style, that is to say, it inherits no attributes from another style, select (No style) from the Based on: option, as below.
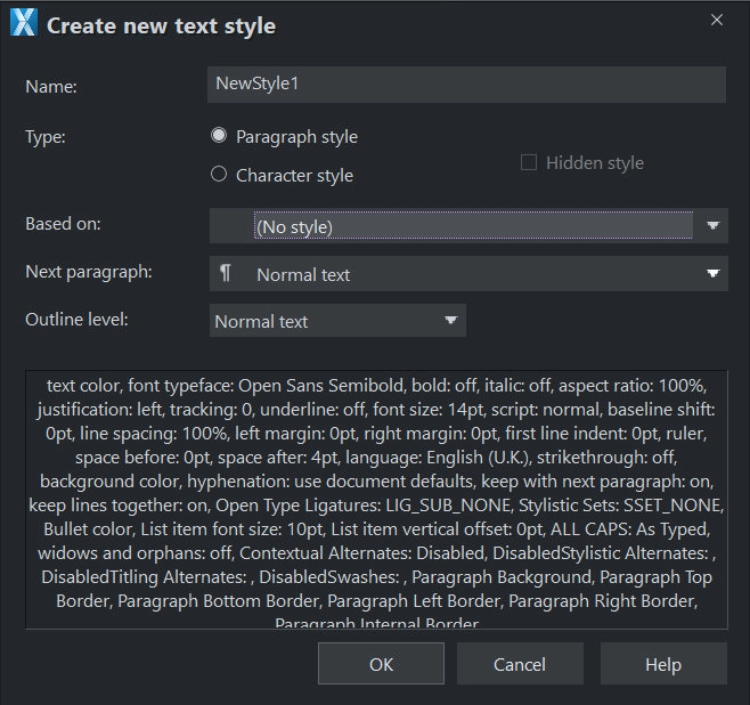
This dialog shows the creation of a NewStyle2, that is a Paragraph Style and based on no other style. The lower section lists all the attributes that make up this Style. The attributes listed have been taken from selected text, so this Style consists of a complete definition, listing all possible text attributes.
In this case when entering text in this Style, the Next paragraph (i.e. when Return is pressed) will be in the same style again.
Removing Styles
The Styles list in the Styles menu includes the entry No style. Selecting this removes the Style (Paragraph and/or Character Style) from the selection whilst retaining the same appearance. When you select the option a dialog appears informing you of this. Click on the dialog's Clear Styles button to proceed with the operation. Now your selected text looks exactly the same as before, but has No style applied to it.
Deleting Styles
To delete a style select Delete style from the Styles menu, the Delete style dialog opens. Now choose the text style you wish to delete from the dropdown menu in the dialog. The style will be deleted from the menu as will all references to the style, and the style will be returned to its base style. However, the returned style will still retain the deleted style's attributes and appearance. So for example a deleted style based on Heading 1 will appear as Heading 1+ to indicate this.
If your style was based on nothing, ie No style then the style will revert to No style appearing as No style + in the menu and again retaining the same attributes and appearance.
Note that you can't delete the default styles and you also can't delete styles which have other styles based on them. You will receive a warning prompt should you attempt to do so.
Hidden Styles
Text styles can be marked as Hidden in the Style Properties dialog, which means they won't appear in the main styles list unless the text caret is located in text that uses that style.
This is useful to help avoid the styles list becoming too long in documents that use a lot of different styles. Some SmartShapes such as the bar and column charts have their own text styles and these are now automatically made hidden styles, so they don't appear in the main styles list. Similarly the TOC styles used for Tables of Contents (in Designer Pro) are also hidden. Use the Show hidden styles option in the styles menu to have all styles included in the styles list.
Additionally hidden styles can't become current, so any new text you add to a design should never use a hidden style by default.
Style Properties
If you want to change the definition of a style, such as the style it's based on, or just look at its definition, use the Properties… option in the style menu. You need to select some text that has the style applied before you do this, to indicate the style you want to edit.
The Style Properties dialog appears, which looks the same as the Create Style dialog shown above.
The style description at the bottom of the dialog describes how the style differs from the style on which it is based. So if you want to see all of the style's attributes, just temporarily select No style from the Based on list, to see a full description. Don't forget to reset this to the correct Based on style, or click cancel in this dialog, if you don't want to change the style!
Text Sizes in Multi-variant Websites
When working with multi-variant websites it’s often useful to have different font sizes for the same text in the different variants. In Designer+, this is achieved by having different text style settings in each variant. For example you may have your Heading 1 text style set to 32px in the Main variant for wide screens, but only 24px in the Mobile variant where there is less space. This is achieved by first changing the text size on some Heading 1 text in one variant and then using Update Heading 1 in this variant (in the text styles drop-down menu). This ensures the text size changes only for Heading 1 text in the current variant. However, many users miss this very powerful and useful option.
Since 24.5, if you change the font size on text in a multi-variant website, a prompt appears with a number of different options to help you manage different text sizes in your site.
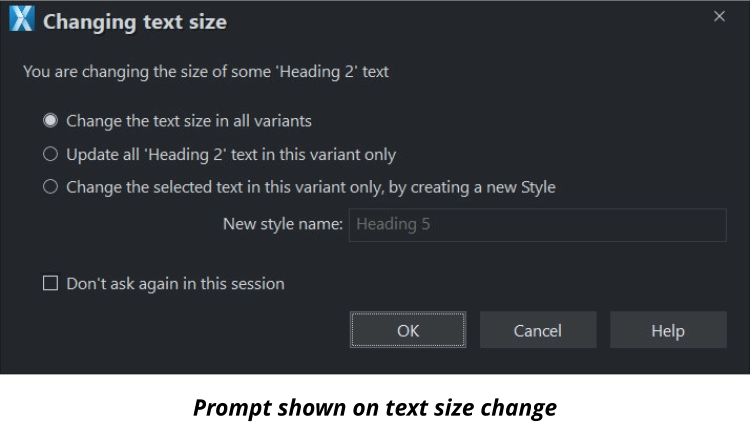
Change the text size in all variants
The size of the selected text will change in all variants, not just the variant you are working on. So it’s important you check the other variant(s), to make sure the text still fits and looks ok at the new size.
Update all text text in this variant only
This option is useful when you want different sized text in different variants. The text style that’s applied to the selected text will be updated in the current variant only, so that all similar text with the same text style applied (Heading 2 in the above example), will be updated. But Heading 2 text in the other variant(s) will not change.
Change the selected text in this variant only, by creating a new Style
This is similar to the second option above, except a new style is created. This is useful where you want different sized text in different variants, but you only want to change the selected text and not other text that uses the same style.
Points to note
- Note that it’s best not to use too many different styles or font sizes. The best designed websites use only a few different text sizes, so decide what sizes you want and then use a different text style for each.
- If you don’t like the prompt and want to manage text sizes yourself, select the Don’t ask again option and you won’t be prompted again in the current Designer+ session. Text sizes will change in all variants in this case, unless you use the Update style in this variant option.
- Text that doesn’t have any style applied (No style) does not trigger the prompt.
Copyright © Xara