Bulleted and Numbered lists
Bullet Lists
|
|
You can turn any text into a bulleted list by selecting the text and then selecting the bulleted list button on the InfoBar. |

Each paragraph of text becomes a separate bullet. If you press return to finish a line at the end of one bullet point, the next line starts with a bullet point too. If you hit backspace immediately after the return, the last empty bullet is removed, text cursor remains at the same position and allows you to continue adding text to the previous bullet point.
To finish entering a bulleted list, hit return on the end of the last bullet and then immediately hit return again on the new bulleted line. This removes the last empty bulleted line and allows you to start entering normal text again. Or you can just turn off the list button on the InfoBar.
|
|
You can nest bulleted lists by pressing the indent button on the InfoBar. This indents the current bulleted line and changes the bullet character to a different style, to distinguish it from the parent bullet. |


Example of a nested bulleted list
|
|
To move a bullet point from a sub-list into its parent bulleted list, simply place the text caret in it and press the outdent button. |

So it's easy to make and edit arrangements of nested bulleted lists using the indent and outdent buttons.
Numbered Lists
|
|
You can create and edit numbered lists in just the same way as described for bullet lists above, using the numbered list button. |

You can choose the numbering scheme to be used for each list, using the Numbered list section of the List properties dialog. Place the text cursor in one of the numbered list points, press the right mouse button and choose 'List properties…" from the context menu. The dialog is modal, which means it will stay open as you make edits to your list items and you can instantly see your changes as you make them.
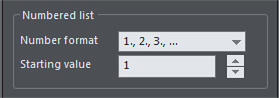
Numbered list dialog
In the dialog you can choose from a variety of numbering schemes and also enter the value that should be used for the very first entry in the list. Then the number is automatically incremented for the second and subsequent entries in the list.
Editing List items
If you want to make edits to the bullets or numbers themselves, perhaps a color, font size or position change, the List item section of the List properties dialog lets you do this. Place the text caret in one of the list points, press the right mouse button and choose List properties… from the context menu.
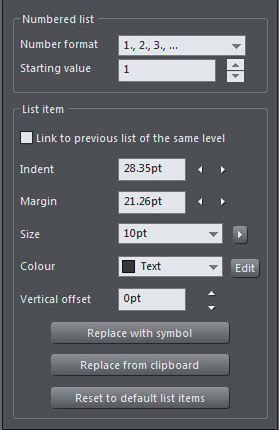
List properties dialog
Link to previous list of the same level
You can link separate lists so that the list item attributes of a second list continue from the previous list at the same level. This allows you to insert gaps, graphics, paragraphs etc. in the middle of lists. With numbered lists the numbering of the second list carries from the last number used of the previous list.
The option also works with sub-lists, so when checked, the current list picks up its settings from the previous list at the same level and of the same type. So set this option on a bulleted sub-list and it will pick up the bullet symbol, margin, indent, color, etc. settings from the previous sub-list of the same level.
Just place the text carat in the second list and check the Link to previous list of the same level checkbox to link to the previous list.
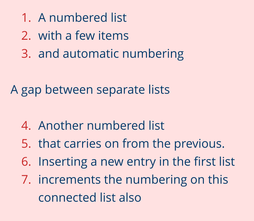
A linked numbered list
Indent
The indent is the space between the numbers/bullets and the start of the list text. Use the Indent controls to adjust this spacing for the list at the caret position.

Indent examples
Margin
The margin field controls the space to the left of the bullet/number. Use these controls to adjust the horizontal offsets of sub-lists.

Margin examples
Size
Adjust the font size of the bullet or number. Enter a value, use the dropdown menu or use the slider that appears when you click the arrow to the right.
Color
Create a custom color for the bullet or number by clicking the Edit button to bring up the color picker. Once you have opened the color editor in this way you can also click on any of the colors on the color line, if you want to choose a standard color. Use the dropdown to stick with the default color or pick out one of the current document's named colors should it contain any.
Vertical offset
Move the bullets or numbers up or down relative to the text list. This is particularly useful for bullet symbols because the vertical positions of these can vary, so depending on which symbols you choose for your bullets you may need to adjust the position.
Replace with symbol
For bullet lists only - choose a replacement symbol from the Symbol picker. Click to open the picker. If you choose any of the Material Icons symbols, you will probably need to adjust the vertical position of the symbol - see above.
Replace from clipboard
Xara allows you to use any graphic for your bullets or numbers in lists. Replace from clipboard performs the same function as the Paste as list bullet operation in the context menu. See the Graphical Bullets and Numbered Lists section below, for more info.
Reset to default list items
Revert to the default bullet/number settings.
Graphical Bullets and Numbered Lists
You can use any graphic or symbol for the bullet or number in a list. You can design your own bullets and numbered lists by using any of the normal drawing or text tools, or use one of the many bullet designs from the . Create a simple circle using the Ellipse Tool for example, give it a fill and copy it to the clipboard. Then highlight the list you want to apply the style to using the Text Tool. Right click the list and choose Paste as list bullet from the menu. The design will now appear as a bullet for each of the list items.
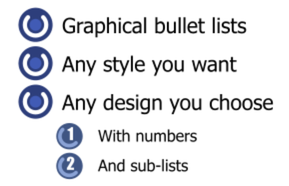
For a numbered list it's exactly the same procedure except you select or group a text item with your graphic and then select Paste as list number to replace all the numbers or text items in your list. The text object in the group is used to show the number.
Both paste options are also available within the List properties dialog (right click the list and choose the List properties... option and select Replace from clipboard).
(Note that you cannot currently use graphical bullets and numbers with List text styles - you'll receive a warning prompt if you try).
Copyright © Xara