Linking to next/previous step
You can easily add buttons/objects to a presentation page that reveal the next step in the page. Just add or create your button, and use the Link to list in the Link tab of the Web Properties dialog to apply a link to the button/object that will display the next presentation step.
When the viewer has displayed all the steps on the page using a 'next presentation step' link or the right arrow key, clicking the button or key again displays the next page.
Note: If you convert a presentation into a web document (Presentation website checkbox in Web Properties dialog Website tab), any next/previous presentation step links automatically turn into next/previous page links. You cannot apply 'next/previous presentation step' links to a web document.
Applying transitions to presentation step links
You can apply a link transition to any link object, such as a button, in your presentation page in the same way as you can in a web document page, using the Link tab of the Web Properties dialog. Link options for presentation documents also include next/previous presentation step.
Applying presentation step transitions
When you create a step, Designer automatically assigns the Fade transition type to it.
To change a step transition:
|
|
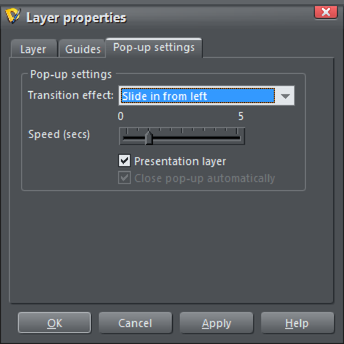
Open the Web Transitions tab of the Layer Properties dialog either by clicking the Layer Transition Properties button in the Presentation toolbar or right click an object in the step and choose Presentation > Transition. Or in the Page & Layer Gallery, select the step and then click on the Properties tab. |

Choose a transition from the Transition effect list, drag the Speed slider to choose a transition time between 0-5 seconds, and click Apply.
New steps you create get the transition effect of the last step in the presentation by default. This means if you want the same transition on all steps, you only need to set it once on the first step and then all subsequently added steps will use the same transition.
Applying presentation page transitions
Each presentation page can be given its own transition. To add a transition for the current page, right-click on the page and select the Page tab of the Web page properties dialog.
Then select a page transition type from the Transition effect drop-down list and move the Speed slider to apply a transition speed from 0 to 5 seconds.
Then when your website visitor navigates to the page with the animated transition, they see the animated transition.
You can also set the page transition for multiple pages at once. Just select the pages you want to change in the Page & Layer Gallery (use Shift+click and Ctrl+click to extend the selection), then change the transition on the Page tab, as above.
Note: The page transitions will only work for a website if it's set in the Export tab of Web Properties. Presentation documents are set with transitions by default so there is no need to visit this option in the Website tab of the dialog.
Copyright © Xara