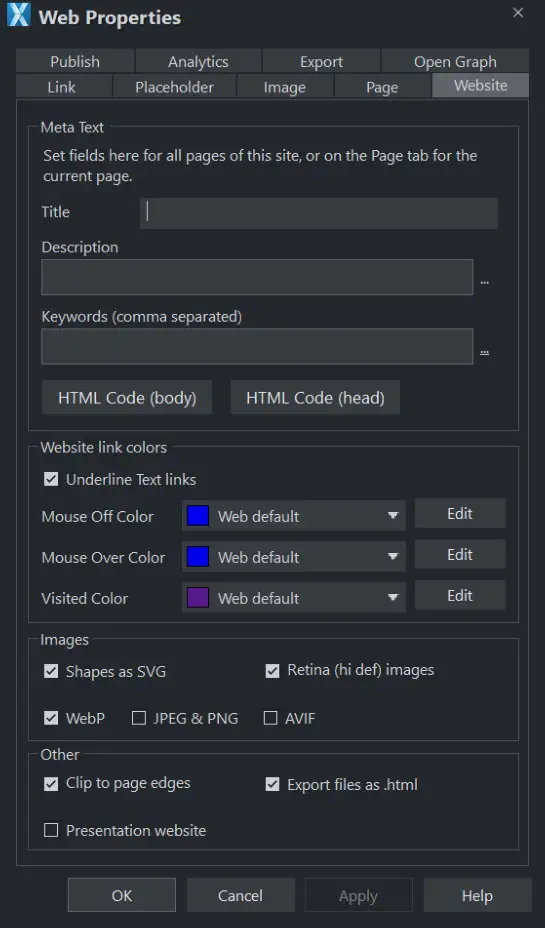
Website Tab in Website Properties


The settings on this tab apply to the entire current document/website, so it doesn't matter what object or page is selected.
Title, Description & Keywords: These fields are just as described in the Page Tab section. You can optionally set these fields here so that they apply to every page in your site, unless overridden by the Page Tab settings for a page. So for example a page that doesn't have its own title set in the Page Tab will get the title you specify here. These fields are optional, but may be important for your SEO, see our article How can Xara help with my SEO?
HTML code (head) and HTML code (body): These buttons serve the same purpose as the HTML code (head) and HTML code (body) buttons in the Page Tab section, and allow you to enter and edit large amounts of HTML code to either the head or body sections of all your website pages.
If code is specified here in the Website tab it is included in every page of your site in addition to any code specified for each page in the Page Tab. This allows you to have some code included on every page, while also adding other code to those pages that need it.
Website Link Colors
This section of the Website Tab allows you to control how text links appear on your website.
Underline Text Links: Underlining is commonly used to highlight clickable links in text, so this option is selected by default. Uncheck it if you don't want your text links underlined.
Mouse Off: Here you can choose the color you would like to be used for all your text links. You can either choose a named Theme Color from the dropdown list (if there are any in your current document) or click the Edit button to open the Color Editor so you can choose any other color.
Mouse Over: Text links will change to this color when a visitor moves the mouse pointer over them.
Visited: Text links that point to a page which the visitor has already visited will display with this color instead of the Mouse Off color.
Shapes as SVG
Modern web browsers have great SVG support, so we can export many types of object to web using SVG instead of having to make a separate image file for each one. Using SVG makes your website and web documents load faster, because there are fewer images to download. And your content looks sharper as SVG too.
Turn on this option and then when you publish your document/website to web, Xara will use SVG wherever it can.
Retina (enabled by default)
When this option is on, Xara will export high resolution versions of each image in your website, in addition to images at normal screen resolution. This means devices with very high resolution screens will see higher quality images.
See High Resolution Images for more information.
WebP JPEG & PNG AVIF
Export your images as WebP or AVIF. Enable JPG & PNG if your site visitors are likely to use old devices without evergreen browsers
Clip to page edges
This option is enabled by default. If you have objects in your website that overlap the web page borders, click this checkbox to crop these objects so that only the portion on the page is visible. Deselect this checkbox if you would like the object to flow over the page edge, so that even the portion that overlaps the pasteboard is displayed.
Note that if you have an invisible page (the default for new web documents, or if you've applied 'no color' to your page), clipping to the page edge does not happen even when this option is turned on.
Export files as .html
New documents/websites will export to .html files instead of .htm.
Presentation website
Click the Presentation website checkbox to convert an existing website into a presentation.
Note: If you created your presentation document by choosing presentation 955 pix from the New menu, the Presentation website check box is automatically selected.
Note: If you have transitions applied to a layer or presentations step transitions that slide in from the sides, top or bottom of the page, disabling this checkbox causes the transition to come in at the edge of the browser window, rather than the page edge.
Copyright © Xara