Scaling (resizing) objects

This is part of the Selector Tool.
Scale Line Widths button
The Scale line widths button on the Selector Tool InfoBar is used in many operations where the width and height of the selected objects are important. It controls whether the line attributes (not just line widths) are taken into account when working out the size and position of the selected object(s).
|
|
With the Scale line widths button set, scaling an object also scales its line widths. With this button unset, line widths remain unchanged. |

You can toggle this button during drags by clicking "/" on the numeric keypad.
If you have a rectangle with a 4 pixel line width, as you turn Scale line widths on and off you'll see that the X, Y, W and H fields in the Selector Tool change as the effects of the line width are included and excluded.
The following features are affected by Scale line widths:
- Position and size as reported on the Selector Tool InfoBar XYWH fields
- Changing position and size by entering values into the InfoBar XYWH fields
- Changing size by entering values in the W% H% fields
- Scaling/stretching objects by dragging in the Selector tool
- Alignment
- Snapping
The line attributes that are taken into account when Scale line widths is turned on are:
- Line width
- End caps
- Join type
- Dash pattern
- Arrowheads
- Brush style
- Stroke type (inc. variable width strokes)
In general, if you are interested in the visual positions of objects you should turn Scale line widths on. If you're interested in the exact positions of lines (e.g. where the centers of lines are, as is typical in technical drawings) then you should turn Scale line widths off.
Lock Aspect button
|
|
With the Lock aspect padlock button set, the width/height aspect ratio remains constant as you scale the object. |

In other words, the shape remains in the same proportions as the original. It's recommended that this button remains selected most of the time in order to ensure that when you resize objects they do not become squashed.
With this button unset, you can change the aspect ratio as you scale the object, in other words, you can stretch object one way or another when dragging a corner resize handle or when entering a new size.
Smart transform
Additionally you can right click on the padlock button to display a context menu giving you the option to turn on or off both Aspect ratio lock and Smart transform. The latter attempts to scale the shape smartly rather than just squashing all members of the group and is on by default.
Then all you need to is to hold down the Alt key while performing the drag, or else un-check the Smart transform option. Holding down the Alt key will toggle the existing selection.
Scaling using the mouse

Drag one of the corner handles. The object scales as you move the pointer diagonally. The InfoBar shows the current scaling. The object will scale between the dragged handle and the opposite one. To use any other point of the object as the fixed point move the transformation center to it and use the InfoBar buttons to scale.
Hold "Shift" while dragging to scale the object around its center. This works independently of the position of the transformation center.
"Ctrl + drag" scales the object in multiples of its original size (x2, x3, and so on).
To create a copy while scaling (leaving the original in place) right click, or press "+" on the numeric keypad.
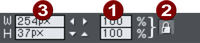
Scaling using the InfoBar
|
|
Type into the Scale Text boxes and press Return.
|
|
|
If Lock Aspect is set, you can type into either text box to resize the object by the desired percentage. If this button is unset, you can enter separate values for both the width and height. |
|
|
Alternatively, type the required size of the object into the W or H text boxes. |


If the Lock Aspect button is on, this scales the object and maintains the aspect ratio. You can enter the size in any unit, such as 1 cm.
Scaling with the InfoBar buttons (or number boxes) always scales around the transformation center. You can position this anywhere else in the object, as described in "Rotating objects".
If you scale a text area or text column using the Selector Tool, the text itself is not scaled, only the dimensions of the area or column are changed. Use the Text Tool font size control to change the actual text size. However if the text is inside a Group, resizing the group will scale the text.
Scaling text areas and columns
If you scale a text area or text column using the Selector Tool, the text itself is only scaled if you use the corner control handles, if you use the other control handles the dimensions of the area or column are changed.
Additionally you can use the Text Tool font size control to change the actual text size. However if the text is inside a Group, resizing the group will scale the text.
Scaling groups
If you scale a group using its side handles, an attempt is made to scale it smartly rather than just squashing all members of the group - we call this Smart transform. This is commonly useful when attempting to make a narrower 'mobile-friendly' website variant of a wider website – you need to make wide objects like headers and footers fit the smaller page width.
Take this footer group as an example:

The result you get should look something like this:

The text has remained the same size and the rounded corners have been preserved.
This works better for some groups than others, depending on the design and complexity of the group. If instead you want a simple 'squashed' result, where each member of the group is simply scaled, all you need to do is hold down the Alt key while performing the drag.

As you can see the text has been squashed and the rounded corners are no longer round. But this can be useful for some groups, typically graphics that don't include any text or rounded corners.
Turn Smart transform on or off by right-clicking on the Lock aspect ratio padlock button and selecting or de-selecting the option. It is on by default and holding down the Alt key during the drag will toggle the selected option.
Perimeter & Area
|
|
The 2 controls on the right of the Selector tool InfoBar show the perimeter and area of the current selected shape(s). Perimeter is shown in the current units for the document and area is shown in the current units squared. These fields are not editable. |

Copyright © Xara