Layer Operations
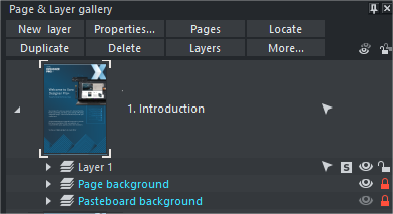
The Page & Layer Gallery lists everything in your document, from the pages and layers right down to each individual item on the page. It provides a way to select, hide, lock and re-arrange these items.
You can open and close the gallery by clicking the Page & Layer Gallery tab on the Galleries bar, or pressing F10.
Clicking the small right arrow  to the left of the pages in the gallery, or double clicking anywhere on the layer row, will expand the layer to show its contents, and display the full range of tabs at the top of the gallery. Doing the same again will collapse and hide the layer contents.
You can re-order the layers, that is, the stacking order on the page, by using drag and drop on the layers in the Page & Layer Gallery.
You can rename a layer by performing a second (slow) click on the layer name. (The first click would select the layer.) This is very like file renaming in Windows Explorer. Alternatively right click the layer and choose Rename layer.
Holding the mouse pointer over the small layer icons  will show a thumbnail of the contents of the layer.
The New layer button will create a new blank layer and place it at the top of the stack. You can re-arrange the order by dragging it to the required position.
The Duplicate button will copy the layer and its contents and place it on top of the stack - that is on top of all other objects on the page.
Right clicking the layer and choosing New layer, Duplicate layer or Delete layer performs the same functions.
Clicking the Layers button on the top of the Page & Layer Gallery (or right clicking in the gallery and choosing Layer Mode) will display only the layers on the current page. This is a mode - the Layers button stays depressed. While in Layers Mode, as you move to different pages the layers for the current page are always shown and all other page nodes are collapsed. Click the Layers button (or right click and choose Layer Mode) again to turn off layers mode.
Layer Properties
Right click on a layer and select Layer Properties to open the properties dialog.

Creating layers and editing layer properties
Using the Layer tab of Layer Properties you can:
- Create a new layer or edit an existing one.
- Make the layer editable and visible by default.
- Define the layer as a web page background that will not appear when printed.
- Specify that all objects in the layer will only repel text objects within the same layer. This prevents text on the layer being repelled by objects in other layers and is useful for popup layers in web pages.
Using guidelines
The Guides tab allows you to create layer guidelines at precise numeric values and choose a color for guide layer objects.
See the Guide Objects and Guidelines section in Object handling for more information on using guidelines.
Pop-up settings (Web Designer and Designer Pro only)
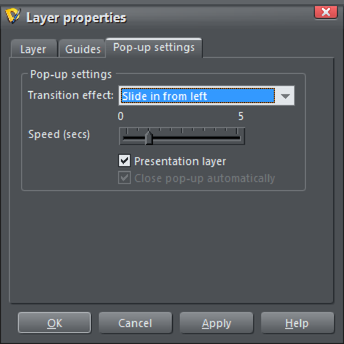
Note: The Presentation layer checkbox is only enabled if you are in a presentation document. To convert a web document into a presentation document, see Web Presentations.
Using this tab you can apply animated transition effects to a layer, if it's used as a pop-up layer on a web page, or if it's a presentation layer. The layer then appears with the transition effect when it's revealed in the exported web page. Use the slider to set a transition time from 0-5 seconds.
In a presentation document, a layer can be set as a presentation by checking the Presentation Layer checkbox. See Website Presentations.
Note: Turning off the Presentation Layer option will remove the step from the presentation.
By default when a transition is applied, objects will only slide in/out to the edge of the web page. If you would like objects to start from the browser window edges, rather than the web page edges, deselect the Clip to page edges checkbox in the Website tab of the Web Properties dialog.
Copyright © Xara