Saving & Exporting Photos
Selecting the Save option will always save a native .xar file file (unless you're editing a Photo document – see Photo Document section below). To save a photo as a JPEG, PNG or other image file type, it's necessary to use the Export option, or the shortcut "Ctrl + Shift + E".
You may select from a very wide range of file types, such as JPEG, PNG, GIF (and Photo & Graphic Designer and Designer Pro only) TIFF, PDF, PSD, BMP, as well as other lesser well known types.
|
|
There are two icons available on the top bar that are short-cuts to save the selection as JPG or PNG. These are in the flyout bar shown when you move the mouse pointer over the Export HTML icon. |


For photos we recommend saving as JPEG (sometimes called JPG) as this offers the greatest compatibility and the best size / quality compromise.
When you export a JPEG or PNG, there is a Settings option on the Save Dialog. Selecting this provides many advanced export options, as well as compare side-by-side alternative settings or even alternative file types such as PNG.
When you export a JPEG, an export preview dialog is shown where you can adjust many export options, as well as compare side-by-side alternative settings or even alternative file types such as PNG.
The Export Preview dialog allows you to adjust the size, resolution, JPEG quality and even select from 3 alternative export file types if you so wish. The default values should be fine for all normal purposes and you can just click the export button to save your photo.
Things to remember when exporting:
- First select the object or objects you want to export
- The default exported size of the image will be the size you see on screen at 100% zoom.
The Export Preview dialog is described in more detail here.
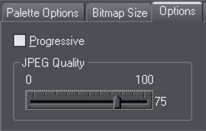
Tip: You can control the JPEG quality in the Export Settings dialog on the Options tab. The default and recommended value is 85%
|
|
The JPEG system is designed so that a setting of 85 is the optimum value. We recommend you do not save JPEGs at 100% quality, as the results are visually identical to the 85% quality, only the file size and memory use are dramatically increased with no benefit.
|
When saving for use on the web it's quite possible to reduce the quality below 85 to increase page view speed. The preview window shows the quality of any value you select.
Tip: If you expect you may want to perform any further edits on your exported image, for example to create the image again at another size, we strongly recommend saving the .xar file as well. This will preserve the lossless master image along with all its edits and changes.
Example: To resize a photo and save as a new JPEG
This process is very quick and simple:
- Drop your photo onto Xara (either onto a blank page or onto the title bar to create a new document)
- In the Selector Tool either drag a corner handle to resize the image, or enter the required width or height into the "W" or "H" field on the InfoBar. Check the image size is correct at 100%
- Type "Ctrl + Shift + E" to start the export process
- Enter a filename, and ensure JPEG is selected from the file type dropdown
- In the preview dialog simply click the export button
To save any image as a PNG go through the same process except choose the PNG file type.
Copyright © Xara