Photo Filter Presets
The Photo Filter Presets allow you to instantly apply professional photo effects to your photos. Find the filters in Elements / The Designs Gallery under "Components" > "Images Resources" > "Photo Filter Presets". They are grouped into categories and there is a wide range of moods and themes to choose from.
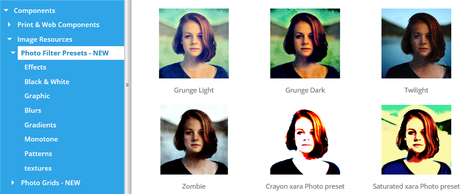
Some of the Photo filter presets in Elements
To apply a filter to a photo, first select the photo then either drag and drop the photo filter from the Designs Gallery or click the Import button on your chosen filter in Elements. The preset filter is then applied to your photo.
Note: You can keep the Catalog open after an import by holding down the Shift key as you click the Import button. Useful if you want to try a range of filters from the Catalog.
Using multiple filters
There are multiple different 'classes' of filters and overlays that can be applied together. The set of filter presets is divided into two folders under "Components" > "Image Resources" > "Photo Filter Presets". The Filters folder contains presets that affect the overall look of your photo. It would not be useful to apply more than one of these presets to a photo and so these will replace each other. In other words, only one of these presets can be applied to a photo and applying a second will automatically remove the first.
However the Overlays folder contains various different classes of presets that can be applied in addition to any of the presets under the Filters folder.
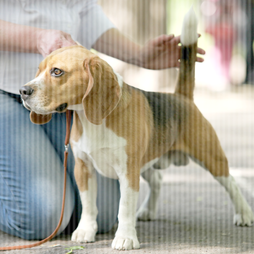
This photo has had the "Softlight" filter effect applied from "Filters" > "Effects" and also the "Stripes" pattern, from "Overlays" > "Patterns".
Each of the presets in the same sub-folder under Overlays will also replace each other, because it wouldn't be useful to have for example two different patterns applied. But you can mix presets from each of the other folders under Overlays as much as you like. So you could for example apply a check pattern from the Patterns folder, a texture from the Textures folder and a transparency effect from the Transparency folder all to the same photo.
Replacing photos and removing presets
If you drop a replacement photo onto a photo with a filter applied the filter preset will be maintained. And if you have any existing photo edits in place, for example if you used the Red Eye or Photo Heal tools then the applied filter will merge with these edits too.
When you right-click on a photo, you will see a Photo Filter option in the context menu that appears. This option has a sub-menu, which allows you to apply filters to your photo and remove filters that are already applied.
The Apply filter… option opens the Designs Gallery onto the Photo Filter Presets folder so you can apply a filter to the selected photo. Following this option in the menu, you will see Remove options for each of the filters you currently have applied to the photo, so you can remove any of them.
The final option in the menu allows you to clear all applied filters from the photo.
Editing Photo Filter Presets
Most of the preset filter effects modify the image by adjusting the same settings that you see in the Photo Tool and the Brightness levels dialog. Therefore remember that applying an effect may remove any photo enhancements you have applied manually beforehand, using the Photo Tool. Similarly if you apply a preset filter and later adjust the settings in the Photo Tool, if you later remove the preset it may also remove your enhancements.
Similarly, the overlay effects under "Overlays" > "Transparency" work by applying transparency effects to your photo directly. You can see and modify these effects by selecting your photo and going into the Transparency Tool.
Applying presets to your photo and then examining the settings in the Photo Tool and Brightness Levels dialog is a great way to learn about the capabilities of the Photo Tool.
Copyright © Xara