Operations That Use A Mask
ClipView
You can clip your drawing or photo to be inside a selected shape.
- Select one of the region tools from the Photo Regions and Masks tool flyout bar and draw whatever shape you require.
- Now select "Arrange" > "ClipView" (or press the key short cut "Q") and the drawing will be clipped to the visible areas of the selection.
ClipViews are live and non-destructive in that the whole drawing is retained inside the Clipview object. See Object Handling for more details.
Cut, Copy, Delete
These operations are useful when used with the Photo Region tools, to cut pieces from photos, but you can use them on any objects.
- Select one of the region tools from the Photo Region and Mask tools flyout bar and draw whatever mask shape you require.
- Now select an option from the Edit menu to perform a Cut/Copy/Delete operation.
- The Selector Tool is automatically selected and the operation performed.
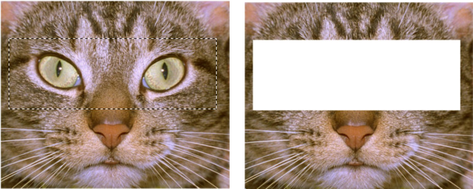
The Rectangle Region tool is used to create a selection (left). Cut or Delete then removes the selected area of the Photo (right).
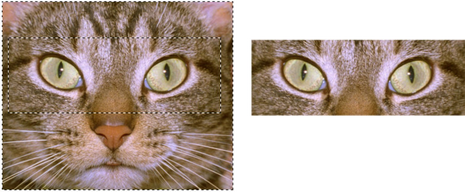
On the left example the selection has been inverted. Now when you Cut or Delete only the cat's eyes remain, everything else is deleted.
You can use the Photo Region and Mask tools on top of any drawing or photo.
If you use these operations with soft masks, an Opacity Mask is created using the soft mask. See the Opacity Masks section of the Transparency chapter for details on Opacity Masks.
Duplicate, Clone
This will copy only the selected part of the drawing or photo. The Clone option places a copy exactly on top of the original.
Content Aware photo scaling
To protect part of a photo from being scaled;
- Select one of the mask tools from the Regions and Masks tools flyout bar and draw whatever mask shape you require around the area you wish to protect.
- Now go into the Content Aware photo scaling tool
 (Photo tool fly-out bar on the main toolbar) and click on the photo.
See the Content Aware Scaling feature for more information.
Photo enhance tool

Use one of the Enhance tools to apply brightness, contrast, saturation, temperature and blur/sharpen changes to any part of a photo.
- Select one of the Region tools from the Regions and Masks tool flyout bar and draw whatever shape you require around the area you wish to enhance.
- Now go into the Enhance Photos tool (Photo tool fly-out bar on the main toolbar) and click on the photo.
- Use the Enhance controls from the Photo tool InfoBar.
Advanced users may wish to use Soft masks to introduce graduated effects to the photo enhance operation. See the Photo Tool and Photo Handling chapters for more information.
Photo clone tool

The clone tool will take a mask shape and convert it into a clone shape, which copies one part of a photo to another part. See the Clone Tool section of the Photo Tool chapter for details.
Combine Shapes
There are a set of operations under the "Arrange" > "Combine Shapes" menu that allow you to combine shapes in a number of different ways. You can also use these with the region tools.
For example to slice a piece of a photo out (cookie cutter style),
- Select one of the regions tools from the Photo Regions and Masks tools flyout bar and draw whatever shape you require.
- Select "Arrange" > "Combine Shapes" > "Slice".
Copyright © Xara