Moving objects
To slide an object across the page

- Choose the Selector Tool.
- Drag the object to the required position. Hold down "Ctrl" to restrict the direction of movement to one of the constrain angles.
The constrain angles are user definable. Refer to "Customizing Designer"
Hold down "Ctrl + Alt" and you can drag the selected object even if the pointer is not over it. This is useful when the selected object is hidden behind another object or part of a group. Release "Ctrl" and "Alt" after you start the move unless you want to constrain the move.
You can also move objects using the arrow cursor keys. This is described on the next page.
Object snapping is a very powerful way of accurately aligning lines, points and the edges of objects to any other object so they exactly touch. It also helps you align to the horizontal and vertical center lines of the page.
|
|
To toggle object snapping, click the Snap to objects button or right click and choose "Snap to" > "Snap to Objects". You can also choose "Window" > "Snap to objects". |

Click and drag on the object you want to snap. As you drag, Xara displays a magnet icon whenever you are near a "point of interest" or potential snapping site relative to a visible object on the page.
To snap in a path relative to the page center (both horizontally and vertically), move the object over the lines that appear as you drag on the page. A red dot on the line also indicates potential "point to path" snapping points, so that you can snap the object to a point such as the center or center line of the page.
See Snapping for details on snapping to grid and snapping to objects.
Drop copy
During a move (and while still holding the left mouse button down) click the right mouse button or press + on the numeric keypad to drop a copy of the object. The original object doesn't move. You can do this as many times as you wish to create a series of duplicated objects.
You can also hold down the right mouse button and drag a copy of the object. Left click to leave a copy at the current mouse position.
Fills
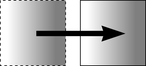
Usually, moving an object also moves the fill with it:
|
|
Normal move left to right with a linear filled object. This also applies to rotating, skewing, scaling and stretching objects. |
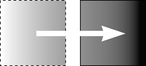
Xara can also move the object but not the fill origin.
|
|
To do this click the "−" key on the numeric keypad during the move. The same move, but pressing "−" (minus) during the drag. |
Nudging objects
Usually you can move an object a small amount by using the arrow keys to nudge the object (these keys sometimes have other uses, especially in the Text Tool).
Nudging is not affected by either magnetic or grid snapping (snapping is described later).
Nudge modifiers
To modify the nudge distance, use these key combinations while using the arrow keys:
- Ctrl nudge 5 times the normal distance
- Shift nudge 10 times the normal distance
- Ctrl + Shift nudge by l/5th the normal distance
- Alt nudge by 1 pixel
- Alt + Shift nudge by 10 pixels
You can change the normal nudge distance under the General tab in "Utilities" > "Options". Refer to "Customizing Designer".
Nudge works in most tools.
Cut, copy and paste
These let you move or copy an object in the same document or between different documents. The procedure is:
- Select the object.
- To remove the object, choose "Edit" > "Cut" (or "Ctrl + X"). To copy the object but not remove it, choose "Edit" > "Copy" (or "Ctrl + C"). Either option puts the object (or a copy of it) onto the clipboard.
- Choose "Edit" > "Paste", "Ctrl + V", or "Insert". This pastes the clipboard contents into the document.
Note that if the objects you copy are all on the same layer, then you can paste those objects to any layer by first making it the current layer and then choosing "Edit" > "Paste" > "Paste in layer" or "Paste in place in current layer". The layer from which the objects were copied is ignored in this case.
However if the objects you copy are on several different layers, then the layer structure is maintained when you paste.
This allows you to copy layered data within a document or to a different document. Any layers which are missing in the target document are created automatically by this operation. So for example if you copy a mouse-over button, which has one object on the MouseOff layer and another object on the MouseOver layer, to a new document, the MouseOff and MouseOver layers will be created if they don't already exist and the button objects copied onto them.
"Ctrl + Shift + V" or "Edit" > "Paste in place" pastes the clipboard contents into the same X/Y position from where they were cut or copied or the same position relative to the bottom of the page in the case of footer objects. This only applies to objects cut or copied from within Xara Designer. Objects imported from other programs are always pasted into the center of the current view.
The object remains on the clipboard so you can paste the same object several times.
You can paste the clipboard content into multiple pages of your document by simply selecting the pages in the Page and Layer Gallery. A simple "Ctrl + V" paste will place the object in the center of the page when you have more than one page selected.
If there is a choice of formats on the clipboard, Xara will display a Paste Special dialog which allows you to choose the format you want to paste in (eg. When pasting in text you may have the choice of pasting in unformatted text or Rich Text).
In addition you may see the following paste options, depending on the clipboard contents:
Paste unformatted text
Pastes any text on the clipboard into your document without any formatting.
Paste in place (Ctrl+Shift+V)
The same as Paste, except your object will be pasted in the exact same position from which you copied it. This is useful for moving objects from one layer or page to another, without changing its X/Y position
Paste format/attributes (Ctrl+Shift+A)
Preserves the format (e.g., font and font size) or style attributes (e.g., line and fill color) of the pasted object. It is a quick way of applying multiple attributes. When you Paste Attributes, the attributes of the objects on the clipboard are applied to all the objects currently selected.
Paste position
This option applies the position of a copied object on the clipboard to a currently selected object, which moves to the exact same position as the copied object.
If multiple items have been copied to the clipboard, Xara treats them as if they are a group and moves the currently selected object to the position of the copied group as a whole.
The currently selected object is pasted or moved into the center position of the copied object or group of objects.
Paste size
This option applies the size of a copied object on the clipboard to a currently selected object, which resizes around its center to the exact size of the copied object.
If you have multiple items selected when you 'paste size', each of those objects is made the target size, instead of the selection as a whole. So for example if you copy a 200x200 pixel photo, then select 10 other photos and 'paste size', all 10 photos each become 200x200 pixels. This gives a quick way to make a bunch of objects a particular size.
Paste size and position
As the name suggests, this option applies both the size and exact position of the object on the clipboard, to the selected object. This useful for making text areas have the same size and position on each page of your document, if you have previously made them different.
Paste replacing selection
This is similar to Paste position, except that the copied object on the clipboard replaces the currently selected object and retains the deleted item's position.
The copied object is pasted into the center position of the deleted object.
Paste in current layer
The same as Paste in place, except your object will only be pasted into the current layer.
This is useful if you want to display or hide just your pasted object when layers above or below are displayed.
Paste in place in current layer
The same as Paste in current layer, except your object will be pasted into the current layer in the exact same position from which you copied it.
Paste opacity mask (Ctrl+Shift+M)
See Opacity Masks.
Paste opacity mask in place
The same as Paste opacity mask, except your opacity mask will be pasted in the exact same position from which you copied it. This is useful for moving opacity masks from one layer or page to another, without changing its X/Y position.
Paste on all pages
Pastes the copied object at the same size and position on all pages of the document.
Cut, copy and delete with a mask
If there is an active mask present, it modifies the behavior of the cut, copy and delete operations. Only the unmasked area of the selected objects is cut, copied or deleted. This provides a quick way of cutting up photos or whole drawings.
See Operations That Use a Mask for more details.
Copyright © Xara