Working with Templates
Using the templates available in the or The Designs Gallery is the quickest and easiest way to create high quality designs.
To load a template, open Elements, browse through the thumbnails in one of the design categories or use the Search option to find the right resource. Click on the thumbnail and select Open to open it (or Import to add it to an existing document if that's appropriate). Alternatively simply drag and drop the template from the Designs Gallery. Once loaded, you can customize the template to produce your own personalized high-quality design. Typically you'll want to replace any photos with your own, enter your own text and perhaps change the color scheme, all of which is incredibly easy in Xara.This chapter describes how to do these customizations.
Replacing photos
To replace a photo simply drag your own image file (JPEG, GIF, PNG, BMP) from your Windows File Explorer and drop it on top of the picture that you want to replace. Your photo will automatically be scaled appropriately to replace the template photo. The new photo will be selected together with the SmartPhoto adjustment handles enabling you to easily adjust the position and scale of your photo if desired (see below).
Alternatively you can load your photos into the current design using "File" > "Import". This adds a new photo object to your design and also adds it into the Bitmap Gallery. Remove the new photo from the page by selecting it and pressing "Delete". Then drag your photo from the Bitmap Gallery and drop it onto a template photo to replace it, as described above.
There is also the option of importing stock photos from the . You can either browse the catalog from the File menu. "File" > "New From Elements". Or you can replace a photo by right-clicking it, and then choosing "Replace photo" > "With Stock Photo" from the context menu.
By default when you replace a photo, any other copies of that photo on the current page are also replaced. This is usually what you will want, because some templates have multiple copies of the same photo which need to be replaced, including some on hidden layers. E.g. perhaps a large version of a photo and a thumbnail version of the same photo. However if you want more control over the photo replacement, hold down Ctrl while dropping your photo and then you'll be asked which instances of the photo you want to replace.
Note: Normally you should not replace photos by first deleting the template photo as this will also delete the shape that holds the photo, which determines its size. If you have deleted a photo in this way, use the Undo function ("Ctrl + Z") to restore it and replace the image as described above instead..
Adjusting a photo in its frame
You'll often want to adjust the position, scale and rotation of a photo in its frame. Select the photo - you will see the SmartPhoto adjustment handles appear allowing you to rotate and scale the picture, move it within its outline frame, resize the frame and even round its frame edges.
Editing photos
The easiest and most convenient way to edit photos in your design is to use the built-in Photo Tools. These can be found on the Photo Tools fly-out bar on the main toolbar.

Use the Photo Enhance Tool to perform the most common adjustments to your photo, such as adjusting brightness, contrast and saturation. You can also crop photos while in this tool by just dragging on the photo. Or go into the dedicated Clip Tool for more clipping options. The Clone Tool is useful for removing unwanted parts of an image non-destructively, by copying one part of a photo to another. There are also tools for intelligently resizing an image, removing red eye effects, making panoramas and other photo editing functions.
See the Photo Tool chapter for full details.
Changing colors
Editing theme colors individually
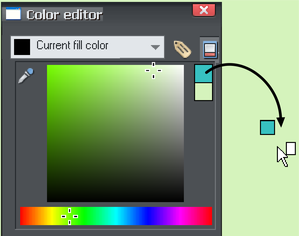
To edit a template's theme colors, right click on one of the larger square named color patches on the left of the Color Line at the bottom of the window and choose Edit in the menu that appears. This opens the Color Editor. There will usually be several named theme colors in the Color Line - hover the mouse pointer over the color to see the tooltip showing the color name. Sometimes there will also be several colors linked to a theme color that will change at the same time; these are shown on the Color Line with smaller color squares, but normally you won't need to edit these because they change automatically with the main theme colors.
You can also click on any object in the design to select it and then click a named or palette color on the Color Line to change the object's color. If the object is not just a single color (such as a button made up of a group of different colored shapes) a 'replace colors' dialog will appear with a list of the colors used in the object. You can choose which color you want to replace with your chosen color. This way you can, for example, make a button that uses Theme Color 1, use Theme Color 2 instead.
Once you've changed the theme colors in your document, if you then paste in or import templates which still use the original theme colors, you'll be presented with a choice. You may want to import the new objects with their original colors, in which case choose the 'Don't match' option. But more likely you'll want them to be changed to match the colors you've chosen for your document, in which case choose the 'Match' option. The color matching prompt is shown whenever you import objects which share a color name with the colors already in your document, where the actual color values differ. See Color Handling for more information.
Page background color
If you drag a color from the Color Line over the page, and drop it, it will set the page background to that color.
Once you've set the color this way, if you want you can refine it using the color editor. Right click on the page and choose Page Background > Edit page color from the menu. The color editor appears allowing you to edit the page color.
When working with website documents, setting the page background color actually sets the background color for the whole browser window when you view your exported website.
|
|
To set a repeating background texture, drag the photo or bitmap onto your document. Open the Bitmap Gallery, scroll to the photo you just loaded, click on it to select it, then click the Background button on the Gallery, and choose the Set Page Background option. |

Changing text
|
|
Double click on the text you want to edit to go into the Text Tool, or just click the Text Tool icon on the main toolbar. |

You can drag over the text to select it and then type to replace it, just as in a Word Processor.
To change the font, drag select the region of text to be changed and select from the font dropdown menu on the InfoBar.
You can add new passages of text to the design by just clicking and typing, or, to create a block of text with a set width and height, click and drag diagonally on the page while in the Text Tool and then enter your text into the text frame that appears. You can easily make a passage of text automatically flow around photos and other objects on your page. All you have to do is right click on an object and choose "Repelling & Anchoring" to make that object repel text that is underneath it. See the Repelling Text section of the Text Tool help for details.
Or you can anchor an object to a particular point in text, so that the object follows the text as the anchor point moves. Right click on it and choose Anchor to text. After anchoring, move the object to where you want it relative to the text, using the Selector Tool. Now as you edit the text and the anchor point moves, the anchored object moves too. See the Text Tool chapter for more details.
Adding Pages
You can easily add more pages to your design to create multi-page websites or multi-page documents. Simply choose the page template from Elements and click Add Page, and it will be added as a new page immediately following the current page.
Copyright © Xara