Color Erase / Selection
Note: The tool is no longer shown by default on the Photo Tool InfoBar and has been replaced with the 'Select colors to enhance' tool on the Enhance Tool toolbar. Information on adding the tool back onto the InfoBar can be viewed from here
The Color Erase / Selection
The Color Erase / Selection was introduced in Designer Pro X and Photo & Graphic Designer in 2013.
What is the The Color Erase / Selection tool?
The Color Erase / Selection tool allows you to
- Erase (make transparent) parts of photos based on colors
- To allow only those areas to be adjusted using the Photo Tool Enhance operations (such as Brightness, Blur, Hue Adjust etc).
Can you show me some examples?
The tool could be used to remove the background from a photo or alter the colors within a photo. An example is included below. Here the color of a flower has been altered without affecting other parts of the picture.
.
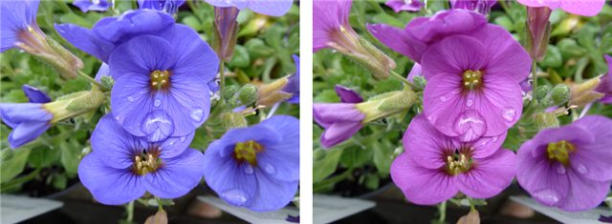
note: As with most operations in Designer this is fast, real-time, and non-destructive in nature (in other words no pixels of the original image are permanently affected).
How do I use the tool?
- Click on the Photo Tool to display the Photo tool flyout and click on the Color select/ erase tool.

- Next, click on the part of the photo you want to erase or select. (You can either select the photo before going into the tool, or click using the tool to select the required photo).
- This will add a color marker. All parts of the picture containing the color at the click point are Immediately erased and show a checker-board background.
In fact this erases not just the exact color you clicked on, but a range of closely related shades of that color. This is because real-world objects in photographs are never just one precise color, but typically a range of shades, from light to dark. This is also true of a blue sky which typically becomes a paler shade of blue nearer the horizon.
You can adjust the range of colors affected by adjusting two slider controls on the InfoBar (Color tolerance & Fade), or by adding additional selection points known as markers. You can click at multiple places on your image, and for each click, an erase-marker is placed on the photo to show where the color is being picked from.
Important: The process of erasing colors, and using that area as a selection to Enhance (e.g. brighten) both start with the same ‘erasing’ method described here. You can convert those erased parts into a Mask (using the Make soft mask button) so that subsequent operations such as changing brightness, will only affect those parts.
Assume you wish to alter the hue value of the erased color
- Click on the button labelled 'Make soft mask'. This will enable the mask mode.
- Click on the Photo tool and click on Enhance photo.
- Click on Set photo hue and alter the color and strength slider as required.
Color markers
Each time you click, a small round black marker is placed on the photo. This indicates the point from which the color is picked. It doesn’t just pick the color of a single pixel but averages the color under this round marker. You can adjust the size of the marker (zoom in first) to change the area that is averaged to create the selection color.
Resize the color marker using the resize arrows around it. You can drag to re-position it, and press the Delete key to remove a marker. If you have multiple markers you can just click on the marker to select it (the selected marker shows the 4 red resize arrows around it).
Each subsequent click will add a new marker. It’s typical that to fully select all the shades and closely related hues, you may have to place several selection marker on your photo, and to adjust the Color Tolerance and Fade sliders.
What does the Make soft mask button do?
‘Make soft mask’ turns the erased areas into a mask, so that subsequent Enhance operations affect only the erased areas. As with the example above, you can click on the photo tool after selecting ‘Make soft mask’ and adjust the brightness, sharpness, or color, etc.
Advanced users: When operating on a mask, the simple Photo is changed into a Photo Group and you are actually working on the mask ‘inside’ the Photo Group. In this case the mask is an alpha-channel bitmap, and the Photo Enhance operations are only applied to the photo through the regions of the mask. This means that if you select the photo again, new operations (e.g. a new mask, or new enhance operation) will now apply to the whole photo. This means you can perform successive edit operations on the photo.
Can I protect areas of my image?
Yes. Its a common requirement to want to only erase or change the color of parts of an image rather than the entire image. For example, you may wish to alter the clowns hat color in the example above without affecting the color of the trousers. 'A region selection' can be used to expose areas you wish to alter.
Applying masking before
Turn on the Region Painter tool or one of the other region painter tools from the Region Painter tool flyout bar and mark the part(s) of the photo you want color selection to work on. The selected regions are shown with an animated 'crawling ants' outline. Then switch to the Color Select/erase tool and click on the photo on a color you want to remove. The selection region is turned off and stored away with the color selection. Adding more color selection blobs to select/erase more colors will also affect the selected regions.
Applying masking after
Sometimes you may only realize after selecting/erasing colors that part of the photo needs to be protected. In this case turn on the region painter tool and, as above, draw the selection regions to indicate which parts of the image should be exposed. Then return to the color selection tool and simply click anywhere on the photo.
Can I modify an input mask?
After applying color selection with a mask, you may subsequently need to adjust the mask that was used to protect parts of the image from the selection. Press the Edit Input Mask button on the infobar, and the region you previously provided is shown to you again with animated 'crawling ants'. You can now modify the region as required, or, if you no longer want the region at all, use Window >Clear Mask/Region. Then return to the color selection tool and click on the photo, to update the region that’s applied to the color selections.
Information on Other Photo Tools
Photo Enhance Tool | Photo Clip tool | Photo Clone tool | Magic Erase Tool | Photo Heal Tool | Red-eye tool | Content-aware photo scaling | Content-aware photo zoom | Levels tool | Panorama Tool | Perspective Correction | Exif | Opacity Masks | Photo Hue Tool | Color Erase / Selection | Background Erase | Photo Effects | Shadow & Highlight controls